SH51X S SH53CX S SH53K S SH53X S SHS53X S SHS53CX S SH53CKX S KSO53CX S SD53X SD53 English Operating Instructions OVEN Contents Pl ea 08 se to 44 ph ac 8 o gu tiv 24 ne ar ate 24 us an y 2 on te ou 4 e r Operating Instructions,1 Warnings,2 Description of the appliance,3 Installation,4 Electrical Connection,5 Start-up and use,6 Modes,6 The electronic programmer*,9 Precautions and tips,10 Maintenance and care,10 Afetr Sales Service,12 Guarantee,13
GB Warnings WARNING: The appliance and its accessible parts become hot during use. Care should be taken to avoid touching heating elements. Children less than 8 years of age shall be kept away unless continuously supervised.
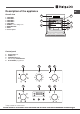
Description of the appliance GB Overall view 9 1. 2. 3. 4. 5. 6. 7. 8. 9. POSITION 1 POSITION 2 POSITION 3 POSITION 4 POSITION 5 GUIDES for the sliding racks DRIPPING PAN GRILL Control panel 6 8 5 7 3 4 2 1 Control panel 1. 2. 3. 4. 5. SELECTOR Knob TIMER Knob* THERMOSTAT Knob Indicator light THERMOSTAT ELECTRONIC programmer* 1 2 4 3 1 5 4 3 •• •• * Only available in certain models.
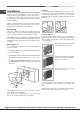
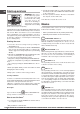
GB Installation ! Please keep this instruction booklet in a safe place for future reference. If the appliance is sold, given away or moved, please make sure the booklet is also passed on to the new owners so that they may benefit from the advice contained within it. ! Please read this instruction manual carefully: it contains important information concerning the safe operation, installation and maintenance of the appliance.
Electrical Connection The electrical connection to the mains must be made on the appliance. The power voltage and frequency are as indicated on the rating plate. Unplug the appliance before all operations, even when replacing the oven lamp. Using the appliance without correct earthing is highly dangerous. ! After connecting the appliance to the flexible cable, tighten all the screws on the terminal board. GB ! THIS APPLIANCE MUST BE EARTHED.
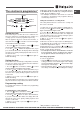
GB Start-up and use WARNING! The oven is provided with a stop system to extract the racks and prevent them from coming out of the oven (1). As shown in the drawing, to extract them completely, simply lift the racks, holding them on the front part, and pull (2). ! The first time you use your appliance, heat the empty oven with its door closed at its maximum temperature for at least half an hour. Make sure that the room is well ventilated before switching the oven off and opening the oven door.
Practical cooking advice GB ! Do not place racks in position 1 and 5 during fan-assisted cooking. Excessive direct heat can burn temperature sensitive foods. ! In the GRILL and GRATIN cooking modes, place the dripping pan in position 1 to collect cooking residues (fat and/or grease). MULTI-COOKING • Use position 2 and 4, placing the food that requires more heat on 2. • Place the dripping pan on the bottom and the rack on top. GRILL • Insert the rack in position 3 or 4.
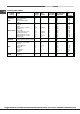
GB Cooking advice table Cooking modes Convection Oven Multi-cooking Top oven Grill Gratin Foods Weight (in kg) Rack position Pre-heating time (min) Recommended temperature Duck Roast veal or beef Pork roast Biscuits (short pastry) Tarts Pizza (on 2 racks) Lasagne Lamb Roast chicken + potatoes Mackerel Plum cake Cream puffs (on 2 racks) Biscuits (on 2 racks) Sponge cake (on 1 rack) Sponge cake (on 2 racks) Savoury pies 1 1 1 1 1 1 1 1+1 1 1 0.5 0.5 0.5 1 1.
The electronic programmer* DISPLAY END OF COOKING icon DURATION icon •• •• DECREASE TIME button 4. When the set time has elapsed, the text “END” appears on the DISPLAY, the oven will stop cooking and a buzzer sounds. Press any button to stop it. • For example: it is 9:00 a.m. and a time of 1 hour and 15 minutes is programmed. The programme will stop automatically at 10:15 a.m.
GB Precautions and tips ! This appliance has been designed and manufactured in compliance with international safety standards. The following warnings are provided for safety reasons and must be read carefully. General safety • The appliance was designed for domestic use inside the home and is not intended for commercial or industrial use. • The appliance must not be installed outdoors, even in covered areas. It is extremely dangerous to leave the appliance exposed to rain and storms.
detergent, then rinse well and dry with a soft cloth. Do not use abrasive products. • All accessories can be washed like everyday crockery, and are even dishwasher safe. • We recommend that detergents are not sprayed directly onto the control panel, but that a sponge is used instead. ! Never use steam cleaners or pressure cleaners on the appliance. Cleaning the oven door Clean the glass part of the oven door using a sponge and a non-abrasive cleaning product, then dry thoroughly with a soft cloth.
GB Afetr Sales Service No one is better placed to care for your Hotpoint appliance during the course of its working life than us – the manufacturer. Essential Contact Information Hotpoint Service We are the largest service team in the country offering you access to 400 skilled telephone advisors and 1000 fully qualified engineers on call to ensure you receive fast, reliable, local service. UK: 08448 224 224 Republic of Ireland: 0818 313 413 www.hotpointservice.co.
Guarantee GB 12 months Parts and Labour Guarantee Your appliance has the benefit of our manufacturer’s guarantee, which covers the cost of breakdown repairs for twelve months from the date of purchase. This gives you the reassurance that if, within that time, your appliance is proven to be defective because of either workmanship or materials, we will, at our discretion, either repair or replace the appliance at no cost to you.
GB PLEASE PHONE US TO REGISTER YOUR APPLIANCE AND ACTIVATE YOUR PARTS GUARANTEE ON 08448 24 24 24 14
GB PLEASE PHONE US TO REGISTER YOUR APPLIANCE AND ACTIVATE YOUR PARTS GUARANTEE ON 08448 24 24 24 15
195102264.