Operating Instructions OVEN Contents GB Installation, 2-3 GB English,1 Positioning Electrical connection Data plate Description of the appliance, 4 Overall view Control panel Display in programming mode Display in cooking mode Start-up and use, 5-7 Modes, 8-14 Manual cooking modes Automatic cooking modes Programming cooking Practical cooking advice Cooking advice table Precautions and tips, 15 General safety Disposal Respecting and conserving the environment Care and maintenance, 16-17 Switching the
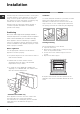
Installation ! Please keep this instruction booklet in a safe place for future reference. If the appliance is sold, given away or moved, please make sure the booklet is also passed on to the new owners so that they may benefit from the advice contained within it. ! Please read this instruction manual carefully: it contains important information on installation, operation and safety. Ventilation To ensure adequate ventilation is provided, the back panel of the cabinet must be removed.
Electrical connection Power cable supply connection to the electrical mains: The electrical connection to the mains must be made on the appliance. The power voltage and frequency are as indicated on the rating plate. ! THIS APPLIANCE MUST BE EARTHED. We recommend you use a power supply cable which is long enough to allow you to take the oven out of its recess in the event of maintenance operations (only use HAR - H 05 - RRF quality cables fitted with a plug conforming to the regulations in force.
Description of the appliance GB Overall view GUIDES for the sliding racks Control panel position 5 position 4 position 3 position 2 position 1 GRILL DRIPPING PAN Control panel SETTINGS icon Display MANUAL COOKING MODES icon TEMPERATURE icon DOOR / CONTROL PANEL LOCK icon CONTROL PANEL POWER BUTTON START / STOP CONFIRM SETTINGS icon MINUTE MINDER icon TIME icon AUTOMATIC COOKING MODES icon SELECTOR control dial Display in programming mode Selected menu indicator Temperature indicator Coo
Start-up and use ! The first time you use your appliance, heat the empty oven with its door closed at its maximum temperature for at least half an hour. Make sure that the room is well ventilated before switching the oven off and opening the oven door. The appliance may emit a slightly unpleasant odour caused by protective substances used during the manufacturing process burning away. ! Turn the control dial to adjust the parameter shown on the display between the “<” and “>” symbols.
as described above. GB After the appliance has been connected to the mains, or after a blackout, the clock will need to be reset. Setting the minute minder ! The minute minder may be set regardless of whether the oven is switched on or off. It does not switch the oven on or off. When the set time has elapsed, the minute minder emits a buzzer that will automatically stop after 30 seconds or when any active button on the control panel is pressed. To adjust the minute minder, proceed as follows: icon. 1.
inside the oven falls. Restoring the factory settings Demo mode The oven factory settings can be restored to reset all selections made by the user (language, tone, customised durations, etc…). To carry out a reset, ! The appliance will not enter DEMO mode if the language has not been selected beforehand. The oven can operate in DEMO mode: all heating elements are deactivated, and the controls remain operative.
Modes GB ! Every time the oven is switched on, it suggests the first manual cooking mode. helps prevent food from burning on the surface and allows the heat to penetrate right into the food. Always cook in this mode with the oven door closed. Manual cooking modes ! All cooking modes have a default cooking temperature which may be adjusted manually to a value between 40°C and 250°C as desired.
• when cooking meat, the muscle fibres contract less than they would during a classic cooking cycle. The result is a more tender meat which does not need to be rested after it is cooked. Meat should be browned before it is placed in the oven.
GB • The dough must be left to rise at room temperature for 1 – 1 ½ hours (depending on the room temperature) or until the dough has doubled in size. Recipe for BREAD: 1 dripping pan holding 1000 g max, lower level 2 dripping pans each holding 1000 g max, medium and lower levels Recipe for 1000 g of dough: 600 g flour, 360 g water, 11g salt, 25 g fresh yeast (or 2 sachets of powder yeast) Method: • Mix the flour and salt in a large bowl. • Dilute the yeast in lukewarm water (approximately 35 degrees).
approximately 35x30cm (height 5 cm) on it; - the dripping pan on shelf level 3; - the rack on shelf level 5;. Recipe (serves 8): In the deep dripping pan • 1 onion, chopped • 500 g rice • 500 g frozen mixed seafood (shelled prawns, mussels and clams, squid rings, etc.) • 2 handfuls frozen peas • ¼ chilli, diced • Chorizo (spiced paprika sausage), sliced • One tbsp fish stock powder • 1 measure powdered saffron • 700 g water Cover the dripping pan with aluminium foil.
Programming cooking GB ! A cooking mode must be selected before programming can take place. Programming the duration 1. Press the icon. 2. Turn the control dial to set the duration; hold the dial in this position to scroll through the numbers more quickly and make the setting process easier. The display will show a graphic indicating the duration in bar format. 3. Once you have reached the desired duration, icon again.
Cooking advice table Modes GB Foods Weight (in kg) Standard guide rails Manual Multilevel* Grill* Fan grilling* Roast* Fish* Pizza* Proving* Pizza on 2 racks Pies on two racks/cakes on 2 racks Sponge cake on 2 racks (on the dripping pan) Roast chicken + potatoes Lamb Mackerel Lasagne Cream puffs on 3 racks Biscuits on 3 racks Cheese puffs on 2 racks Savoury pies Roasts (white or red meat) Bream Fish fillets Sea bass with potatoes Pizza Focaccia bread Fish fillets Lamb skewers Hamburgers Preheati
Modes Foods GB Weight (in kg) Bread (see recipe) Preheating Standard guide rails Sliding guide rails 1 2 or 3 2 no no Automatic* Bread** Rack position Beef Roast beef 1-1,5 2 or 3 2 Veal Roast veal 1-1,5 2 or 3 2 no Lamb Leg of lamb 1-1,5 2 or 3 2 no Roast pork 1,2-1,5 2 or 3 2 no 1-1,5 2 or 3 2 no Pork Chicken Roast chicken Fish fillet Cod Perch Trout 0,4-0,5 0,4-0,5 0,4-0,5 2 or 3 2 or 3 2 or 3 2 2 2 no no no Fish en papillote Bream Sea bass 0,4-0,5 0,4-0,
Precautions and tips ! This appliance has been designed and manufactured in compliance with international safety standards. The following warnings are provided for safety reasons and must be read carefully. General safety • The appliance was designed for domestic use inside the home and is not intended for commercial or industrial use. • The appliance must not be installed outdoors, even in covered areas. It is extremely dangerous to leave the appliance exposed to rain and storms.
Care and maintenance GB Switching the appliance off Disconnect your appliance from the electricity supply before carrying out any work on it. F Cleaning the appliance • Slight differences in colour on the front of the oven are due to the different materials used, i.e. glass, plastic or metal. • Any shady areas resembling grooves on the oven door glass are caused by reflections from the oven light. • The enamel is branded at very high temperatures. This process may cause colour variations.
Left guide rail Right guide rail B C D of irec ex tio tra n ct io n 2. Choose which shelf to use with the sliding rack. Paying attention to the direction in which the sliding rack is to be extracted, position joint B and then joint C on the frame. GB 3. Secure the two frames with the guide rails using the holes provided on the oven walls (see diagram). The holes for the left frame are situated at the top, while D the holes for the right frame are at the bottom. 4.
Troubleshooting GB Problem Possible cause Solution A programmed cooking mode does not start. The display shows ECO Mode. There has been a blackout. Reprogram the cooking mode. The appliance is in standby mode. An automatic mode has been The temperature inside the oven selected. “Hot” appears on the is higher than the suggested display and cooking does not start. value for the selected mode.
After Sales Service GB No one is better placed to care for your Hotpoint appliance during the course of its working life than us – the manufacturer. Essential Contact Information Hotpoint Service We are the largest service team in the country offering you access to 400 skilled telephone advisors and 1000 fully qualified engineers on call to ensure you receive fast, reliable, local service. UK: 08448 224 224 Republic of Ireland: 0818 313 413 www.hotpointservice.co.
06/2011 - 195087021.01 XEROX FABRIANO Guarantee GB 12 months Parts and Labour Guarantee Your appliance has the benefit of our manufacturer’s guarantee, which covers the cost of breakdown repairs for twelve months from the date of purchase. This gives you the reassurance that if, within that time, your appliance is proven to be defective because of either workmanship or materials, we will, at our discretion, either repair or replace the appliance at no cost to you.