
Installation guide


ISTEP91ADJUSTTHE SURFACE
BURNER PILOTS
• Locate the pilot adjustment screw. It can be ac=
cessed through the small hole near the center of the
manifold panel.
•To adjust, use a flat-blade screwdriver with a shaft
diameter of less than 3/16". Turn the pilot adjustment
screw until the pilot is 5/16" high. Do not.reduce the
flame to less than 5/16" or a pilot outage may occur.
A pilot flame burning higher than recommended may
generate soot (carbon black) on the bottom of the
cooktop.
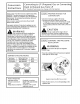
[STEP 12] CHECK QUALITY
OF FLAMES
The combustion quality of the burner flames needs to
be determined visually.
(A) Yellow flames-
Further adjustment
required
11111111i
(B) Yellow tips-
Normal for LPGas
(4) Soft Blue flames-
Normal for Natural Gas
tltt1111
If burner flames look like (A),further air shutter
adjustment is required. Normal burner flamesshould
look like (B) or (C),depending on the type of gas you
use.With LPgas, some yellow tipping on the outer
cones is normal.
STEP ]0J LIGHT THE OVEN PILOT
• Locate the pilot in the back
of the oven botton_ The
pilot is attached to the left
side of the oven burner.
•To light the oven pilot, push
in and hold the oven
control knob while lighting
the pilot with a long match or match holder. Once
the oven pilot is lit, continue holding the oven control
knob for one minute before releasing.
•The pilot flame size should be approximately 3/8 for
LP and 1/2 for natural gas.
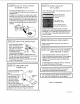
STEP 111CHECKING THE
FLAM E S IZE
Turn on oven burner. Check / InnerCone
the flame size for LP _r/ of Flame
gas,
The flame should have
approximately 1-inch
blue cones. After 30
seconds of burner
operation, check for
flames lifting off the
burner ports. If lifting is ob-
served, gradually reduce the air shutter
opening until flames are stabilized. Some yellow
tipping may be normal on LP gas. See Step 12
Bake/Broiler
Burner
I
I
ISTEP 131REPLACE OVEN PARTS
Replace oven bottom, ovenracks, oven door and
broiler drawer.
ISTEP 14]COMPLETE AND ADHERE
CONVERSION STICKER
Upon completion of this conversion, fill out the LP
sticker included with the instructions. Once complete,
apply the sticker to the back of the range near the
regulator. The convers ion stic ker must reflect the
change in fuel.
If converting back to natural gas from LP,remove the
LPsticker from the back of the range.
Save these instructions for reference in case the
range must be converted back to natural gas.
The conversion to LPgas for the standard twin burner
gas range with standing pilot is now completed.
I
I
DWG No. 183D5578P057
N.D. 657-04