
- HOTPOINT Range Use and Care & Installation of models RGB52524ER RGB524PR, RGB528ER, RGB528GER, RGB52yGEP, RGB628G
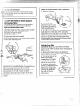


3;” 1/21/open-end wrench
~ Tm]n open-end or socket wrench,
I
or adjustable wrench
~ Flat blade screwd~iver (small)
M PR&PmEMH6E FOR COHWERS!OH
(1)Twn offgas supp~at tieWall.
(2) Ttwnofftieelectiealpowerto tie rmge.
If range has not yet been connectedto gas supply,
or ifflexibleconnectionwasmade, range maybe
pulled outhorn the -wallto make conversioneasier.
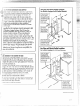
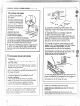
~ 1. For models equipped with sealed burners,
+-
remove the storage drawer, broiler drawer or kick
~ panel and locate he pressure regulator at rear of
~
the range.
Y
\ fi$.
)
Remove Screws
Access Cover
aj%~-J
On some models, you may have to remove an
access cover also.
For models equipped with dual burners, remove
the cooktop and locate the pressure regulator at
right rear ofrange.
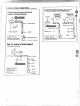
~. Followl-hedirections in box m, E or
❑
that match your regulator type.
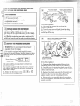
Ifit is this regulator:
1. Use a cointo removethe capfrom the
pressure regulator.
2. Turn the cap overand hook it intothe slots.
The type ofgas to be used should nowbe visible
on the top ofthe cap.
❑
Note: On some models the shut-off valve
may be in a different location.
this protective cap’
Cap Assembly
except for conversion
Ifit is this regulator:
1. Unscrew the plastic-protectedhex-nut cap
assembly from the top center ofthe regulator.
~. Carefullypry the protective plasticcap offthe
threaded metal cap.Gently pullthe plasticwasher
offthe other threads.
~. Replacethe plasticcap onto the threaded end
displayingthe gas type you desire. Press the
plasticwasher onto the remaining threads.
~. Reinsert the cap assembly into the regulator.
Do not overtighten, but make s~~rethe washer is
seated securely.
-.
‘.
. .
“.,
. .. . . ——
—...
......——-..
—