_0° COrn Safety Information Operating/Care ........ 2, 3 and Cleaning Instructions Charcoal Fiber. .............. Grease Fiher . ............... 5 4 Hood Light ................. Hood Surfaces ............... Controls .................... 5 5 4 Installation Consumer Consumer Warranty Instructions Support Support .................. ...6-14 . . .
IMPORTANTSAFETYINFORMATION. READALLINSTRUCtiONSBEFOREUSING. SAFETY PRECAUtiONS WARNING-TO REBUCE THE RISK OF FIRE,WARNING - TO REBUCE THE RISK OF ELECTRICSHOCKORINJURY TOPERSONS,OBSERVE THEFOLLOWING: A. Use this unit onh in the rammer intended b_ tile manuf_mtureI: con[ilC[ the Ifmu hme questkms, l/lantlfilc[urei', B. Before servicing or cleaning unit, swimh power off at seIMce panel and lock tile service disconnecting means to t)re_ent power fl'om being sMtched on accidentally. \_]len the service disc
INSTRUCTIONS LISEZ \ I .I DE SECURITE TOUTES IMPORTANTES. LES INSTRUCTIONS AVANT D'UTIUSER. PRbcCAUtiONS ENMATlecRE BESE-CURITEAVERTISSEMENTPOUR RtDUIRE LE AVERTISSEMENTPOUR R_DUIRE RISQUE D'INCENDIE, DESECOUSSE £'LECTRIQUE OUDE LERISQUE D'UNFEUDEGRAISSE SURLASURFACE BLESSURE CORPORELLE, OBSERVEZ LESPRECAUTIONS DECUISSON DELACUISINIERE : SUIVANTES: A_ Ne laissez j_mmJs _ms sm'veill_mce les m_it(_s de A. N'utilisez cet appm'ei[ que de la manibre prevue pro" le Ii_bricant. Si x_)us a\ ez des questions
Usingthe hood controls. Throughout this manual, features and appearance may vary from your model. Control Knobs (onsomemodels) Switch Pad Controls (onsomemodels) ill ON t OFF O FAN Control Turn O to HI, MED or LO as needed. LIGHT Control cooking LIGHT Control Press the pad at the top to tm'n Continuous use of the tim system while cooking helps kee I) the kitchen condin'table and less lmmid. It also reduces cooking o(lo_s and soiling moistm'e that create a fl'equent need tot cleaning.
Charcoal Filter--Recirculating Installations Only CD The charcoal filter cannot be cleaned. It must be replaced. Order filter no. WBO2XI0700. Replacement filters can be ordered from your GEsupplier. If the hood Replaceable charcoal filter NOTE; DO NO Trinse, or put charcoal filters in an automatic dishwasher is not vented to the outside, the air will be recirctdated through a disposable charcoal filter that helps remove smoke and odols.
Installation Instructions Range Hood Questions? Ca//800.GE.CARES(800.432.2737)orVisitour Website BEFORE YOU BEGIN DUCTWORK Read these NOTE: instructions completely • IMPORTANT instructions for local - S ,,ethese inspector's • IMPORTANT governing • Note codes • Note - Obse,,'e ;,ll - Be sure to leave - Keep these instructions • Skill level - Installation of this appliance basic mechanical and electrical skills. time - 30 minutes-3 " Proper installation installer.
Installation WORKSHEET--CALCULATE DUCT PIECES O J TOTAL EQUIVALENT EQUIVALENT NUMBER LENGTH x USED = TOTAL 1Ft. x ( 7" Round, straight 1Ft. 6" Round, straight 1Ft. 3W'x 10" Rect.90° elbow 14Ft. x ( ) Ft. 3W'x 10" Rect.45° elbow 8Ft. x ( ) Ft. 3W'x 10" Rect.90° flat elbow 33 Ft. x ( ) Ft. 3W'x 10" Rect. wall cap with damper 24 Ft. 18ft. w/o damper) x ( ) Ft. x ( ) Ft 3W'x 10" Rect.to 6" round transition 2Ft. x ( ) Ft 3W'x 10" Rect.to 6" round transition 90° elbow 4Ft.
Installation Instructions TOOLS YOU WILL NEED DAMAGE - SHIPMENT/INSTALLATION • If the mfit is dmnaged store in which in shipment, it was bought • If the refit is dmnaged replacement • If the the is the customer), customer to the or Flatbladeand Phillips screwdrivers customer; (if other or replacement between unit repair of the by the installer repair the or replacement.
Installation Instructions [] CHOOSE VENT OPTION Detem_ine require below [] the and that choices. xent option is axailable that )our fin" your installation model IMPORTANT: will from the recirculating, is to be installed ductless rammer, knock out rely vent openings in the hood.
Installation [] REMOVE EXHAUST Instructions [51REIVIOVE WIRING ADAPTOR If exhausting/venthlg using the 3¼" x 10" rectangular duct---optional for JV338, Jv347, Jv348 mad JV367 models tufty: I_.emove the exhaust adaptor fl'oln the inside of the hood. Set it aside along with its mouI]tiI]g screws. COVER Remo_e the wiring cover ti'om inside the hood. Set the cover and its mounting screw aside.
Installation [] Instructions FOR 31/4"X 10" RECTANGULAR DUCTED DISCHARGE INSTALLATIONS ONLY: Attach exhaust knockout depending scre_:s. edge adaptor/damper opening over (fin" vertical on installation) Make sure ot hood. dalnper ]/elnove the appropriate with two is nearest from exhaust adaptor to top/back dalnper flap.
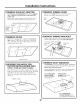
Installation [] Instructions MARK HOLES Select the require xent and option proceed that _our to that installation C. Outside rear exhaust (Horizontal duct-31A" x 10" Rectangular) will section: • Use the diagram mark the locations A. Outside top exhaust (Vertical duct-31/4" x 10" Rectangular) • Use the diagrmn mark the locations electrical wiring electrical keyhole screw wiring the hood as a template and on the cabinet for ductwork, and keyhole slots.
Installation Instructions [] II_ [] Drixe a mounting screw (front the hardware packet) partway into IN each PARTWAY center of the narrow neck of the SCREW keyhole slots marked on the cabinet bottom. SECURE HOOD Slide the hood back against the wall. Tighten the motmting screws. Be sm'e the screw heads are in the narrow neck of the keyhole slot.
Installation [] Instructions INSTALL LIGHT BULB [] NOTE: A light bulb is not shipped with tile hood.
GERangeHoodWarranty. Aft warranty service provided by our Factory Service Centers, or an authorized Customer Care® technician. To schedule service, on-line, 24 hours a day, visit us at ge.com, or carl 800.GE.CARES (800.432.2737). Please have serial number and model number available when calling for service. Staple your receipt here. Proof of the original purchase date is needed to obtain service under the warranty.
ConsumerSupport. a question or need assist;race with your "J Haxe GE Appliances Website any da)of the year'. For greater comenience _, order parts or e_.en schedule appliance? Try the (;E Al)pliances _ ebsite 24 hom_ a day, and faster service, you can now download Owner s Manuals, ScheduleService Expert (;E repair sets,ice your, con;enience business hout_. is onl) 24 hotu_ ge.com serxice on-line. am ge.com one step away fl'om {lax of the xear! your do(n: Get on-line Or {'all 800.(;E.