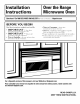
Installation Instructions Overthe Range Microwave Oven I Questions?Call 800.GE.CARES(800.432.2737)or Visit,,,, x_ebsite;,t:Hotpointcom BEFORE YOU BEGIN Read these instructions completely • IMPORTANT instructions for local • Note codes and to Installer instructions with the carefully. - S_,,e _hese inspector's • IMPORTANT goxernin(, and ordinances. Be sure to leaxe these Note to Consumer instructions - Keep for futm'e reterence.
Installation Instructions _] CONTENTS Redrculating ........................................ information Important Safety Attach General Mounting Preparation Electrical Hood Instructions Requirements Exhaust .................................. ....................................... 4, 5 .............................. ......................................... 6 Tools You Will Need 7 Placement installation of Mounting Removing Finding Installation [] ...............................
Installation Instructions IMPORTANT SAFETY INSTRUCTIONS This product requires The installer must on the power installation outlet If not does (trader box to insure grotmded. box a three-l)rong, perform that n(>t meet electrMan deficiencies.
Installation Instructions HOOD EXHAUST NOTE: Read outside. If you these next plan OUTSIDE two pages to recirculate only the if you air back TOP EXHAUST The following chart ductwork installation. describes plml to vent into the an example ot one exhaust to the proceed (EXAMPLE to page 6. ONLY) possible EQUIVALENT LENGTH DUCT PIECES " your room, x 12 Ft.StraightDuct RoofCap (6" Round) 12 Ft. 24 Ft. xx TransitionAdaptor* Rectangular-to-Round 5 Ft.
Installation Instructions NOTE: If wm need to install ducts, note that the total duct lengti_ of 3V_" x 10" rectangular or 6" diameter round duct should not exceed 140 equivalent feet. Outside ventilation Read the following requires careflfllv. a HOOD EXHALIST Maximum DLICT. The hood has been designed a standard 3V_" x 10" rectangular If a round duct is required, transition adaptor m ust be a 6" diameter duct.
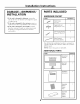
Installation Instructions PARTS INCLUDED DAMAGE--SHIPMENT/ INSTALLATION HARDWARE " If the unit oI" unit is damaged to the i'ei)la " If the than in shipment, in which it was return bought the PART QUANTITY fin" repair ceu/enL unit replacement • If the store unit the is dainaged is the by the customer, responsibility is damaged customer), be made by arrangement and installer.
Installation Instructions TOOLS YOU WILL NEED Rulerortape Pencil # 1 and#2 Phillipsscrewdriver measure and tedge (optional) Carpenter square Tin snips(for cutting damper,if required) Scissors (to cut template, if necessary) Electric drill with ¾_", V/" and %" drill bits 0 Gloves Stud finder Saw (saber, hole or keyhole) Safety goggles MOUNTING Fillerblocksor scrap wood pieces,if needed for top cabinetspacing (usedon recessedbottom cabinet installationsonly) or Hammer (optional) Duct and mas
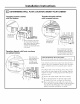
Installation Instructions PLACEMENT OF THE MOUNTING REMOVING THE MICROWAVE OVEN FROM THE CARTON/ REMOVING THE MOUNTING PLATE []Remove tray bag,. front the Do of tile installation exhaust adaptor instructions, and the not tile Styrofoam remo_e tile I-_ PLATE FINDING THE WALL STUDS i filter, glass small hardware I)r°tecting, tile o_,en, Wall Studs _Fold back all 4 carton flaps full) against carton sides. Then careflflE roll the oxen and carton oxer onto tile top side.
Installation DETERMINING Template beneath with flat bottom Instructions WALL PLATE LOCATION cabinet UNDER YOUR CABINET Template beneath cabinet with recessed bottom Trimthe rearwall template along the dotted line. II Trimthe rearwall templatealong the dotted line. I)raw a verticalline on the wall at the centerof the 30" to 36" wide space.Tapethe RearWall Template onto the wall matching the centerline andtouchingthe bottom of the cabinet. ...........
Installation DETERMINING Instructions REAR MOUNTING SCREW LOCATIONS ........................... _-_ ........................................................................................... _._ ............................................................................................................................... = ......... REAR . ,_ CAUTION: _,_ar to axoid cutting on shal]_ edges.
Installation INSTALLATION This the microwave following ()veil three A, Outside Top B, Outside Back C, Recirculating is designed types Exhaust fi)r TYPES adaptation Instructions (Choose A, B or C) to NOTE: of ventilation: (Vertical Exhaust Duct) (Horizontal (Non-Vented microwave Exhaust Wpe of ventilation proceed Duct) This Top (except to that is shii)ped fl)r required non-vented for wmr assembled models), fl)r Outside Select installation the and section, Ductless)
Installation Instructions OUTSIDE TOP EXHAUST INSTALLATION A1. A2. A3. A4. (Vertical Duct) OVERVIEW Attach Mounting Plate to _'fll Prepare Top Cabinet Check Damper Operation Mount Microwave Oven A5. Ac!j ust Exhaust Adaptor A6. (_onnect Ductwork I-_ To use toggle ATTACH THE MOUNTING PLATE TO THE WALL bolts: Spacingfor Toggles MoreThanWall -,,,-I_,-,.-!.
Installation I-_ Tile Instructions I-_ USE TOP CABINET TEMPLATE FOR PREPARATION OF TOP CABINET top cabinet support locations. screw template holes, will power help cord you and locate tile exhaust INSTALL THE DAMPER (cont.) Re nsta rear top outlet _ " Close I'ea retainingscrew tile blower cover with adaptor and reinstall I" scYew. " Remove tape holding should pivot easily. the damper.
Installation I-_ MOUNT Instructions ADJUST THE EXHAUST ADAPTOR THE MICROWAVE OVEN (cont.) []Insert a self:aligning screw through turning threads the screw at least two full turns alter have engaged. (It will be completely Be later.) careful mounting not secure Be sure to keep to pinch flush the center hole. tightened Temporarily top cabinet power the cord, to bottom oven Open the to connect by the cord especially top cabinet and ac!iust to the house duct.
Installation Instructions OUTSIDE BACK EXHAUST INSTALLATION B1. Prepare Rear B2. Remove Exhaust B3. Attach B4. Prepare B5, B6, Adapt Motmt OVERVIEW _4'all Adaptor Mounting Top Plate to _'all Cabinet Blower tot Back Exhaust the Microwave Oven PREPARING THE REAR WALL FOR OUTSIDE BACK EXHAUST The rear wall template as shown on page 9. " Read the instructions TEMPI ,ATE. should be positioned accm'atel) on the REAR _4_I,I, • Grit the oi_enin_, ti)llowing, REAR WAI,I, TEMPI,ATE.
Installation I-_ Instructions ATTACH THE MOUNTING PLATE TO THE WALL USE TOP CABINET TEMPLATE FOR PREPARATION OF TOP CABINET Tile top cabinet S/ll)l)oI't Remove the template fl'om the rear wall. The mounting plate must be secured to tile wall using at least 3 toggle bolts and one wood screw. Tile wood screw must engage a wall stud, []Remove _ tile toggle wings fl'om scI'ew template holes and • Read the instructions TEMPI,ATE. tile bolts.
Installation Instructions ADAPTING MICROWAVE BLOWER FOR OUTSIDE BACK EXHAUST (cont.) [] Carefllllv slide the and lift it partially blower wires handling the wires are ] enough to allow and place oi_ening, the in the blower top trait of the back into the microwaxe. right, blower motor toward the out of the opening. Note: long Tilt The flexible while perfimning these steps. Disconnect only if it is necessary fi_r additional flexibility. CAUTION: Do unit Make wiring.
Installation Instructions CabinetFront MOUNT OVEN THE MICROWAVE CabinetBottomShelf FillerBlock to Depth ofquivalent Cabinet Recess T Self-AligningScrew FOR EASIER INSTAI,IATION AND PERSONAI, SAFETY, WE RECOMMEND THAT TWO PEOPLE INSTALL THIS MICROWAVE OVEN. MicrowaveOvenTop _lnsert 2 self-aligning screws throm,h_ outer top cabinet holes. Tm'n two flfll tm'ns on each screw. NOTE: If vour cabinet is metal, use tile nylon grommet around tile power cord hole to prevent cutting of tile cord.
Installation RECIRCULATING INSTALLATION (Non-VentedDuctless) OVERVIEW C1. Attach Mom_ting C2. C3. Prepare Check Top Cabinet Microwave Assembly C4. C5. Adapt Mount Blower tin _Recirculation the Microwave Oven C6.
Installation Instructions _ ADAPTING MICROWAVE BLOWER FOR RECIRCULATION _ RelllO_e retaining tile back screw. top center blower illOtoF Carefiflly and slide blower wires handling the wires (]ooI" the blower lift it partially out are motor of the long toward opening.
Installation Instructions NOTE: ADAPTING MICROWAVE BLOWER FOR RECIRCULATION (cont.) ] place Tilt and oi)ening, in tile tile blower unit back top of tile microwave. tile When thread not pinch oven cord hole top cabinet. throughout tile oven, power through into mounting ii/icrowave in bottom of Kee I) it tight Steps 1-3.
Installation Instructions MOUNT THE MICROWAVE OVEN (cont.) []Insert 2 self-alioning throuoh_ holes. each INSTALLING THE CHARCOAL FILTER ACCESSORY [] screws outer top cabinet TtlI'n two fllll ttlI'ns Remoxe of the on []Open the oxen the 3 screws using along the a # 1 Phillips top front edge screwdrixer. door. screw. [] Remoxe pulling the grille it straight by slidim, off. it to the left and then Charcoal Filter _ [] Tighten center screw completely.
Installation Instructions BEFORE YOU USE YOUR MICROWAVE F_ Make the microwa',e o',en has been installedsureaccording to instructions. [_ '_ F_ I _] _ Remoxe all I'OW_lX, e IlliC )ackim* material ox, en. Install tm'nmble Replace house and fllse from the I ring in caxitx. or mrn breaker back on. IllIIIIIIII % Plug power cord electrical outlet. into a dedicated 15- to 20-amp Ensure proper _r_: ueX_sts/ 23 Read the Owner's Manual. EEP THE INSTAIJ,ATION INSTRUCTIONSUSE.
39-40449 ] 03-05 JR P6nted [ in Malaysia DE68-02957A J