
Installation guide


Installation Instructions
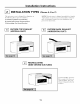
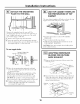
I-_ USE TOP CABINET TEMPLATE
FOR PREPARATION OF TOP
CABINET
Tile top cabinet template will help you locate tile top
support screw holes, power cord and exhaust outlet
locations.
" Read tile instructions on tile TOP CABINET
TEMPLATE.
" Tape it tmderneath tile top cabinet.
" Drill tile holes, fi_llowing tile instructions on tile
TOP CABINET TEMPLATE.
CAUTION: _'_ear satiety o-oo-des when drillim, holes
in tile cabinet bottom.
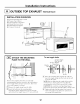
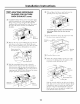
INSTALL THE DAMPER
Remove rear
retaining screw
" Place tile microwaxe in its upright position.
" Remoxe tile retaining screw at tile rear of tile
I/lOtOI" doo I'.
" I,ifl tile blower motor door.
" Slide tile exhaust adaptor toward tile lett side and
into tile opening.
" Tile adaptor should be oriented as shown.
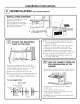
I-_ INSTALL THE DAMPER (cont.)
Renstarear
_ retainingscrew
" Close tile blower cover with adaptor and reinstall
I'ea I" scYew.
" Remove tape holding the damper. The damper
should pivot easily.
" Tile adaptor can be a(!justed, lett to right and fl'ont
to back, to align with the house exhaust ductwork.
13
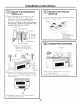
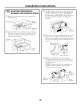
r_ MOUNT THE MICROWAVE OVEN
FOR EASIER INSTAI,IATION AND PERSONAl,
SAFETY, X,_E RECOMMEND THAT TWO PEOPLE
INSTALL THIS MICROWAVE OVEN.
NOTE: If yore" cabinet is metal, use tile nylon
grommet aro/md tile power cord hole to prevent
cutting of tile cord.
NOTE: We recommend using filler blocks if tile
cabinet front hangs below tile cabinet bottom shelf.
IMPORTANT: If filler blocks are
not used, case damage may occur from
overtightening screws.
NOTE: When mo/mting
tile illicrowave oven_
thread power cord
through hole in bottom of
top cabinet. Keep it tight
throughout Steps 1-3. Do
not pinch cord or lift
oven by pulling
_I,ifl microwave, tilt
it fl_rward and hook
slots at back bottom
edge onto flmr lower
tabs of mounting
plate.
_ Rotate front of
oxen
up against cabinet
bottolIl.