Instructions for Installation and Use Electric Oven Models: SD 52K - SD 52 I To the Installer Before installation fill in the product details on the back cover of this book. The information can be found on the rating plate. To the User You must read the instructions prior to installing and using the appliance and then retain them for future reference.
CONTENTS Introduction Close-up view How to use your appliance How to keep your oven in shape Pratical cooking advice Safety is a good habit to get into Installation Electrical connection After Sales Service Hotpoint Guarantee Key Contacts 3 4 5-6 7 8-9-10 11 12 13 14 15 Back Cover Retention of this Instruction Book This Instruction Book must be kept handy for reference as it contains important details on the safe and proper use of the appliance.
Introduction Your new electric oven is guaranteed* and will give lasting service. This guarantee is only applicable if the appliance has been installed in accordance with the installation instructions detailed in this booklet. To help make best use of your cooking equipment, please read this booklet carefully. The oven is designed specifically for domestic use and responsibility will not be accepted for use in any other installation.
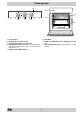
Close-up view E A 10 20 120 30 110 40 100 50 60 70 90 80 MAX 60 180 100 140 220 H G B I C F A. B. C. E. Control Panel Cooking mode selection knob Cooking temperature selection knob Oven indicator light (only available on certain models) - When lit, it indicates the ovens is heating up to the temperature set. F. Dripping Pan or Baking Sheet G. Oven Rack H. Guides for sliding the racks or dripping pan in and out I.
How to use your appliance This multi-function oven combines the advantages of traditional convection ovens with those of the more modern fan assisted models in a single appliance. It is an extremely versatile appliance that allows you to choose easily and safely between 5 different cooking modes. The various features offered by the oven are selected by means of selector knob “B” and thermostat “C” situated on the control panel.
How to use your appliance End Cooking Time Knob (I) (only available on certain models) Some models are equipped with a timer program to control when the oven shuts off during cooking. To use this feature, you must wind the “I” knob one full turn in the clockwise direction 4 ; Then, turn the knob in the counter-clockwise direction 5, to set the time by matching up the indicator on the control panel with the number of minutes on the knob.
How to Keep Your Oven in Shape How to remove the oven door For a more thorough clean, you can remove the oven door. Proceed as follows: • open the door fully; • lift up and turn the small levers situated on the two hinges; • grip the door on the two external sides, shut it slowly but not completely; • pull the door towards you, pulling it out of its seat; Reassemble the door by following the above procedures backwards. Before cleaning your oven disconnect it from the power supply.
Practical Cooking Advice When using this mode, place the grid on the 2nd or 3rd oven rack from the bottom (see cooking table) then, to prevent fat and grease from dripping onto the bottom of the oven and thus smoke from forming, place a drippingpan on the 1st rack from the bottom. Important: always use the “fan assisted grill” with the oven door shut. This will allow you both to obtain excellent results and to save on energy (approximately 10%).
Practical Cooking Advice Cooking Fish and Meat When cooking white meat, fowl and fish, use temperature settings from 180 °C to 200 °C. For red meat that should be well done on the outside while tender and juicy in the inside, it is a good idea to start with a high temperature setting (200°C-220°C) for a short time, then turn the oven down afterwards. In general, the larger the roast, the lower the temperature setting.
Practical Cooking Advice Selector knob Food to be cooked setting 1 Convection a 2 Fan assisted b 3 Top Oven c 4 Grill d 5 Fan assisted grill Weight (in kg) Cooking rack position from bottom Preheating time (minutes) Thermostat knob setting Cooking time (minutes) 1 1 1 1 3 3 3 3 3 15 15 15 15 15 200 200 200 180 180 65-75 70-75 70-80 15-20 30-35 Pizza (on 2 racks) Lasagne Lamb Roast chicken + potatoes Mackerel Plum-cake Cream puffs (on 2 racks) Biscuits (on 2 racks) Sponge cake (on 1 rack)
Safety Is A Good Habit To Get Into To maintain the efficiency and safety of this appliance, we recommend that you do the following: • only call the Service Centres authorised by the manufacturer • always use original spare parts • • • • • When handling the appliance, we recommend you always use the purpose provided handles recessed into the sides of the oven to prevent harming people or damaging the appliance itself.
Instalation The appliance must be installed only by a qualified person in compliance with the instructions provided. The manufacturer declines all responsibility for improper installation which may harm persons and animals and damage property. Important: The power supply to the appliance must be cut off before any adjustments or maintenance work is done on it. The panels of the adjacent cabinets must be made of heatresistant material.
Electrical Connection Electrical connection The electrical connection to the mains must be made on the appliance. The power voltage and frequency are as indicated on the rating plate. WARNING: THIS APPLIANCE MUST BE EARTHED.
After Sales Service "No company is better positioned to offer an after sales service on a Hotpoint appliance than us - the manufacturer" As part of our commitment to you, all Hotpoint appliances have the added benefit of a fully inclusive parts and labour guarantee for the first 12 months. In addition to this you also have the advantage of free replacement parts for the first 5 years when fitted by a Hotpoint engineer.
Guarantee "Satisfaction guaranteed or your money back" We give you a unique 'satisfaction guaranteed' promise - valid for 90 days - after you have purchased your Hotpoint appliance. If there is a technical problem simply call Hotpoint Repair service or visit our web-site at www.hotpointservice.co.uk and where necessary, we will arrange for an engineer to call. If the technical problem is not resolved under this guarantee, we will replace your machine or, if you prefer, give you your money back.
Key Contacts After Sales Service Over 900 trained specialists, directly employed by us, ensure that you can have complete confidence in both the appliances and services we offer. Repair Service and Information Desk UK: 08709 066 066 (Open 8 to 8 Mon - Fri, 8 to 6 Sat, 10 to 4 Sun & Bank Holidays) www.theservicecentre.co.