Operating Instructions OVEN Contents GB English, 1 Installation, 2-3 Positioning Electrical connection, 4 Data plate Description of the appliance, 5 Overall view of classical-opening model Overall view of side-opening model Control panel Start-up and use, 6-7 SE481012X SE48L1012X SE48R1012X SE481012GX SE48L1012GX SE48R1012GX Control panel lock DEMO mode Setting the clock Setting the timer Starting the oven Cooking modes, 8-11 Manual cooking modes Automatic cooking modes Programming cooking Practical
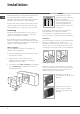
Installation Before operating your new appliance please read this instruction booklet carefully. It contains important information concerning the safe operation, installation and maintenance of the appliance. OK OK Please keep these operating instructions for future reference. Make sure that the instructions are kept with the appliance if it is sold, given away or moved. Positioning Keep all packaging materials out of the reach of children.
16 mm thick: use the second groove (see diagram). GB Secure the appliance to the cabinet by opening the oven door and inserting 4 screws into the 4 holes on the outer frame. All parts which ensure the safe operation of the appliance must not be removable without the aid of a tool.
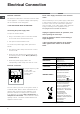
Electrical Connection GB Electrical connection The electrical connection to the mains must be made on the appliance. The power voltage and frequency are as indicated on the rating plate. ! THIS APPLIANCE MUST BE EARTHED.
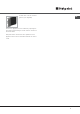
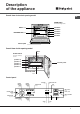
Description of the appliance Overall view of classical-opening model GB GUIDE RAILS for the sliding racks position 5 position 4 position 3 position 2 position 1 GRILL rack DRIPPING PAN rack Control panel Overall view of side-opening model GRILL rack GUIDE RAILS for the sliding racks position 5 position 4 position 3 position 2 position 1 Control panel DRIPPING PAN rack Control panel MANUAL COOKING MODE selector MANUAL COOKING MODE icons DURATION icon COOKING END TIME icon TEMPERATURE display
Start-up and use GB The first time you use your appliance, heat the empty oven with its door closed at its maximum temperature for at least half an hour. Ensure that the room is well ventilated before switching the oven off and opening the oven door. The appliance may emit a slightly unpleasant odour caused by protective substances used during the manufacturing process burning away. The Control panel lock and DEMO mode can be activated/deactivated even when the control panel is switched off.
- Press the button to stop cooking. - Set a new cooking mode (previous settings will be reset). If a blackout occurs while the oven is already in operation, an automatic system within the appliance will reactivate the cooking mode from where it was interrupted as long as the temperature has not dropped below a certain level. Programmed cooking modes which have not started will not be restored and must be reprogrammed. GB There is no preheating stage for the BARBECUE mode.
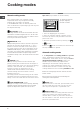
Cooking modes GB Manual cooking modes Spit roast (only available in certain models) To operate the rotisserie spit (see diagram) proceed as follows: All cooking modes have a default cooking temperature which may be adjusted manually between 40°C and 250°C as desired. In the BARBECUE mode, the default power level value is indicated as a percentage (%) and may also be adjusted manually. MULTILEVEL mode All heating elements and the fan are activated.
PIZZA mode Use this function to make pizza. Please see the following chapter for the recipe and further details. BREAD mode Use this function to make bread. Please see the following chapter for the recipe and further details. PIZZA mode To obtain the best results, we recommend that you carefully observe the instructions below: Follow the recipe. The weight of the dough should be between 500 g and 700 g. Lightly grease the dripping pan.
GB Programming cooking Practical cooking advice A cooking mode must be selected before programming can take place. Do not place racks in position 1 and 5 during fanassisted cooking. This is because excessive direct heat can burn temperature sensitive foods. Programming the duration To set the duration of a manual cooking mode : 1. Press the button several times until the icon and the first digit on the TIME display flash. 2. Press the "+" and "-" buttons to adjust the hour value.
Cooking advice table Cooking modes Multilevel* Barbecue* Gratin* Low temperature Foods Pizza on 2 racks Pies on two racks/cakes on 2 racks Sponge cake on 2 racks (on the dripping pan) Roast chicken + potatoes Lamb Mackerel Lasagne Cream puffs on 2 racks Biscuits on 2 racks Cheese puffs on 2 racks Savoury pies Mackerel Sole and cuttlefish Squid and prawn kebabs Cod fillet Grilled vegetables Veal steak Sausages Hamburgers Toasted sandwiches (or toast) Spit-roast chicken using rotisserie spit (where pres
Precautions and tips GB This appliance has been designed and manufactured in compliance with international safety standards. The following warnings are provided for safety reasons and must be read carefully. General safety The appliance was designed for domestic use inside the home and is not intended for commercial or industrial use. The appliance must not be installed outdoors, even in covered areas. It is extremely dangerous to leave the appliance exposed to rain and storms.
Care and maintenance Switching the appliance off Disconnect your appliance from the electricity supply before carrying out any work on it. Cleaning the appliance The stainless-steel or enamel-coated external parts and the rubber seals may be cleaned using a sponge that has been soaked in lukewarm water and neutral soap. Use specialised products for the removal of stubborn stains. After cleaning, rinse and dry thoroughly. Do not use abrasive powders or corrosive substances.
GB Sliding rack kit assembly To assemble the sliding racks: A 1. Remove the two frames, lifting them away from the spacers A (see figure). Assistance Warning: The appliance is fitted with an automatic diagnostic system which detects any malfunctions. Malfunctions are displayed by messages of the following type: ER followed by numbers. Call for technical assistance if a malfunction occurs. Before calling for Assistance: Left guide rail Right guide rail B C D of irec ex tio tra n ct io n D 2.
After Sales Service After Sales Service GB No one is better placed to care for your Hotpoint appliance during the course of its working life than us - the manufacturer. Essential Contact Information Hotpoint Service We are the largest service team in Europe offering you access to 400 skilled telephone advisors and 1100 fully qualified engineers on call to ensure you receive fast, reliable, local service. UK: 08709 066 066 Republic of Ireland: 0818 313 413 www.hotpointservice.co.
Guarantee 02/2008 - 195060967.01 XEROX BUSINESS SERVICES Guarantee GB 12 Months Parts and Labour Guarantee Your appliance has the benefit of our manufacturers guarantee, which covers the cost of breakdown repairs for twelve months from the date of purchase. This gives you the reassurance that if, within that time, your appliance is proven to be defective because of either workmanship or materials, we will, at our discretion, either repair or replace the appliance at no cost to you.