
Installation Guide


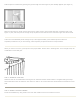

How to Install Wainscot Base Trim
To minimize expansion or contraction of the product, place the pieces flat with space between each for air to circulate.
Allow 72 hours for pieces to adjust to the temperature and humidity of the room in which they will be installed.
Finish or seal the front, back and edges of each piece. Allow them to dry completely.
Nail base trim to wall with grooved side up using 1” finishing nails.
Space nails 16” apart. Nail into studs whenever possible for secure hold.
TIPS:
• Use nail gun for fastest, easiest installation.
• Pre-drill holes to prevent splitting.
• To maintain House of Fara solid wood products, simply wipe with damp cloth.
How to Install Tongue and Groove 8' Planking and 32" Wainscot
IMPORTANT WARNING!
This product will expand and contract. Loosely fit individual boards together to allow for expansion. DO NOT tightly
press individual boards together. They WILL buckle when expansion occurs. Leave a minimum of 1/8” at the edge of
first/last board and corner. Best installed in a climate-controlled environment; allow ample time for product
to acclimate to room temperature.
To minimize expansion or contraction of the product, open all packages. Place the pieces flat with space
between each for air to circulate. Allow 72 hours for pieces to adjust to the temperature and humidity of
the room in which they will be installed – not in a damp or unheated area.
Finish or seal the front, back and edges of each piece. Allow them to dry completely.
Arrange boards in desired sequence of pattern – as solid wood products vary in grain and color.