
User's Manual

Page 10 of 13
Detection Sensitivity:
Use this feature to set the detection sensitivity. This affect the distance the radar detects
objects. You may set the sensitivity from a value of “10” to “99”. Each value is an
approximate percentage of maximum detectable range (typically 500 to 600 feet for the
DR-1500). Setting the value to “99” sets the range to maximum. This is due to typically
only two display digits being used with the radar.
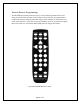
1. Press the “SENSITIVITY” key on the remote once
[The current value will be displayed on the display]
2. Enter the desired sensitivity as a two digit value from 10 to 99 percentage of
maximum range of the radar or use the Up/Down arrow keys
3. Press “SET/OK” to save the limit in the radar or press “CANCEL” at any time
before “SET/OK” to cancel this operation
Internal Clock:
Use this feature to set the internal clock of the radar. This is only required if you have
purchased the optional statistics collection package. The unit will keep time even with
external power removed.
It may be more convenient to set the clock of the radar by connecting a
serial cable to the radar and using the “Houston Radar Stats Analyzer”
program. A button in the program allows you to sync the radar clock with
your computer clock. However, the following steps may be used in the
field to either check or set the time of the radar
1. Press the “CLOCK” key on the remote
[The radar will display “SE”- short for seconds of the current time]
2. Press the “UP” arrow key on the display to move to the minutes option
[The radar will display “MI”- short for minutes of the current time]
3. Press the “UP” arrow key on the display to move to the hours options
[The radar will display “HO”- short for hours of the current time]
4. Press the “UP” arrow key on the display to move to the day of the month option
[The radar will display “DA”- short for day of the current day of the month]
5. Press the “UP” arrow key on the display to move to the month option
[The radar will display “MO”- short for month of the current date (January is “1”,
December is “12”)]
6. Press the “UP” arrow key on the display to move to the month option
[The radar will display “YE”- short for year of the current date (2000 is “00”,
2006 is “06” etc.)]
To set any of the above value, navigate to the desired option, then press
“SET/OK”. At this point the radar will display the current option. You may then
directly enter the desired value for the option and press “SET/OK” again.