
User's Manual

Page 5 of 13
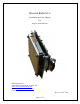
INSTALLATION
Mounting:
The DR-1500 is supplied with a mounting plate and may be conveniently mounted via 4
mounting holes inside your enclosure.
Use a “split washer” is used to ensure the mounting screw remains tight under vibration.
Direction Pointing:
The DR-1500 is directional in nature. It rejects traffic moving away from it and only
measures oncoming traffic.
If the optional stats analyzer feature is purchased with the unit, stats will
only be collected for incoming traffic. This allows you to position the unit in
a median without worry of picking up traffic on the outgoing lane
For optimal performance, keep in mind the following:
9 Radar should be mounted with the circuit board horizontal to the road.
9 Radar should be pointed into the direction of the oncoming traffic.
9 Radar should be placed along the size of the road to minimize the angle of the
oncoming traffic to the radar.
o If radar cannot be placed right along the side of the road, it should be
pointed at least 200-300 feet up the road into oncoming traffic.
9 The radar may pickup rotating fans. Avoid pointing it at fans or compressors.
9 Radar should be mounted at least 3+ feet high from the road for optimal
performance.
Hookup:
Power Input
:
The DR-1500 radar can be powered from a nominal 12V DC battery and features
industry leading operational power consumption. This is up to 10X lower than competing
products.
This operational power translates directly into a longer battery life or gives you an option
to power the unit from smaller batteries that would also require smaller solar panels.