
Users Manual Part 2


HoverCast Set-Up
3
Connecting to a Display - HoverCast
21
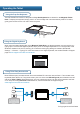
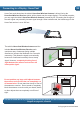
Install the Receiver: Install the HoverCast Wireless Receiver on or near the intended output
display by hand-tightening the retention nut clockwise until the the unit is secure. The receiver can
also be placed near a projector, AV console, or other output interface, as long as it retains line-of-
sight of the tablet’s HoverCast Wireless Antenna. For a visual reference, please see the
HoverCast Positioning Diagram on pages 23, 24 and 25.
Connect HDMI: Find an available HDMI-In port on the output display’s interface panel, and
connect the HoverCast Wireless Receiver via the included HDMI Cable.
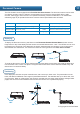
Connect Touch-USB (optional): If you are using a Touch-USB enabled display, find an
available Touch-USB port on the output display’s interface panel, and connect it to the HoverCast
Wireless Receiver via the included Type-A or Type B USB 2.0 Cable, depending on the panel's
interface type. If output display’s interface panel has multiple Touch-USB inputs, be sure to use the
Touch-USB port number that corresponds with the HDMI-In number that is being used. (Example: If
you are using the HDMI 2 input, also use the Touch-USB 2 input).
Supply Power to the Receiver: Locate an available A/C wall outlet, and connect the
HoverCast Wireless Receiver with the included HoverCast Power Adapter. When properly
powered, the receiver will display a single red solid light.
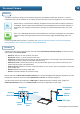
HoverCast
Power Button
HoverCast
Power Adapter
Type-A or Type-B USB
2.0 Cable
(
o
p
tional
)
HDMI Cable
Output
Display
HoverCast Wireless Receiver (Back)
HDMI-In
Port
Touch-USB
Port
2
3
4
While there is no software to set up or passwords to enter, the right steps must be followed in the
set-up process to enjoy the benefits of wireless HoverCast technology.
1