
Wall Clock Mechanical Instructions


CHIME SELECTION
Selecting the chime melody is accomplished by moving a lever on or next to the clock dial. Some
models play only the Westminster chime, while others give you a selection of three melodies.
If the dial states "WESTM-SILENT" or "STRIKE-SILENT", your clock has only the Westminster
chime. If your clock has a triple chime movement, the chime lever identifies the melody choices.
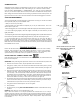
Never change the selection while the clock is chiming or positioned near the release points. See
figure 8 for when it is safe to move the chime selection lever without damaging the movement.
CARE AND MAINTENANCE
Your clock requires little care and maintenance. Listed below are steps you can take to maintain
the exceptional quality of your Howard Miller clock.
• Wind your clock every seven days.
• Wax and polish your clock cabinet as frequently as you do your other furniture. Use a non-
silicone liquid or paste wax.
• When cleaning glass, use a non-ammonia glass cleaner. Never spray the cleaner directly on the clock.
• For clocks with hanging weights, check the weights occasionally to ensure that they are still
tightly assembled.
• Avoid exposing the clock to direct sunlight or high intensity lighting which may fade the finish. Protect
from extreme temperatures and humidity changes which may cause the wood to split or crack.
• It is recommended that your clock movement be oiled every two years from the date of
purchase and thoroughly cleaned every five to ten years depending on climatic conditions.
Extremely dry, humid or salty air, heat or cold may necessitate more frequent servicing. Howard
Miller does not recommend that you service the clock movement yourself. Contact an authorized
Howard Miller Service Center.
TROUBLE SHOOTING
Ensure that all instructions provided with your Howard Miller product have been carefully
followed. These instructions will provide detailed information to answer most questions.
Contact the Howard Miller web site (www.howardmiller.com) for a list of frequently asked
questions that may conveniently resolve your problem or answer your questions.
CLOCK DOES NOT CHIME AT PROPER TIME
If the clock chimes more than one minute before or after the proper time, the minute hand should
be removed and adjusted.
CAUTION: When performing this operation be careful not to scratch the hand nut, hand or dial.
1. When the clock starts to chime, stop the pendulum and record the time.
2. Using pliers, carefully remove the small nut that holds the minute hand in place by turning
the nut counterclockwise while at the same time hold the minute hand with your fingers near
the small nut.
3. Remove the hand from the hand shaft by grasping it with your fingers at the point where it
attaches to the shaft. Pull the hand straight off. This hand is not screwed on and should
come off easily. The minute hand has a small raised area on the back side directly around
the shaft hole, this is the hand bushing. Using pliers, grip the bushing firmly by its sides so
that it cannot slip in the pliers. With your other hand, turn the clock hand forward or
backward the distance necessary to chime at the correct time. (See figure 9).
4. Re-attach the hand to the shaft and turn the hand nut finger tight. Make sure the hand points
to the correct location that you recorded in Step 1 plus any corrections you made in step 3.
If the hand does not point to the correct mark, repeat steps 2 and 3.
5.
Snug up the hand nut with the pliers. Do not over tighten.
6. Start pendulum.
7. Re-set the time by moving ONLY THE MINUTE HAND backwards as described in the set-up
operation.
EXAMPLE: Clock chimes at 1:10 but should chime at 1:15.
Step 1: When clock chimes at 1:10 stop the pendulum and record the time of 1:10. Step 2:
Carefully remove the small nut. Step 3: Remove the minute hand. Grip the bushing by its sides
and turn the hand forward 5 minutes. Step 4: Reattach the hand so it points to 1:15. Attach the
hand nut finger tight. Step:5 Snug up the hand nut. Step 6: Start pendulum. Step 7: Reset clock
to current time.
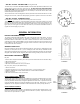
HOOK
LYRE
SPEED UP
SLOW
DOWN
ADJUSTMENT
NUT
MOVE CHIME SELECTION LEVER
ONLY WHEN MINUTE HAND IS IN
SAFE TIME AREA
SAFE
TIME
SAFE
TIME
SAFE
TIME
FIGURE 7
FIGURE 8
3
FIGURE 9
BUSHING
BA
CK SIDE OF
MINUTE HAND