
User's Guide
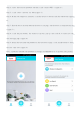
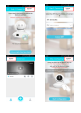
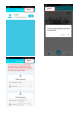


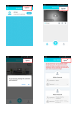
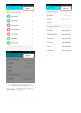
Table Of Contents

Method 2: AP (hotspot) connection (the connection mode is applicable to QJ series, WJ series products)
Step 1: open the phone Settings, select WLAN Settings, search the wireless webcam ID, and the wifi
camera ID prefix is: HOW - etc. (figure 1);
Step 2: click ID, password: 168168168, complete WLAN connection (figure 2);
Step 3: Run the application of "BlueCam" and click "+" (figure 3);
Step 4: click "LAN search" to enter the LAN search page (figure 4);
Step 5: on the LAN search page, find the device to add, then click the add button (figure 5);
Step 6: Find the added devices on the device list page, and the device displays online (figure 6);
Step 7: click the play button to pop up the security tips, and click ok to enter the user settings page
(figure 7).
Step 8: Modify the user name and password on the user-device page, click the finish button to start the
real-time view (figure 8);
Note: we strongly recommend that you set up a powerful username and password to protect your
privacy.
Step 9: on the device list page, click the Settings button (figure 9);
Step 10: click on "WIFI Settings" (figure 10);
Step 11: select the network you want to connect to and enter your password, then click the Settings
button to restart and automatically connect to the wifi network (figure 11).
Note: don't power off the device when you reboot.