
user manual

Removal and Installation
8-39
HP DesignJet CP Series Printers
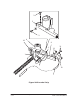
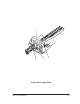
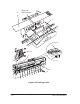
Y-Axis Belt
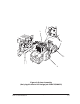
Refer to figure 13 page 8-41
Removal
Switch off the printer and remove the power cord.
1. Remove the following:
1. Window and Top Cover page 8-15.
2. Right Hand Cover page 8-21.
3. Left Hand Cover page 8-18.
The spring (item 1) in the next step is under high
tension and could spring out of the Y-axis tensioner
holder (item 2).
Caution: Cup your hand over the Y-axis tensioner holder in the
next step to avoid losing the spring.
2. To release the tension on the Y-axis belt (item 3), manually squeeze the
spring (item 1) using the tensioner wedge clip (item 4) until you hear it
click into place. If the tensioner wedge clip will not click into place,
carefully remove the spring and the tensioner wedge clip with a screw
driver.
3. Remove the Y-axis belt from the Y-axis motor pulley (item 5).
4. Remove the Y-axis belt pulley (item 6) located in the Y-axis tensioner
holder.
5. The rest of the procedure is ONLY to be performed if the Y-axis belt is
being REPLACED by a new Y-axis belt.
6. Remove the carriage assembly page 8-42
7. Remove the Y-axis belt by releasing it from the carriage assembly.