
user manual

8-45 Removal and InstallationHP DesignJet CP Series Printers
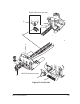
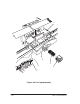
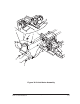
Y-Axis Motor Assembly
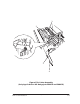
Refer to figure 16 page 8-47
Removal
Switch off the printer and remove the power cord.
1. Remove the following:
1. Window and Top Cover page 8-15.
2. Right Hand Cover page 8-21.
3. Left Hand Cover page 8-18.
4. Encoder Strip page 8-32.
5. Y-Axis belt page 8-39
2. Remove the cables from the cable clamps (item 1) on the Y-axis bracket
(item 2).
3. Remove two T-15 screws and washers installed into the Y-axis bracket
(item 3).
4. Remove the one remaining T-20 screw (item 4) which secures the Y-axis
Motor assembly (item 6) to the front slider rod (the other screw was
removed when you removed the encoder strip).
5. Disconnect the Y-axis motor cable (item 5) from the position J2 Y
MOTOR on the refill interconnect PCA (item 7).
6. Remove the Y-axis motor assembly from the slider rods.