
user manual


8-64 Removal and Installation
HP DesignJet CP Series Printers
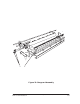
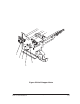
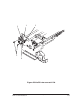
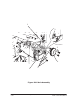
Refill Interconnect PCA
Refer to figure 23 page 8-65
Removal
Switch off the printer and remove the power cord.
1. Remove the following:
1. Left Hand Cover assembly page 8-18.
2. Remove the top half of the elevator assembly by releasing it from two
retaining clips at the back and lifting up and to the left.
3. Carefully disconnect all cables (item 4) from the refill interconnect PCA.
4. Remove the refill interconnect PCA (item 1) by removing two T-20 screws
(item 2) installed through two support rings (item 3) and into the left
hand side chassis.
Installation
1. Install two T-20 screws (item 2) through the refill interconnect PCA and
the two supporting rings (item 3) into the left hand side chassis.
2. Connect all cables (item4) to the refill interconnect PCA.
3. Install the top half of the elevator assembly by securing it to two
retaining clips at the back and push down and to the right.
4. Install the following:
1. Left Hand Cover assembly page 8-18.
5. Connect the power cord.
6. Perform the following service tests:
1. D11 Bail page 4-7.
2. D08 Sensors page 4-20.
3. D03 Carriage Axis (Y-axis) page 4-12 .
4. D06 Refill page 4-18.