HP Digital Sender 8100C Administrator Guide
2 Copyright information Warranty Safety information © Copyright Hewlett-Packard Company 2000 The information contained in this document is subject to change without notice. WARNING! Electrical shock hazard All rights reserved. Reproduction, adaptation, or translation without prior written permission is prohibited, except as allowed under copyright laws.
3 Contents 1 About the digital sender Introduction . . . . . . . . . . . . . . . . . . . . . . . . . . . . . . . . . . . . . . . . . . . . . . . . . . . . . . . 5 Environments and protocols . . . . . . . . . . . . . . . . . . . . . . . . . . . . . . . . . . . . . . . . . 6 Network operating systems. . . . . . . . . . . . . . . . . . . . . . . . . . . . . . . . . . . . . . 6 Dependency matrix . . . . . . . . . . . . . . . . . . . . . . . . . . . . . . . . . . . . . . . . . . . . 6 Features . . . . . . . . .
4 Administrator tools. . . . . . . . . . . . . . . . . . . . . . . . . . . . . . . . . . . . . . . . . . . . . . . . 36 Shutting down and restarting . . . . . . . . . . . . . . . . . . . . . . . . . . . . . . . . . . . 36 Resetting to factory defaults. . . . . . . . . . . . . . . . . . . . . . . . . . . . . . . . . . . . 37 Checking the address book database . . . . . . . . . . . . . . . . . . . . . . . . . . . . 38 Clearing the data base . . . . . . . . . . . . . . . . . . . . . . . . . . . . . . . . . . .
Introduction 1 About the digital sender Introduction The HP Digital Sender 8100C can be directly connected to TCP/IP networks. It converts black-and-white and color documents, drawings, and photographs into electronic format and distributes them directly to several types of destinations: ● e-mail addresses fax numbers ● HP JetSend-enabled printers ● The unit includes a flatbed scanner and an automatic document feeder (ADF) that can accept up to 25 pages.
6 Installing the digital sender is simply a matter of making a few connections and configuring a few network and e-mail parameters. The digital sender operates as a stand-alone unit and does not require network privileges to administer. The HP JetDirect print server (network interface card) that comes installed in the digital sender handles all protocol support for TCP/IP and SMTP automatically.
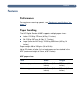
Features Features Performance For maximum scanning speeds, see “Equipment specifications” on page 71. Paper handling The HP Digital Sender 8100C supports multiple paper sizes: ● ● ● Letter: 215.9 by 279 mm (8.5 by 11 inches) A4: 210 by 297 mm (8.3 by 11.7 inches) Legal (from the ADF only): 215.9 by 355.6 mm (8.5 by 14 inches) Paper weight: 60 to 105 g/m2 (16 to 28 lb.). Up to 25 sheets of letter, A4, or legal paper can be stacked in the ADF (maximum height of 3 mm, or 0.1 inches).
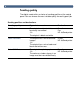
8 Sending quality The digital sender offers a choice of sending qualities at the control panel. You can choose the most suitable quality for each type of job. Sending qualities and destinations Sending quality Type of document Destinations B/W Document The original contains text that must E-mail be clearly transmitted. Fax -OrHP JetSend printer The original is black and white. Color Document The original has a mix of text and E-mail images.
Features Distribution services The digital sender is capable of distributing documents to the following types of destinations: ● e-mail addresses ● fax phone numbers (via fax Internet service) ● HP JetSend-enabled printers E-mail destinations The digital sender can send MIME-compliant e-mail messages to Internet addresses. It uses SMTP-MIME to deliver these messages. SMTP is independent of the network operating system on which your e-mail server is running.
10 Internet fax destinations Users can send faxes directly from the digital sender. They have the ability to select destinations from a fax numbers book already loaded in the digital sender, or type them at the control panel. The same document can be sent to multiple fax numbers. Sending faxes with the digital sender requires an account with a supported Internet fax provider. Visit the HP digital sender website (http://www.digitalsender.hp.
Features Security The HP Digital Sender 8100C operates as a stand-alone unit on the network. You administer each digital sender independently of any other device on the network under a password that applies only to that digital sender. The digital sender accepts three types of users: ● registered users Individuals who have created their own user profile on the digital sender. Only registered users have personal e-mail address books and lists that are accessible at the digital sender.
12 Components Hardware components The following illustrations show the digital sender hardware components.
Components Front view with ADF unit raised ADF unit (raises to reveal glass) Glass 13
14 Rear view Control panel Control panel connector cable ADF connector cable Locking lever Connector socket Control panel socket Power switch Power connector socket ADF connector socket Connector to the preinstalled network interface card
Installation process 2 Installing the digital sender Installation process See the Welcome Poster for installation and initial setup of the HP Digital Sender 8100C. This Administrator’s Guide provides much more detail on configuring the digital sender.
16 The configuration process E-Mail, I-Fax, and HP JetSend configuration After you have physically installed the digital sender, you only need to configure a few parameters to begin using it.
The configuration process Assigning an IP address to the digital sender The easiest method for assigning an IP address to the digital sender is by entering it directly at the control panel. You can also assign an IP address using a DHCP or BOOTP server. You might be more familiar with assigning IP addresses to network devices from a DHCP or BOOTP server. In this scenario, you prepare the device attached to the network, make an entry for it on the DHCP or BOOTP server, and then turn the device on.
18 Configuration Checklist Decisions needed for installation ❑ ❑ Register the digital sender. Method you want to use to assign IP address to the digital sender: manually at the control panel, or from a DHCP or BOOTP server.
The configuration process To configure parameters 1 If you have not already done so, turn the digital sender on. 2 Press SETUP (ALT+F4) from the main menu to go to the setup menu. 3 Press SETTINGS (F2) and use the arrow keys to highlight the General configuration menu from the list which appears. Press OK (F1). 4 In the configuration menu, use the arrow keys to scroll to a parameter you want to modify and then press CHANGE (F3).
20 Configure e-mail parameters After you have physically installed the digital sender, you only need to configure a few parameters to begin using the digital sender. After you have configured these parameters, you will be able to send e-mail messages and use e-mail addresses located on an LDAP server of your choosing.
The configuration process Configure I-fax parameters After you have configured the digital sender to send e-mail, you only need to configure a few additional parameters to begin sending faxes. Information for the i-fax parameters are issued by your Internet fax provider.
22 Configure extended and optional parameters Listed below are some additional parameters you can configure for extended and optional functionality (see “Configuration menu parameters” on page 26 for detailed explanations of all parameters): General configuration menu ● Admin Full Name (full name of the administrator) Language (for the control panel, if other than English) ● Date, Time, Time Zone (of the digital sender) ● Paper Size (default size for the scanning area) ● ● Allow Guest Login (either
The configuration process To add HP JetSend-enabled devices As a convenience for your users, you can add the addresses of HP JetSend-enabled printers used in your office. Users can then select from a list of HP JetSend-enabled printers rather than manually entering an IP address or DNS name. To add a HP JetSend-enabled printer to the list: Note 1 At the control panel, press PRINT (F3). 2 Type the IP address or DNS name for the HP JetSend-enabled printer you want to add, and then press .
24 Test the installation Use the following steps to verify the digital sender setup. To test the installation 1 Display the Revision page to verify that the network interface card is successfully linked to the network. The TCP/IP status parameter should read READY. To display the page, select STATUS (ALT+F3), then REVISION (F1). Press BACK (F4) to close. 2 Test the e-mail service to confirm that the digital sender can communicate through Internet e-mail.
Summary of administrator activities 3 Administering Summary of administrator activities Procedures in this chapter explain how to perform administrator activities at the control panel. Access to administrator-specific activities is blocked by the administrator password. It is recommended that administrator create a password during the setup of the HP Digital Sender 8100C.
26 Configuration menu parameters Parameters that use an IP address can show only the numeric address, even when a symbolic name has been assigned to a device. Configuration parameters on the control panel Parameter Description General Menu Administrator E-mail Administrator e-mail address (required). Up to 255 characters are allowed. Administrator Full Name Full name of the administrator. Up to 31 characters are allowed. Administrator Password Password for this digital sender.
Configuration menu parameters Configuration parameters on the control panel (continued) Parameter Description Network Menu IP Configuration To specify how the digital sender network interface card obtains its TCP/IP configuration. Choices: ● MANUAL. From the control panel. ● BOOTP (Boot Protocol) or DHCP (Dynamic Host Configuration Protocol). Automatically from the network (the IP Address, IP Subnet Mask, and IP Gateway parameters are ignored).
28 Configuration parameters on the control panel (continued) Parameter Description WINS Server Address IP address of the WINS server. Used for WINS (Windows Internet Naming Service) symbolic name resolution if you identify servers and devices on your network by network name instead of by IP address. CLEAR sets the address to 0.0.0.0. If left blank or set to 0.0.0.0, the function is disabled. E-mail Menu E-mail Server Addr. IP address of the e-mail SMTP-MIME server. CLEAR sets the address to 0.0.0.0.
Configuration menu parameters Configuration parameters on the control panel (continued) Parameter Description LDAP Search Root Basepoint (root) from which to start searches for names on the LDAP directory server. Directories are often represented in a hierarchical way using a tree. The basepoint might be a country, an organization, or other type of group. Not all servers require this information. Up to 512 characters are allowed. See the digital sender website for examples (http://www.digitalsender.hp.
30 Controlling security Changing or setting administrator password Unless a password is used, anyone can perform sensitive administrator activities. Therefore, the administrator is encouraged to create a password during the setup of the HP Digital Sender 8100C. Note The administrator password is case-sensitive. To change or set administrator password 1 Make sure the digital sender is idle. 2 At the control panel, press SETUP (ALT+F4). Then press SETTINGS (F2).
Controlling security Determining who can use the digital sender The administrator determines who can use the digital sender: either registered users (only those with a user profile) or both registered users and guest users. To determine who can use the digital sender Note 1 Make sure the digital sender is idle. 2 At the control panel, press SETUP (ALT+F4). Then press SETTINGS (F2). 3 Select the General configuration menu.
32 Obtaining status and activity information Use these tools to learn the status of the digital sender and its jobs: ● job(s) state Revision page ● Tasks page ● Job(s) state The job state screen shows the status of the last five jobs processed by the digital sender, with the latest job listed first. To view the Job(s) state screen press STATUS (ALT+F3).
Obtaining status and activity information Revision page The Revision page displays useful information about the digital sender (see the table on the next page). Use it for the following reasons: ● verify configuration settings ● verify the operating status of the network interface card ● learn the MAC address of the digital sender ● learn firmware version numbers The Revision page is in English only (even if you configure the control panel for a different language).
34 Revision page parameters Parameter Descriptions Box Version # Product version FW Ver. Version of firmware installed in the digital sender. FW Date Release date of the firmware installed in the digital sender. HP JetDirect Prd. # Product number of the network interface card: ● HPJ3113A Ethernet (10Base-T) networks HP JetDirect FW Rev. Version of firmware installed on the network interface card (G.xx.xx).
Obtaining status and activity information Revision page parameters (continued) Parameter Descriptions Log Server Addr. IP address of the host computer that receives syslog messages from the HP JetDirect print server. HP JetDirect Cfg. Indicates how the digital sender has received its TCP/IP configuration: ● DHCP Automatically from a DHCP server. ● MANUAL Manually from entries made at the control panel.
36 Notification of e-mail delivery A user can choose whether or not to receive a receipt for the delivery of an e-mail. If the user chooses to receive a receipt, the user receives a notification of e-mail delivery. If the administrator enables AutoBCC in the E-mail configuration menu, the user will receive a return copy of the message. Notes about notifications: ● E-mail notifications require that the recipients have an e-mail address configured in their user profile.
Administrator tools To shut down Note 1 Make sure the digital sender is idle. 2 At the control panel, press SETUP (ALT+F4). Then press SETTINGS (F2). 3 Select any of the configuration menus. If an administrator password is required, the HP Digital Sender 8100C Administrator’s Password dialog box appears. Type the password and press OK (F1). 4 When the configuration menu appears, press TOOLS (F2). 5 Select Shutdown and press OK (F1).
38 To reset to factory defaults 1 Make sure the digital sender is idle. 2 At the control panel, press SETUP (ALT+F4). Then press SETTINGS (F2). 3 Select any of the configuration menus. If an administrator password is required, the HP Digital Sender 8100C Administrator’s Password dialog box appears. Type the password and press OK (F1). 4 When the configuration menu appears, press TOOLS (F2). 5 Select Factory defaults and press OK (F1).
Administrator tools To check address books 1 Make sure the digital sender is idle. 2 At the control panel, press SETUP (ALT+F4). 3 Select any configuration menu. If an administrator password is required, the HP Digital Sender 8100C Administrator’s Password dialog box appears. Type the password and press OK (F1). 4 When the configuration menu appears, press TOOLS (F2). 5 Select Check Address Books and press OK (F1). 6 Confirm that you want to perform the check.
40 B/W Contrast If e-mail or i-fax documents sent by the digital sender appear too light or too dark, the problem may be solved by adjusting the contrast. Use this feature much the same way you would use a similar function on a photocopier: decreasing the contrast lightens the scan of the image, increasing the contrast darkens it. To change the contrast for sending Note 1 At the control panel, press SETUP (ALT+F4). Then press SETTINGS (F2). 2 Select any of the configuration menus.
Creating and maintaining user profiles Creating and maintaining user profiles This section contains information about user profiles that pertains to the administrator. See the user guide for details on other uses. The administrator determines who can create and modify user profiles in these ways: ● If Allow user self-registration in the General configuration menu is on, users can create and modify their own profile. The administrator can see and modify any user profile, including user passwords.
42 To change a user profile 1 At the control panel, press SETUP (ALT+F4). Then press USERS (F1). 2 If an administrator password is required, the HP Digital Sender 8100C Administrator’s Password dialog box appears. Type the password and press OK (F1). 3 Select a name in the list of users by using the arrow keys or type the profile name in the Users field and press MODIFY (F3). 4 Modify the name, e-mail address, password, and password confirmation, pressing ENTER after each field.
Working with address books Working with address books This section contains information about address books that pertains to the administrator. The administrator maintains these categories in the LISTS option of the SETUP (ALT+F4) menu: ● Public E-mail Lists Contains predefined groups of e-mail addresses available to any user. Only the administrator can change information in this address book. ● Public E-mail Addresses Contains e-mail addresses available to any user.
44 Maintaining the Public Lists address book Only the administrator can change information in the Public Lists address book. To add a list to the Public Lists address book 1 Press SETUP (ALT+F4), then LISTS (F3). 2 Select Public E-mail Lists. 3 If an administrator password is required, the HP Digital Sender 8100C Administrator’s Password dialog box appears. Type the password and press OK (F1). 4 Type the name for the distribution list. 5 Press ENTER. 6 Press OK (F1) to add the new list.
Working with address books To add addresses to a distribution list 1 Press SETUP (ALT+F4), then LISTS (F3). 2 Select Public E-mail Lists. 3 If an administrator password is required, the HP Digital Sender 8100C Administrator’s Password dialog box appears. Type the password and press OK (F1). 4 Select the distribution list you want to edit. 5 Press OK to modify the list. 6 Type an address to add to the list and press ENTER. 7 Edit the information for the address and click SAVE (F1).
46 Maintaining the Public E-mail address book Only the administrator can change information in the Public E-mail address book. To add an address to the Public E-mail address book 1 Press SETUP (ALT+F4), then LISTS (F3). 2 Select Public E-mail Addresses. 3 If an administrator password is required, the HP Digital Sender 8100C Administrator’s Password dialog box appears. Type the password and press OK (F1).
Changing the contrast level of the LCD Maintaining user lists and addresses To add, modify, or delete the addresses and lists for a particular registered user, follow the procedures in “Maintaining the Public E-mail address book” on page 46 and “Maintaining the Public Lists address book” on page 44 with the following provisions: ● ● Select User’s E-mail Lists or User’s E-mail Addresses from LISTS. Between steps 3 and 4, enter the user name.
48 Upgrading the digital sender firmware If you register with the digital sender website (http:// www.digitalsender.hp.com), you will be notified by e-mail when a firmware upgrade is available for the digital sender. Notes about the procedure: ● When you upgrade the digital sender firmware, you replace the existing firmware image with one or more new files. ● The digital sender is locked from use until the upgrade has finished. ● This procedure causes the digital sender to shut down and restart.
Backing up and restoring the digital sender Backing up and restoring the digital sender The Backup and Restore utilities save and recover the configuration of all personal and public address books, and the configuration of the digital sender. These utilities are stored in the \Utility folder on the product CD and must be installed on a computer on the same network as the digital sender. To install the Backup and Restore utilities Note 1 On the product CD, browse to the Utilities folder.
50 Restoring the digital sender Use this procedure: Note ● After initializing the address books ● After performing a Restore to factory defaults ● When instructed to do so by HP Customer Support This procedure will erase any changes made to the address books and configurations since a backup image was created. To restore the digital sender Note 1 Make sure the computer you are using has the Backup and Restore utilities installed.
Cleaning the digital sender Cleaning the digital sender Digital Sender glass When to clean: ● ● as necessary when vertical streaks appear on electronic forms of sent documents To clean the glass Clean the glass surface gently using a soft cloth. Do not press hard on the glass surface (you could break the glass). You may dampen the cloth with water, isopropyl alcohol, or window cleaner, if necessary. CAUTION Do not use other cleaning fluids. They may damage the digital sender.
52 ADF When to clean: 1 2 4 5 ● if paper documents in good condition begin to mis-feed ● when vertical streaks appear on electronic forms of sent documents To clean the ADF 1 Raise the control panel access hatch. 2 Wipe the rollers and separation pad with a soft, clean, lint-free cloth. You may dampen the cloth with isopropyl alcohol, if necessary. 3 Close the access hatch. Be sure it snaps down on both sides. 4 Raise the input tray.
Cleaning the digital sender 6 1 6 Check the flat gray bar above the ADF window. The bar should have no black or other markings. If necessary, clean the flat gray bar. 7 Raise the output tray. 8 Wipe the bottom of the ADF window (the clear plastic window) with a soft, clean, lint-free cloth. You may dampen the cloth with water, isopropyl alcohol, or window cleaner, if necessary. 9 To eliminate vertical streaks, clean the flatbed glass, especially near the top of the glass.
54
Sources for information about problems 4 Troubleshooting Sources for information about problems Sources for information about problems Source Description Control panel messages Messages on the control panel display when there are problems. See “Control panel messages” on page 56 for a list of messages and recommended actions. Job(s) state This screen reveals the status of the last five jobs processed by the digital sender. See “Job(s) state” on page 32 for details.
56 Troubleshooting the digital sender General digital sender troubleshooting Use the table in the user guide to solve common problems encountered while using the digital sender. Contact HP customer support (see page 67) if the actions suggested there do not resolve the problem. Control panel messages The following table lists the messages the control panel might display which may require the administrator’s attention. The table also lists the cause of the message, and recommended actions.
Troubleshooting the digital sender Control panel messages (continued) Message Description Actions The e-mail configuration is inconsistent. Please check. There is a problem with the e-mail configuration. ● Using the E-mail configuration menu, The e-mail function isn’t configured. Please contact the administrator or refer to the documentation. There is a problem with the e-mail configuration. ● See “Configure e-mail parameters” on E-mail server not available. Contact the administrator.
58 Control panel messages (continued) Message Description Actions Invalid credentials. Check account name and password. ● Use the E-mail configuration menu at the The account name and password that have been control panel to change the account name configured for authenticating and password. LDAP searches are invalid. Invalid password. Press any key to retry. The digital sender did not recognize the password you entered. ● Press any key and then retype the password.
Troubleshooting the digital sender Control panel messages (continued) Message Description Actions ● Try again later. The LDAP server is currently There is a problem with unreachable. Contact the either the LDAP server or the ● Check that all cabling is securely administrator. network. connected. ● Using the Network and E-mail configuration menus, make sure you have correctly configured all TCP/IP addresses, the LDAP server name, and (optionally) the LDAP port number.
60 Control panel messages (continued) Message Description Search error. ● Try the search again. An unexpected problem occurred in the LDAP search ● Turn the digital sender off and then back (for example, memory on. shortage, or problem with the ● If the problem persists, contact network link or LDAP server). HP customer support. Sorry, you have typed an incorrect password. Please retype your password. The digital sender did not recognize the password you typed.
Troubleshooting the digital sender Internal error message descriptions and actions Code Description Actions NOTE Every internal error message has a code associated with it. Use the code to locate the description and action. 5,xxxxx Internal software or hardware problem. ● Turn the digital sender off and then back on. ● Verify control panel access hatch is snapped into place. ● Verify all cables are seated securely. ● If the problem persists, note the code and contact HP customer support.
62 Troubleshooting network problems Network interface card troubleshooting Several parameters on the Revision page provide helpful information about the print server. In particular, the TCP/IP status parameter indicates whether the print server is actively connected to the network or whether an error condition exists. See “Revision page” on page 33 for a description of all parameters and for steps on how to access the Revision page.
Hewlett-Packard limited warranty statement 5 Warranty and support information Hewlett-Packard limited warranty statement HP PRODUCT HP Digital Sender 8100C DURATION OF WARRANTY One year 1 HP warrants HP hardware, accessories, and supplies against defects in materials and workmanship for the period specified above. If HP receives notice of such defects during the warranty period, HP will, at its option, either repair or replace products which prove to be defective.
64 6 Note Warranty does not apply to defects resulting from improper or inadequate maintenance or calibration, software, interfacing, parts or supplies not supplied by HP, unauthorized modification or misuse, operation outside of the published environmental specifications for the product, or improper site preparation or maintenance.
Hewlett-Packard Year 2000 warranty Hewlett-Packard Year 2000 warranty Subject to all of the terms and limitations of the HP Limited Warranty Statement provided with this HP Product, HP warrants that this HP product will be able to accurately process date data (including, but not limited to, calculating, comparing, and sequencing) from, into, and between the 20th and 21st centuries, and the year 1999 and 2000, including leap year calculations, when used in accordance with the Product documentation provided
66 Replacement parts and accessories You can obtain replacement parts for your HP Digital Sender 8100C by contacting your sales representative or your Hewlett-Packard dealer.
HP customer support options worldwide HP customer support options worldwide You can call HP for support using the table below. For all other support information, such as obtaining printer drivers or help using an online server, see “HP support” on page 69. Customer Support and Product Repair Assistance for the U.S. and Canada (See the administrator guide for additional product repair information.) Call (1) (208) 323-2551 in the U.S.
68 All other countries worldwide: Use the telephone number below for your country to obtain support during the warranty period.
HP support HP support Online services: for 24-hour access to information over your modem, we suggest these services: World Wide Web URL - Firmware upgrades, printer drivers, updated HP printer software, plus product and support information may be obtained from the following URLs: for HP Digital Sender 8100C http://www.digitalsender.hp.com in the U.S. http://www.hp.com in Europe http://www2.hp.com Printer drivers may be obtained from the following sites: in Japan ftp://www.jpn.hp.
70
Equipment specifications A Specifications Equipment specifications Feature Description Product type ● Flatbed and sheetfed Scanning element ● Charged-coupled device Light source ● Cold Cathode Fluorescent Lamp (CCFL) Interface ● Ethernet 10BaseT Optical resolution ● 600 dpi (dots per inch) Maximum scanning speed ● B/W sending quality: 4 pages per minute ● Color sending quality: 3 pages per minute ● Photo sending quality: 3.
72 Feature Description Keypad ● ● ● ● Scan engine ● Full-color and grayscale ADF (automatic 40-key alphabetic keypad 12-key numeric keypad Help key Simplex/duplex key for single-sided or doublesided scanning ● Green “go” button and red “stop” button ● 4 context-sensitive function keys document feeder) and flatbed scans ● Image calibration ● Color and tonal adjustment ● Data scaling and enhancement Automatic document feeder (ADF) ● ● ● ● ● 25-page capacity High feeding accuracy and reliability Vari
Environmental ranges Environmental ranges Temperature Operating 10 to 35° C (50 to 95° F) Storage -40 to 60° C (-40 to 140° F) Humidity CAUTION Operating 10 to 80% noncondensing (10 to 35° C) Storage 0 to 90% The operating environment should be stable, with no abrupt changes in temperature or humidity, or your digital sender might be damaged. If you move the digital sender from a cold to a warm environment, wait about two hours before using it.
74 Supported capabilities Operating capabilities Description Maximum Multiple selections at control panel (combination of each individual e-mail address and each distribution list) 128 Destinations for an e-mail message (combination of all individual e-mail addresses and all addresses in selected distribution lists) 1,024 Destinations for a fax transmission 1,024 Characters in a telephone number 80 Memory capabilities Description Users Public e-mail addresses Fax numbers Maximum 4,096 200,000 2,
Declarations of Conformity Declarations of Conformity EU Declaration of Conformity According to ISO/IEC Guide 22 and EN 45014 Manufacturer’s Name: Hewlett-Packard Company Manufacturer’s Address: Greeley Hardcopy Division 700 71st Avenue Greeley, Colorado 80634 USA Declares that the product Product Name: Model Numbers: Product Options: HP Digital Sender 8100C C7707 (may contain suffix) C7707 Conforms to the following specifications: SAFETY IEC 950:1991+A1:1992+A2:1993+A3:1995+A4:1996 EN 60950:1992 +A
76 FCC Declaration of Conformity Manufacturer’s Name: Hewlett-Packard Company Manufacturer’s Address: Greeley Hardcopy Division 700 71st Avenue Greeley, Colorado 80634 USA Contact Person: Telephone: Product Name: Model Numbers: Product Options: GHC Regulatory Manager 970-350-5600 HP Digital Sender 8100C C7707 (may contain suffix) C7707 This equipment has been tested and found to comply with the limits for a Class B digital device, pursuant to Part 15 of the FCC rules.
German noise declaration German noise declaration Geräuschemission LpS <70 dB am Arbeitsplatz normaler Betrieb nach DIN 45635 T. 19 Die Daten sind die Ergebnisse von Typprüfungen.
78
79 Index Symbols .
80 Index C capacity of ADF 7 cards,connector to network interface 14 changing administrator password 30 contrast 40 user profiles 41 characters,maximum number of 74 checking the address book database 38 checklist for configuration 17 cleaning ADF 52 device 51 scanner glass 51 clearing,address book database 39 codes for backing up and restoring 50 internal messages 61 Collisions parameter 34 Color Document,sending quality 8 color,sending 8 Color-B/W Photo sending quality 8 components hardware 12 software 24
81 Index distribution lists adding addresses 45 deleting addresses 45 maintaining 44 maximum number of destinations 74 distribution services 9 DNS (Domain Name System) configuration problem 56 support 9 DNS Domain parameter 27 DNS Server Address parameter 27 document input tray 12 document lever 12 document output tray 12 documentation,part numbers 66 documents,sending color 8 dots per inch (dpi), resolution 71 dpi (dots per inch), resolution 71 drivers, printer 69 duty cycle 71 E e-mail address book descr
82 Index HP JetDirect printer servers connector to card 14 firmware version installed 34 ID 35 not responding 58 product number installed 34 timeout 35 troubleshooting 62 HP JetDirect Timeout parameter 35 HP JetSend,configuring devices 23 HP Smart Compression Imaging Technology 71 HP Support Assistant compact disc 69 HP Web JetAdmin 24 humidity, specifications 73 I ID, HP JetDirect printer server 35 I-fax configuration problem 57 configuring 16 configuring at control panel 21 dependencies 6 fax file format
83 Index messages control panel 56 internal error 61 network error 59 MIME support 9 minimum configuration 16 paper size in ADF 7 modes,sending 8 modifying,user profiles 41 Multi-Boot Ver.
84 Index protocols dependency on 6 supported 6 used for e-mail 9 Public E-Mail address book adding addresses 46 deleting addresses 46 description 43 maintaining 46 maximum number of addresses 74 maximum number of lists 74 public lists adding lists 44 deleting lists from 44 maintaining 44 Public Printers address book,maximum number of printers 74 Q quality B/W Document 8 Color Document 8 Color-B/W Photo 8 quality modes 8 queue,jobs in 32 R Reader,website 9 Ready status 34 receipts,e-mail delivery 36 Receive
85 Index starting the digital sender 36 status device 32 job 32 stopping the digital sender 36 storage humidity specification 73 temperature 73 SUBJECT field in e-mail messages 28 subnet mask for IP address 27 on self-test page 34 parameter 34 supplies and accessories ordering 66 warranty 63 support agreements 69 support and service language options 67 options worldwide 67 Support Assistant compact disc 69 supported .
86 Index WINS (Windows Internet Naming Service),configuration problem 61 WINS Server Address parameter 28 World Wide Web support service 69 worldwide, support options 67 WWW support service 69 Y Y2K warranty 65 year 2000 warranty 65