Agent Desktop / Laptop – New or Replacement Installation Instructions Version 2/12/2009 Agent Desktop / Laptop Installation Instructions Version 2/12/2009 NOTE: There are several steps in these procedures where the machine can be corrupted, which will cause significant impact and delay to the install of the machine. Follow these instructions very carefully. The following pages are to be followed by State Farm approved Installers or CEs only.
Agent Desktop / Laptop – New or Replacement Installation Instructions Version 2/12/2009 Summary of Changes Version 9/20/2007 Changes • • • • • • • • • NC6400 Laptop is incorporated Install the DVI / VGA adapter for HPDC7700 desktops Updates to the Agent Drop Sheet (Appendix C) Illustrations on Page 13 Critical Note: “Peripherals are attached and working properly” – Page 21 Section breaks added for readability Numbering of steps for readability NC6400 requires a new docking station/Kensington cable Automa
Agent Desktop / Laptop – New or Replacement Installation Instructions Version 2/12/2009 Version 1/12/09 Changes In Section 3, part 1 “Workstation Installation” (Customization) • • 2/12/09 Under step #2 “Enter Machine Name (If this is a replacement system, use the WAWxxxxx name from the machine you are replacing).” Updated this step to “Enter new workstation name from label provided with the new laptop/desktop.” Any other references that reflected this change were updated.
Agent Desktop / Laptop – New or Replacement Installation Instructions Version 2/12/2009 Table of Contents: Section: Title: Pages: 1 Data Backup Process 5-8 2 Hardware Setup (New / Break-Fix / Move) 9-12 3 Workstation Installation Part 1 (Customization) 13-15 3 Workstation Installation Part 2 (Tailoring and Catch-Up) 16-17 4 Peripheral Installation / Move (Self-Install Utility) 18 5 Office Verification (Agent/Staff Logon) 19 -20 6 AS / TS Installers Guide to Map Network Drive 21 Appe
Agent Desktop / Laptop – New or Replacement Installation Instructions Version 2/12/2009 Section 1 - Data Backup Process These steps must be performed prior to replacing or reloading a workstation, unless the system is unable to be powered on or properly booted and logged into. This section may be skipped if you are performing an Agent Office Reassignment or Peripheral Move. For these two efforts, open to Section 4 for Peripheral Installations or Appendix A - for Office Reassignments.
Agent Desktop / Laptop – New or Replacement Installation Instructions Version 2/12/2009 16. Click on the NEW FOLDER and press “F2” to rename it 17. Change the name to PSGWIN and press “Enter” 18. The RELOADBACKUP folder should now contain four folders named: Desktop, Favorites, Quicken, and PSGWIN. Step 3: Backup Desktop 1. In the H:\RELOADBACKUP folder, open the folder Desktop folder 2. Click on “Start” and then “My Computer” 3. Double click on C: drive 4. Double click on “Documents and Settings” 5.
Agent Desktop / Laptop – New or Replacement Installation Instructions Version 2/12/2009 Step 4: Backup Favorites 1. In the H:\RELOADBACKUP folder, open the folder Favorites folder 2. Click on the window with the users’ alias\ (desktop) folder open 3. Click the “Back arrow” button at the top of the window 4. Locate the users’ folder “FAVORITES” and double click on it 5. Click “Edit” to activate the drop down menu 6. Click on “Select All” 7. Click on “Edit” (again) 8. Click “Copy” 9.
Agent Desktop / Laptop – New or Replacement Installation Instructions Version 2/12/2009 If Quicken is not located in My Documents (i.e. Program Files\Quicken), go to “File” and choose “Backup.” Verify that the correct file is listed in the “File To Back Up” section. Click on the “Browse” button in the “Back Up Location” section and browse to the H: drive and then the ReloadBackup\Quicken folder. Click “OK” to backup the Quicken data. Repeat these steps for all Quicken data files used on this machine.
Agent Desktop / Laptop – New or Replacement Installation Instructions Version 2/12/2009 Section 2 - Hardware Setup (New and Replacements) This section is divided into two separate areas: one for laptops and one for desktops. Prior to going to the area for your install, please verify the following steps have been performed: • • • • • Section 1: Data Backup has been performed if this is a replacement system. Verify with the user of the workstation, which is being replaced, that the data has been backed up.
Agent Desktop / Laptop – New or Replacement Installation Instructions Version 2/12/2009 New System 1. Unbox the new DC7100 / DC7600/DC7700 or DC7800 workstation. a. Open the box and remove the keyboard, mouse, power cord, and computer. b. Place the computer on the desk at this workspace. NOTE: The DC7100 / DC7600 / DC7700 /DC7800 have fans in the front of the system for cooling. Do NOT cover the front ventilation holes. c.
Agent Desktop / Laptop – New or Replacement Installation Instructions Version 2/12/2009 Replacement System 1. Before packing up the old Laptop and/or Docking Station, make sure the agent has: • Undocked the NC6910 that is being replaced and set it aside • Unplugged all peripherals from the laptop or docking station. 2. Insert the new NC6910 into the docking station. ** Connect only the monitor, keyboard, mouse, and Ethernet cables, at this time.
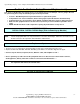
Agent Desktop / Laptop – New or Replacement Installation Instructions Version 2/12/2009 4. Remove the three (3) screws from the panel on the bottom, right, of the docking station as shown: Remove these screws Cover removed Proper alignment to install 5. Insert the security cable key into the cable lock and align the T-bar on the cable head with the two round projections on each side of the T-bar, so these align with the slot in the docking station.
Agent Desktop / Laptop – New or Replacement Installation Instructions Version 2/12/2009 Section 3 – Part 1: Workstation Installation (Customization) ** STOP - Please read the next steps completely before proceeding. Failure to follow correctly may cause significant delays in the successful installation of the machine. ** Note: Using steps in this section, you can install multiple computers simultaneously. Make sure all steps for each section are performed on each computer.
Agent Desktop / Laptop – New or Replacement Installation Instructions Version 2/12/2009 • If the machine fails to sync, you may get the following screen: • Check the date and time for accuracy. If correct, click “Yes.” If incorrect, click “No,” and adjust the date and time in the BIOS. • Machine will reboot – If you get this message a second time, click “YES.” To enter the BIOS, Press F10 on the DC7100/DC7600/DC7700 /DC7800 while booting. Time/Date cannot be set in the BIOS on NC6910. 2.
Agent Desktop / Laptop – New or Replacement Installation Instructions Version 2/12/2009 • There are some possible error messages that may occur during this step: 1. The Security on this machine has not been set correctly.” (Click “OK”) 2. “Would you like to attempt to reapply workstation security”? (Click “Yes”) This will be allowed three times before Message 3 is displayed. 3.
Agent Desktop / Laptop – New or Replacement Installation Instructions Version 2/12/2009 Section 3 - Part 2: Tailoring and Catch-Up 1. When the computer returns to the Ctrl-Alt-Delete login screen, you will need to change the domain by following these steps: • • • Press Ctrl-Alt-Delete and click “OK” on the next screen. Click on “Options” and choose the AGCY domain in all states (including California). Once you select the domain, you will then need to log onto the computer with your userid and password.
Agent Desktop / Laptop – New or Replacement Installation Instructions Version 2/12/2009 14. Click on “Start,” “Run,” and Type \\server name\CCUTILS\BKDirRename.BAK and then click OK. • Enter the old computer when prompted, then click “Submit” • The box will close when completed successfully.
Agent Desktop / Laptop – New or Replacement Installation Instructions Version 2/12/2009 Section 4 - Peripheral Installation / Move Self Install Utility (SIU) To install printers, scanners, MFD / All-In-One devices and other peripherals, you will use the Self-Install Utility (SIU). The following devices are installed via the SIU tool. Unless noted, SIU will install automatically.
Agent Desktop / Laptop – New or Replacement Installation Instructions Version 2/12/2009 Section 5 - Office Verification (Agent/Staff Logon) Upon completion of these steps, all agents and staff members should be able to logon to their workstations and access their H, W, and S Drives. For recently appointed offices, the users may receive “access denied errors.” These errors should go away within 24 hours of activation.
Agent Desktop / Laptop – New or Replacement Installation Instructions Version 2/12/2009 Setting Beginning of Day (BOD) Printer — It is recommended to set BOD to print to the LJ2430 as follows: • Have staff members go into their ECHO environment to the Main Table of Contents. • Choose “Option 9 - Tailoring Your Computer.” “Choose Option 10 - Printer Information.” • The next screen will list the “Beginning of Day Workstation.” Normally, the server name is listed to go to the “Server System Printer.
Agent Desktop / Laptop – New or Replacement Installation Instructions Version 2/12/2009 Section 6 – AS / TS Installers Guide to Map Network Drive • Use an AI / AE userid built in the STATEFARM Domain. • Your AI / AE userid password must be 14 characters long. • You must manually map the H:, N:, and S: drives when logging into a server or a laptop. 1. To map a network drive, Click Start and Right Click on My Computer and select Map Network Drive 2.
Agent Desktop / Laptop – New or Replacement Installation Instructions Version 2/12/2009 Appendix A: Agent Reassignment (Agent Moves) NOTE: The following agent reassignment procedures are to be used when the agent code has changed. 1. Press Ctrl-Alt-Delete and then click “OK” on the next screen that appears. 2. Click on “Options” and choose the AGCY domain in all states (including California), and then log onto the computer with your userid and password.
Agent Desktop / Laptop – New or Replacement Installation Instructions Version 2/12/2009 Agent Drop Sheet – Leave with Agent While we make every effort to ensure that the new machine has been brought back up to full operating status, we ask that you perform the following steps for all machines in your office. For workstation replacements: If a “Restore” window appears, please allow up to 10 minutes for restore to complete. 1. Login/logoff and then log back in to the workstation.