1 Online Topics HP Photosmart eStation C510 series - Print Apps...............................................................................................................3 HP Photosmart eStation C510 series - Description of the External Parts of the Product....................................................3 HP Photosmart eStation C510 series - Use the Removable Display...................................................................................
Contents 2
1 Online Topics HP Photosmart eStation C510 series - Print Apps You can use your printer to browse and print content without a computer. The new HP Photosmart eStation opens up a whole new world of internet printing—right from your printer. The enhanced HP Touchsmart display makes it easy to print your favorite web content without a PC. Choose from a wide variety of Apps or even create your own, and produce impressive photos and everyday prints from anywhere.
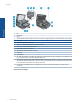
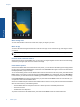
Chapter 1 Online Topics • 4 1 Lid 2 Lid backing 3 Glass 4 The HP eStation Zeen (also referred to as the removable color graphics display, the removable display, or the display).
• Headphone connector 17 Memory card slot for Secure Digital cards 18 Volume up 19 Volume down 20 Speaker 21 Docking connector 22 USB connector: For use when the display is undocked 23 Power connector: For use when the display is undocked 24 Power button 25 Wireless antenna Online Topics 16 Secondary display behind the removable display 26 Cancel 27 Copy Black 28 Copy Color 29 Paper Feed 30 Attention light 31 Docking connector for the removable display HP Photosmart eStati
Chapter 1 • Top and rear views of the printer Online Topics 32 Printhead assembly 33 Cartridge access area 34 Model number and ink selectability label location 35 Rear USB port 36 Power connection (Use only with the power adapter supplied by HP.) 37 Two-sided printing accessory HP Photosmart eStation C510 series - Use the Removable Display This product’s removable display is also known as the HP eStation Zeen, or Zeen.
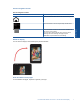
Use the navigation controls Use the navigation controls Feature Feature Description Touch this button to return to the Home screen from anywhere. Touch this button to move to the previously-viewed screen. Online Topics Touch this button to show the menus that are available from the screen you are viewing. Touch the menu button from the Home screen to see the following sub-menus: Manage Homepage, System Notifications, System Dashboard, and Settings.
Chapter 1 Online Topics Move through lists To view contents below or above the screen area, swipe your finger up or down. Move an app Touch the tab above the Apps Favorites bar to view all of the apps. Touch and hold an app, then drag it to where you want it. NOTE: The only app you cannot move or remove is the Printer app; it must always be in the Apps Favorites bar.
Online Topics Manage your Home screen You can customize the widget area of your Home screen pages, add new pages, and rearrange pages. Manage the widget area You can customize the widget area of your Home screen pages by placing items of different sizes from the Widget Library onto the 4 by 4 grid. The product comes with three Home screen pages already populated. You can add up to five more for a total of eight Home screen pages.
Chapter 1 View the Widget Library To view the Widget Library: 1. Touch the Widgets app, and then touch OK. 2. Swipe left and right with your finger to see all available widgets. The grid space that each widget covers is shown in the small grid to the right of the widget icon in the Widget Library. NOTE: You can also access the Manage Widgets screen/Widget Library by touching the Menu button and selecting Manage Home screen, or by tapping the last (empty) home screen page. 3.
To add a new Home screen page: Online Topics 1. From the Home screen, swipe your finger to the left, past each of the Home screen pages, until the empty page appears. 2. Tap the empty Home screen page, and then touch OK to display the Manage Widget screen with the Widget Library. 3. Press and hold a widget from the Widget Library, then drag it to the empty page to start populating the widget area of a new Home screen page.
Chapter 1 Online Topics 4. When you are finished making changes, touch Done to save the changes and return to the Home screen. NOTE: You can also access the area for adding a new Home screen page using the Widget App, or by touching the Menu button and selecting Manage Home screen. Remove a Home screen page To remove a Home screen page: 1. Remove all of the items in the widget area. 2. Touch Done to save your changes and return to the Home screen.
Online Topics Manage your apps Your apps are stored in the App Favorites bar and the App Drawer. You can rearrange, add, sort and delete apps. You can also add Web Bookmarks to your App Drawer. View all apps in the App Drawer Touch the tab at the top of the App Favorites bar to open the App Drawer. Add apps To add a new app, open the App Drawer and touch Add More at the bottom of the screen. Choose from any of the available apps.
Chapter 1 NOTE: Make sure you have an internet connection to the HP eStation Zeen before attempting to add an app. Sort apps Apps in the App Drawer can be sorted alphabetically or by category. If you sort by category, the apps are grouped by Apps, Print App, and Bookmarks. To sort apps: 1. Open the App Drawer and touch Browse By at the bottom of the screen. 2. Touch Alphabetical or Category to select the sorting option you would like.
Online Topics Date and time settings Touch Date & Time Settings on the upper right of the System Dashboard screen. You can set the date, time, time zone, time format, and date format.
Chapter 1 Wireless settings for the HP eStation Zeen and the main printer Touch Wireless Settings on the Display Wireless bar or Printer Wireless bar on the System Dashboard screen. Use the wireless settings to connect the HP eStation Zeen and the main printer to a wireless network, and to check the connection status. If the HP eStation Zeen is removed from the main printer, they may be connected to different wireless networks.
Sync the HP eStation Zeen and the main printer to the same wireless network When both the HP eStation Zeen and the main printer are in range of the same wireless network, they can both be connected to it, and can communicate with each other through that network. To sync them, touch Sync Networks in the Wireless Settings screen. Delete a wireless network from the list of available networks View the battery power status Look at the Power area on the System Dashboard screen.
Chapter 1 To adjust the volume of music and videos that are played on the HP eStation Zeen, touch the plus (+) or minus (-) controls next to Media Volume. To adjust the volume of the printer sounds, touch the plus (+) or minus (-) controls next to Printer Volume. You can also use the volume buttons on the back of the display to control the volume.
Get device information Look through the options in the About Device screen to learn more about the HP eStation Zeen. To display the About Device screen: 1. Touch More Settings at the bottom of the System Dashboard screen. 2. Touch About Device. View System Notification details When you view the home screen, the display notifies you of various status conditions with small symbols on the left side of the Notifications bar.
Chapter 1 account, simply touch the Bookstore app, touch the Account icon in the menu bar and enter your login information. When you log in to an existing account, all of your previous purchases are available in this eReader. Register for your free HP Barnes & Noble eBookstore account 1. Make sure you have a wireless connection and an active internet connection to the HP eStation Zeen. 2. Touch the Bookstore app. 3. Touch the Account icon in the menu bar. 4. Touch Create an Account. 5.
3. Purchase an individual issue, or subscribe to the newspaper. When you purchase a newspaper subscription, you have a 14-day free trial. Your first subscription billing occurs 14 days after your subscription begins. You can cancel your subscription any time during those 14 days by using the Account screen or by logging into your Barnes & Noble account online.
Chapter 1 Expired – This is a book you previously borrowed from your friend but did not return. After 14 days it is automatically returned and marked "Expired". Lent – This is a book that is currently lent to a friend. You cannot read this book while this is lent. Use the eReader Page through a publication Tap on the right side of the screen or swipe right to left to page forward, and tap on the left side of the screen or swipe left to right to page backwards.
9. Now you can safely remove the mini USB cable from the HP eStation Zeen and from your PC. 10. On your HP eStation Zeen, touch the Files app. Touch the Digital Editions folder to find the book you just copied. Touch the book to open and read it. HP Photosmart eStation C510 series - Use the Apps When you purchase this product, a number of apps are provided in the App Favorites bar and the App Drawer. This section describes each of these default apps.
Chapter 1 Apps available in the App Drawer (continued) App Icon App Description Browse Touch this app to browse and print from the web. TIP: While viewing a web page, you can make a clipping by touching More, then Clip Web Page. Open the Clippings app to view and print your clippings. Clippings Touch this app to view and print the text and image clippings you make from documents, email, and web sources.
Apps available in the App Drawer (continued) App Description Slideshow: View a slideshow of all images in this album, rotate and crop an image, delete an image, and email an image. More: Set an image as the unlock screen background, and view image details (including the file name, file type, when taken, album name, and location). HP Support Web Link Touch this app for a shortcut to the HP Support web site, where you can get more information about your HP product and get help.
Chapter 1 Apps available in the App Drawer (continued) App Icon App Description Screensaver Touch this app to control the screensaver settings. You can use these settings to display a slideshow of all of your SD card photos as a screensaver. Settings Touch this app for a quick shortcut to the Settings screen, where you can access the device settings. For information about using the device settings, see the “Use the Removable Display” topic.
When you use eFax®, your document is scanned by the printer, sent wirelessly to eFax's® server, and then on to the receiving fax number. To use the eFax® brand service, the printer must have an internet connection and Web Services must be enabled so the printer can communicate with eFax's® server. Before you can use eFax® with your printer, you must perform the simple setup procedures described below.
Chapter 1 4. Enter the fax number on the keypad and touch Continue. Your document is scanned. When scanning is complete, you are asked if you have more pages to fax. 5. If you have more pages to fax, touch Yes, remove your first original from the scanner glass and replace it with the next one. OR If you do not have more pages to fax, touch No. Your fax is sent. Once it has been successfully sent to eFax's® server, you are notified with a message. Touch OK to acknowledge the message and continue.
c. Slide stack of paper forward until it stops. Online Topics NOTE: If the photo paper you are using has perforated tabs, load photo paper so that tabs are closest to you. d. Slide paper-width guide until it stops at edge of paper. e. Lower photo tray lid. 2. Load A4 or 8.5 x 11 inch paper a. Open main tray. b. Slide paper-width guide. c. Remove all paper from the main input tray. d. Load paper. Slide paper-width guide until it stops at edge of paper.
Chapter 1 e. Close main tray. 3. Load envelopes a. Open main tray. b. Slide paper-width guide. Online Topics c. Remove all paper from the main input tray. d. Insert one or more envelopes into far-right side of main input tray, with envelope flaps on left and facing up. e. Slide stack of envelopes forward until it stops. f. Slide paper-width guide against stack of envelopes until it stops. g. Close main tray. HP Photosmart eStation C510 series - Print Documents Print from a software program 1.
4. If you need to change settings, click the button that opens the Properties dialog box. Depending on your software program, this button might be called Properties, Options, Printer Setup, Printer, or Preferences. NOTE: When printing a photo, you must select options for the specific photo paper and photo enhancement. 5. Select the appropriate options for your print job by using the features available in the Advanced, Printing Shortcuts, Features, and Color tabs. 6.
Chapter 1 11. In the Basic Options area, select a high print quality, such as Best, from the Print Quality drop-down list. NOTE: To achieve the highest resolution, you can use the Maximum dpi setting with supported types of photo paper. If Maximum dpi is not listed in the Print quality drop-down list, you can enable it from the Advanced tab. 12.
HP Photosmart eStation C510 series - Scan to a Computer Scan to a computer 1. Load the original. a. Lift the lid on the product. Online Topics Lift the lid b. Load the original print side down on the right front corner of the glass. Load the original c. Close the lid. 2. Touch the Printer App icon on the Home screen. Touch Scan. a. Touch Computer. If the product is network-connected, a list of available computers appears. Select a computer to start the scan. b. Choose a Resolution for your scan.
Chapter 1 HP Photosmart eStation C510 series - Scan to a Memory Card Save a scan to a memory card 1. Load the original. a. Lift the lid on the product. Lift the lid Online Topics b. Load the original print side down on the right front corner of the glass. Load the original c. Close the lid. 2. Insert a memory device.
NOTE: The memory card slot accepts the following devices: MultiMediaCard (MMC), Secure MultiMedia Card, MMC Mobile (RS-MMC; adapter required), Secure Digital (SD), Secure Digital Mini, Secure Digital High Capacity (SDHC), or TransFlash MicroSD Card (adapter required). 3. Touch the Printer App icon on the Home screen. Touch Scan. a. Touch the Memory Card icon. b. Choose a Resolution for your scan. Select Low (200 dpi) or Medium (300 dpi) or High (600 dpi). c. Touch Scan.
Chapter 1 b. Load the original print side down on right front corner of glass. Load original Online Topics c. Close the lid. 3. Touch Printer App on the Home screen. a. Touch Copy. b. Touch Settings. c. A list of copy settings appears. d. Select copy options, quality, paper size, paper type, and enhancements or set new defaults. Options include • Color or Black and White • Two-sided printing (On or Off) • Number of Copies • Lightness or Darkness 4. Start the copy. ▲ Touch Copy.
• • • • • • • • Fast/Economical Printing: Produce draft-quality printouts quickly. General Everyday Printing: Print documents quickly. Paper-saving Printing: Print two-sided documents with mutliple pages on same sheet to reduce paper usage. Photo Printing–Borderless: Print to the top, bottom, and side edges of 10 x 15 cm (4 x 6 inch) and 13 x 18 cm (5 x 7 inch) HP Photo Papers. Photo Printing–Plain Paper: Print a photo on a plain paper.
Chapter 1 Any third party possessing the cartridge might have access to the anonymous information on the memory chip. If you prefer to not allow access to this information, you can render the chip inoperable. However, after you render the memory chip inoperable, the cartridge cannot be used in an HP product. If you are concerned about providing this anonymous information, you can make this information inaccessible by turning off the memory chip's ability to collect the product's usage information.
Reset the product ▲ Turn off the product, and then unplug the power cord. Plug the power cord back in, and then press the On button to turn on the product. Some error conditions require a reset of the HP eStation Zeen to resolve. You can perform a reset of the HP eStation Zeen to recover from any of the following issues: • • • The HP eStation Zeen is unresponsive to touch or button input for an extended period of time. The screen is frozen. The On button is unresponsive.
Chapter 1 HP Photosmart eStation C510 series - 'Incompatible Ink Cartridges' Error Message Appears on the Product Display. Remove and reinsert the cartridges and verify that they are fully inserted and locked in place. Also, make sure the cartridges are installed into the correct slots. Make sure the cartridges are installed correctly 1. Make sure the product is turned on. 2. Open the cartridge door. The print carriage moves towards the center of the product. Online Topics Open the cartridge door 3.
HP Photosmart eStation C510 series - 'Non-HP Cartridges installed' Error Message Appears on the Product Display Follow the prompts on the display to continue, or replace the indicated cartridges with genuine HP cartridges. HP recommends that you use genuine HP cartridges. Genuine HP cartridges are designed and tested with HP printers to help you easily produce great results, time after time. NOTE: HP cannot guarantee the quality or reliability of non-HP supplies.
Chapter 1 b. Press tab on cartridge, then remove it from slot. Press the tab on the cartridge to remove it Online Topics 3. Insert new cartridge. a. Remove cartridge from the packaging. Remove cartridge from the packaging. b. Twist orange cap to snap it off. A forceful twist may be required to remove cap.
c. Match the color and icon of each cartridge to the color and icon of each slot. Insert the cartridge into the slot until it clicks into place. Online Topics Install the cartridges d. Close cartridge door. Close the cartridge door HP Photosmart eStation C510 series - Ink Cartridge Problem Solution one: Insert the cartridges ▲ One or more of the cartridges is missing. Remove and reinsert the cartridges and verify that they are fully inserted and locked in place.
Chapter 1 The print carriage moves to the center of the product. Open the cartridge door Online Topics c. Remove a cartridge by pressing on the tab and removing the cartridge from the slot. d. Reinsert the cartridge by sliding it forward into the slot until it clicks. Reinsert a cartridge in the correct slot e. Repeat steps c and d for each of the remaining cartridges. f. Run a finger along the top of the ink cartridges to locate any cartridges that are not snapped completely down. g.
b. Reinstall the ink cartridge. It should now snap down into place. c. Close the access door, and check if the error message has gone away. d. If you still receive the error message, turn the product off, and then on again. Solution three: Make sure the printhead latch is closed ▲ Make sure the printhead latch is closed ▲ Make sure that the latch securing the printhead is securely closed. Leaving the latch handle raised can result in incorrectly seated ink cartridges and problems printing.
Chapter 1 c. Locate the ink cartridge that is indicated in the error message, and then press the tab on the ink cartridge to release it from the slot. Press the tab on the cartridge to remove it Online Topics d. Hold the cartridge by its sides with the bottom pointing up and locate the electrical contacts on the cartridge. The electrical contacts are four small rectangles of copper or gold-colored metal on the bottom of the cartridge.
h. Reinsert the cartridge. i. j. Close the cartridge door. If you still receive the error message, turn the product off, and then on again. Solution five: Replace the cartridges ▲ If the error has not been resolved in the solution above, continue with this solution. Replace the cartridges that are causing the problem. To find the compatible cartridge number, look at the stickers near the cartridges inside the printer cover or go online to www.hp.com/go/learnaboutsupplies.
Chapter 1 Online Topics 4. Remove all of the ink cartridges and place them on a piece of paper with the ink opening pointing up. To remove the ink cartridges a. Push in the tab on the ink cartridge you want to replace to release it from the slot. b. Pull the ink cartridge up and then toward you out of its slot to remove it. c. Repeat steps a and b to until all ink cartridges are removed. 5. Lift the latch handle on the print carriage until it stops.
1 Plastic ramps on the sides of the nozzles 2 Edge between nozzles and contacts 3 Electrical contacts CAUTION: Touch the nozzle and the electrical contact areas only with cleaning materials and not with your finger. To clean the printhead a. Lightly dampen a clean, lint-free cloth and wipe the electrical contact area from the bottom to the top. In order to avoid transferring ink and debris from the contact area to the nozzles, do not go past the edge between the nozzles and the contacts.
Chapter 1 c. Use a fresh, lightly-dampened, lint-free cloth to wipe the plastic ramps on both sides of the nozzles. Wipe away from the nozzles. Online Topics d. Wipe the previously cleaned areas dry with a dry lint-free cloth before proceeding to the next step. 8. Make sure the latch handle is raised, and then reinsert the printhead. 9. Carefully lower the latch handle. NOTE: Make sure you lower the latch handle before reinserting the ink cartridges.
10. Reinsert the ink cartridges. Online Topics To reinsert the ink cartridges ▲ Using the colored shaped icons for help, slide the ink cartridge into the empty slot until it clicks into place and is seated firmly in the slot. Make sure that you insert the ink cartridge into the slot that has the same shaped icon and color as the one you are installing. 11. Close the ink cartridge access door. The printhead or ink cartridges were not installed correctly.
Chapter 1 If the issue persists, try the next solution. Solution 4: Replace the printhead ▲ If you have completed all the previous steps and are still experiencing a problem, you can replace the printhead. Replacement printhead assemblies are only available from HP Support or authorized service providers. Contact HP for assistance to get a new printhead. If the issue persists, try the next solution.