HP Slate 21 All-in-One User Guide
© 2013 Hewlett-Packard Development Company, L.P. The only warranties for HP products and services are set forth in the express warranty statements accompanying such products and services . Nothing herein should be construed as constituting an additional warranty. HP shall not be liable for technical or editorial errors or omissions contained herein. This document contains proprietary information that is protected by copyright.
About This Guide This guide provides information on setting up and using the HP Slate 21 All-in-One. WARNING! Text set off in this manner indicates that failure to follow directions could result in bodily harm or loss of life. CAUTION: Text set off in this manner indicates that failure to follow directions could result in damage to equipment or loss of information. NOTE: Text set off in this manner provides important supplemental information.
iv About This Guide
Table of contents 1 Product features ............................................................................................................................................. 1 Front components ................................................................................................................................ 2 Rear components ................................................................................................................................. 3 2 Setting up the hardware .........
Factory data reset .............................................................................................................. 21 Enabling input method editor (IME) .................................................................................................... 21 4 Safety and Maintenance Guidelines ............................................................................................................ 22 Important Safety Information ...............................................................
1 Product features The HP Slate 21 All-in-One provides easy, simple access to the internet, and streaming views of media content (video, audio, photos). The all-in-one has an active matrix, thin-film transistor (TFT) panel. Features include: ● Android 4.2 operating system with multi-user support ● 54.6 cm (21.
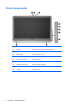
Front components 2 Component Function (1) Webcam Records video and captures still photographs (2) Internal microphone Records sound (3) Webcam light On: The webcam is in use (4) Volume up button Increases volume (5) Volume down button Decreases volume (6) Brightness up button Increases display brightness (7) Brightness down button Decreases display brightness (8) Power button Turns the all-in-one on and off (9) Speakers Produce sound Chapter 1 Product features
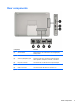
Rear components Component Function (1) SD card reader Reads data from and writes data to Secure Digital (SD) memory cards (2) USB 2.0 connector Connects external USB devices to the all-in-one (3) Audio-out (headphone) jack Produces sound when connected to optional powered stereo speakers, headphones, earbuds, or a headset (4) DC power connector Connects the DC-in cable from the AC power adapter (5) Ethernet connector Connects an Ethernet cable to the all-in-one (6) USB 2.
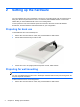
2 Setting up the hardware You can install the all-in-one on a desktop or mount it to a mounting fixture such as a wall mount or swing arm. Be sure to place the all-in-one in a convenient, well-ventilated location. Connect the cables after you have installed the all-in-one to a mounting fixture. To set up the all-in-one, ensure that the power is turned off to the all-in-one and all attached accessories, and then follow the instructions below for your configuration.
2. Lift and rotate the stand until it is positioned straight up so you can access the screw that secures the stand to the all-in-one. 3. Remove the two screws that secure the stand to the all-in-one (1), and then lift up the bottom of the stand slightly and remove it from the all-in one (2).
4. Align the screw holes on the mounting fixture with the VESA holes on the back of the all-in-one, and then insert four 10 mm screws (not provided) through the holes on the mounting fixture and into the mounting holes on the all-in-one. CAUTION: This all-in-one supports the VESA industry standard 100 mm mounting holes. To attach a third-party mounting solution to the all-in-one, four 4 mm, 0.7 pitch, and 10 mm long screws are required. Longer screws must not be used because they may damage the all-in-one.
Connecting the cables The cable connections required depend on whether you are using a keyboard and mouse or wired (Ethernet) or wireless connection. 1. Place the all-in-one in a convenient, well-ventilated location. 2. Remove the rear I/O cover from the all-in-one. 3. If you want to use a wired network connection, connect an Ethernet cable to the Ethernet port on the all-in-one’s rear panel (1), and then to an active Ethernet jack (2). For more information, see Connecting to wired networks on page 15.
4. 8 If you want to use a keyboard and/or mouse, connect the keyboard and mouse to the USB ports on the all-in-one's rear panel.
5. Connect the DC-in cable on the back of the all-in-one (1), and then connect the power cord into the AC adapter (2) and the other end to an electrical wall outlet (3). WARNING! To reduce the risk of electric shock or damage to the equipment: - Do not disable the power cord grounding plug. The grounding plug is an important safety feature. - Plug the power cord into a grounded (earthed) electrical outlet that is easily accessible at all times.
Adjusting the tilt For optimal viewing, adjust the screen tilt to your own preference. 10 1. Face the rear of the all-in-one and hold it so that you do not topple it while changing the tilt. 2. Without touching the screen, adjust the tilt by rotating the stand up and down.
Turning on the all-in-one for the first time NOTE: For a seamless experience, the Startup Wizard requires an internet connection. Before powering on the all-in-one, please be prepared to establish a wired (Ethernet) or wireless (Wi-Fi) internet connection. After connecting the cables, press the power button on the right side of the all-in-one to turn it on. CAUTION: Burn-in image damage may occur on displays that show the same static image on screen for a prolonged period of time.
Using the touchscreen A touch screen device allows you to control items on the screen directly with your fingers. TIP: On touch screen devices, you can also perform on-screen actions with a keyboard and mouse. One-finger slide The one-finger slide is mostly used to pan or scroll through lists and pages, but you can use it for other interactions, too, such as moving an object. ● To scroll across the screen, lightly slide one finger across the screen in the direction you want to move.
Rotating Rotating allows you to turn items such as photos. Anchor the forefinger of your left hand on the object you want to rotate. Using your right hand, slide your forefinger around in a sweeping motion from 12 o’clock to 3 o’clock. To reverse the rotation, move your forefinger from 3 o’clock to 12 o’clock. NOTE: Rotate is intended for specific apps where you can manipulate an object or image. Rotate may not be functional for all apps. Swipes With swipes you can flip between screens or images.
Connecting to networks You can connect to networks with either a wired (Ethernet) or wireless (Wi-Fi) connection. You cannot enable Ethernet and Wi-Fi connections at the same time. Connecting to wireless networks The all-in-one’s wireless network capability lets you connect the all-in-one to wireless local area networks (commonly referred to as Wi-Fi networks, wireless LANs, or WLANs). In a WLAN, the mobile wireless module in your all-in-one communicates with a wireless router or a wireless access point.
Connecting to wired networks Use a LAN connection if you want to connect the all-in-one directly to a router in your home (instead of working wirelessly), or if you want to connect to an existing network at your office. Connecting to a LAN requires an 8-pin, RJ-45 network cable. To connect to a wired network: 1. Plug the network cable into the network jack (1) on the all-in-one. 2. Plug the other end of the network cable into a network wall jack (2) or router.
3 Using the user interface The Home page is displayed when the all-in-one is powered on. An Android operating system uses apps to perform most tasks. NOTE: The user interface icons for your operating system may look different from the icons shown in the user guide. Google apps KingSoft Office Email Gallery Google calendar Camera Google Play Store HP Media Player All apps HP File Manager The row of icons near the bottom of the screen provide quick access to popular apps.
Return to the previous screen. Return to the Home page. Display a list of open apps. Browsing the internet The all-in-one uses the Google Chrome web browser that supports HTML5 and JavaScript to browse the Internet. You must have Internet access to browse the Internet. NOTE: Google Chrome does not support plug-ins. To browse the Internet: 1. Ensure that you have a live Internet connection from either a wireless network or an Ethernet cable (not provided) plugged into the all-in-one. 2.
Using the camera You can use the camera to take a photo or record a video. You can preview and save the photo or video recording. To use the camera: 1. Select the Camera icon 2. If necessary, select the camera to use and whether to use it every time or just in this instance. from the Home page or from HP Media Player. Select Camera. NOTE: With the camera displayed on-screen, select the black bar at the bottom of the screen to display the navigation icons. 3.
4. Select Set date to manually set the date. 5. Select Set time to manually set the time. Security settings Several security settings are available for your all-in-one. To set up security settings: 1. Select the All Apps icon 2. Select Security. 3. Choose the setting to configure and follow the on screen instructions. from the Home page, and then select Settings. Screen lock You can configure the screen on the all-in-one to lock after a period of inactivity.
3. Select the ON button to turn on DTS+ Sound. 4. Select the sound type. Language To change the language: 1. Select the All Apps icon 2. Select Language & input. 3. Select Language. 4. Select your language. from the Home page, and then select Settings. Updating the software The all-in-one periodically checks for software updates automatically. However, you can manually check for updates as well. To check for system updates: 1. Select the All Apps icon 2. Select About tablet.
Factory data reset You can reset the all-in-one to its original factory data settings. This action erases all data from your all-in-one’s internal storage. To reset to factory data: 1. Select the All Apps icon 2. Select Backup & reset. 3. Under Personal Data, select Factory data reset. 4. Select Reset tablet. from the Home page, and then select Settings.
4 Safety and Maintenance Guidelines Important Safety Information A power cord is included with the all-in-one. If another cord is used, use only a power source and connection appropriate for this all-in-one. For information on the correct power cord set to use with the all-in-one, refer to the Power Cord Set Requirements on page 31. WARNING! To reduce the risk of electric shock or damage to the equipment: • Do not disable the power cord grounding feature. The grounding plug is an important safety feature.
● Install the all-in-one near an outlet that you can easily reach. Disconnect the all-in-one by grasping the plug firmly and pulling it from the outlet. Never disconnect the all-in-one by pulling the cord. ● Turn the all-in-one off when not in use. You can substantially increase the life expectancy of the all-in-one by turning off the all-in-one when not in use. NOTE: All-in-one with a “burned-in image” are not covered under the HP warranty.
5 Frequently asked questions Question Answer How do I surf the Internet? Connect to a wired (Ethernet) or wireless (Wi-Fi) network and use one of the two pre-installed browser options. Once you have established an Internet connection, select the All apps icon on the Home screen. Two browser options are available to choose from: Chrome and Browser. Touch one of the browser options to begin surfing the Internet.
6 Product support For additional information on using your all-in-one, go to http://www.hp.com/support. Select your country or region, select Product Support & Troubleshooting, and then enter your model in the SEARCH window. NOTE: The user guide, reference guide, and drivers are available at http://www.hp.com/support. The Ethernet cable and Internet access are not provided. If the information provided in the guide does not address your questions, you can contact support. For U.S.
7 Technical specifications NOTE: All specifications represent the typical specifications provided by HP's component manufacturers; actual performance may vary either higher or lower. Specifications are subject to change. The complete and latest specifications on display products are available on http://www.hp.com/support. HP Slate 21 All-in-One Maximum weight (unpacked) 4.85 kg (10.7 lbs) Dimensions (include base) Height 35.4 cm (13.9 inches) Depth 6.7 cm (2.6 inches) Width 53.1 cm (20.
Video codecs See HP codec list or the nVidia document "Tegra Board Support Package for Android 17r14 Release Software Feature List" Video container See HP codec list or the nVidia document "Tegra Board Support Package for Android 17r14 Release Software Feature List" Audio codecs See HP codec list or the nVidia document "Tegra Board Support Package for Android 17r14 Release Software Feature List" Audio container See HP codec list or the nVidia document "Tegra Board Support Package for Android 17r14 Re
A Agency Regulatory Notices Federal Communications Commission Notice This equipment has been tested and found to comply with the limits for a Class B digital device, pursuant to Part 15 of the FCC Rules. These limits are designed to provide reasonable protection against harmful interference in a residential installation.
For questions regarding this FCC declaration, contact: Hewlett Packard Company P. O. Box 692000, Mail Stop 510101 Houston, Texas 77269-2000 Or, call (281) 514-3333 To identify this product, refer to the Part, Series, or Model number found on the product. Canadian Notice This Class B digital apparatus meets all requirements of the Canadian Interference-Causing Equipment Regulations.
European Union Regulatory Notice Products bearing the CE marking comply with one or more of the following EU Directives as may be applicable: ● Low Voltage Directive 2006/95/EC; EMC Directive 2004/108/EC; Ecodesign Directive 2009/125/ EC; R&TTE Directive 1999/5/EC; RoHS Directive 2011/65/EU ● Compliance with these directives is assessed using applicable European Harmonised Standards. ● The full Declaration of Conformity can be found at the following web site: http://www.hp.eu/ certificates.
Power Cord Set Requirements The all-in-one power supply is provided with Automatic Line Switching (ALS). This feature allows the all-in-one to operate on input voltages between 100–120V or 200–240V. The power cord set (flexible cord or wall plug) received with the all-in-one meets the requirements for use in the country where you purchased the equipment. If you need to obtain a power cord for a different country, you should purchase a power cord that is approved for use in that country.
with ENERGY STAR qualified computers and displays.
Restriction of Hazardous Substances (RoHS) A Japanese regulatory requirement, defined by specification JIS C 0950, 2005, mandates that manufacturers provide Material Content Declarations for certain categories of electronic products offered for sale after July 1, 2006. To view the JIS C 0950 material declaration for this product, visit http://www.hp.com/go/jisc0950.
Ukraine Restriction of Hazardous Substances The equipment complies with requirements of the Technical Regulation, approved by the Resolution of Cabinet of Ministry of Ukraine as of December 3, 2008 No. 1057, in terms of restrictions for the use of certain dangerous substances in electrical and electronic equipment.