User's Guide for HP Jetdirect 175x external print server/Internet connector for USB and HP Jetdirect 310x external print server/Internet connector for USB Contents 1. Install print server 2. Configure and manage print server 3. Troubleshoot print server 4. Get Support 5. Limited Warranty for print server 6.
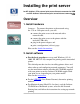
Installing the print server for HP Jetdirect 175x external print server/Internet connector for USB and HP Jetdirect 310x external print server/Internet connector for USB Overview 1. Install hardware Summary: To connect the printer to the network using the 175x or 310x print server, you will: ● connect the print server to the network with a network cable, ● connect the print server to the printer with the included USB cable, ● plug in the power adapter, and ● print a configuration (self-test) page.
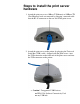
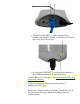
Steps to install the print server hardware 1. Attach the print server to a 10Base-T (Ethernet) or 100Base-TX (Fast Ethernet) local area network by plugging a network cable into the RJ-45 connector on the rear end of the print server. 2. Attach the print server to the printer by plugging the Universal Serial Bus (USB) cable—shipped with the print server—into the USB connector on the front end of the print server and into the USB connector on the printer.
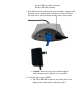
■ ■ any USB-to-parallel converter any USB cable extender 3. Plug the DC power cord from the power module—shipped with the print server—into the power connector on the rear end of the print server . Plug the power module into a power outlet. ❍ Caution! Do not use the power module shipped with your print server with any other products! 4. Verify the print server’s LEDs: ❍ The 10 or 100 LED on the rear end of the print server lights green to indicate the connection speed.
❍ The power/status LED on the top front begins blinking and within 15 seconds is solid green, to indicate the server passed its self test. ❍ A solid green USB LED on the top front indicates a good USB-II connection, as illustrated above. If your LEDs are not solid green, see interpreting the LEDs and diagnosing problems 5. Verify the connection with the printer by printing a configuration (test) page: on the rear end of Briefly press and release the test button the print server.
Interpreting the configuration page and diagnosing problems If the page does not appear on the printer, or if it is unreadable, go to this Troubleshooting page, and then return to this User’s Guide to continue with the installation. 6. You can use the clip attached to the bottom of the print server to mount it to the printer or to a table or wall. Use either the supplied sticky tape or the mounting screw holes. Or you can pull off the clip. Next, install software.
Configuring and managing the print server on your network for HP Jetdirect 175x external print server/Internet connector for USB and HP Jetdirect 310x external print server/Internet connector for USB This section describes the tools you can use to configure and manage your print server, as well as the settings you can apply for various protocols. Use this page to link to topics of interest. Easiest basic configuration ● Set up each Macintosh running MacOS (8.6 or later).
Tools for changing configuration and for managing Software tools summary: describes a variety of software tools that you can use to install, configure, and manage a network printer. These tools cover a variety of functions in a variety of operating environments. In general, they allow you to set parameters for the various protocols listed below... Embedded web server: describes the web server contained within the print server. You can use this tool to configure and manage the print server.
these FTP instructions ● IPP printing: [for 310x only, not for 175x] can be set up using the Internet Printer Connection Software ● IPX/SPX: in most cases, parameters do not need to be set on the print server. Note: The print server supports both IPX/SPX direct mode (peer-to-peer) and [for 310x only, not for 175x] IPX/SPX in client/server mode with Novell NetWare servers.
Default configuration for HP Jetdirect 175x external print server/Internet connector for USB and HP Jetdirect 310x external print server/Internet connector for USB Fresh from the factory, before any configuration is changed by a user, the print server has a default configuration for TCP/IP and for IPX peer-to-peer printing (called IPX direct mode). When power is applied in this factory-default state: ● TCP/IP: The print server sends out several BOOTP requests and one RARP request.
Resetting the print server to factory defaults (cold reset) The factory-default reset procedure (described below) is sometimes called a “cold reset” or a “cold boot”. When done, the print server responds exactly like it was fresh from the factory. To reset the print server configuration to factory defaults, follow these steps: 1. Unplug the power module from the back of the print server. on the rear of the print 2.
HP Jetdirect Software Solutions Summary for HP Jetdirect 175x external print server/Internet connector for USB and HP Jetdirect 310x external print server/Internet connector for USB HP provides a variety of software solutions to set up or manage your HP Jetdirect-connected network devices. Use this table to help you determine which software is best for you. Operating Environment Function Remarks HP Install Network Printer Wizard (Windows) ● ● ● ● Windows 95, 98, Me, NT 4.0, 2000, XP NetWare 3.x, 4.
[for 310x only, not for 175x] ● Windows NT 4.0, Me, Printing via the XP Internet, to Internet TCP/IP only Printing Protocol Note: (IPP)-enabled Microsoft Internet HP Jetdirect-connected Printing software is printers also integrated with Windows 2000. ● Allows economical distribution of high-quality hardcopy documents over the Internet, replacing fax, mail, and overnight services ● Requires HP Jetdirect print server firmware version x.07.
IPP printing, using Internet Printer Connection Software for HP Jetdirect 310x external print server/Internet connector for USB Note: Not applicable to 175x Using the appropriate software on your system, you can create an IPP print path from your system to any HP Jetdirect-connected printer over the Internet. Note: For incoming print path requests, the network administrator must configure the firewall to accept incoming IPP requests. Security features available in the software are currently limited.
● ● TCP/IP HP Jetdirect 310x print server Supported Proxies (HP software) ● Web proxy with support for HTTP v1.1 or greater (may not be needed if printing over an intranet) Microsoft-Supplied Software Note: Contact Microsoft Corp. for support of Windows IPP software Windows 2000 Integrated Software On Windows 2000 systems, an alternative to using the HP-supplied software is to use the IPP-client software integrated with Windows 2000.
server does not contain printer drivers, so your system cannot automatically obtain the driver). Click OK to install the printer driver onto your system and follow the instructions on the screen. (You may need your printer CD-ROM to install the driver.) 6. To complete the print path setup, follow the instructions on the screen.
HP IP/IPX Printer Gateway for NDPS for HP Jetdirect 310x external print server/Internet connector for USB Note: Not applicable to 175x NDPS (Novell Distributed Print Services) is a printing architecture developed by Novell, in partnership with Hewlett-Packard. NDPS simplifies and streamlines the administration of network printing. It eliminates the need to set up and link print queues, printer objects, and print servers. Administrators can use NDPS to manage networked printers within the NetWare 4.11, 4.
Note: For more information (including access to the most recent HP IP/IPX Printer Gateway software and the User Guide), access HP support information at: http://www.hp.com/support/net_printing.
HP LaserJet Utility for MacOS for HP Jetdirect 175x external print server/Internet connector for USB and HP Jetdirect 310x external print server/Internet connector for USB This section describes printer installation software for Mac OS-compatible computer systems. It also explains how to use the HP LaserJet Utility to configure HP printers connected to an AppleTalk network through an HP Jetdirect print server.
Configuring the Printer The HP LaserJet Utility allows printer settings such as printer name and preferred zone to be configured from your MacOS system. Hewlett-Packard recommends that only network administrators use the printer configuration capabilities of this utility. If this printer is to be serviced by a print spooler, set up the printer’s name and zone before configuring the spooler to capture the printer. Running the HP LaserJet Utility 1.
your network. You can name your printer anything you like—for example, “Michael’s LaserJet 4000.” The HP LaserJet Utility has the ability to rename devices located in different zones, as well as the local zone (no zones need to be present in order to use the HP LaserJet Utility). 1. Select the Settings icon from the scrolling icon list. The Please select a setting: dialog appears. 2. Select Printer Name in the list. 3. Click Edit. The Set Printer Name dialog box appears. 4. Type the new name.
1. Select the Settings icon from the scrolling icon list. The Please Select a Setting: dialog box appears. 2. Select Printer Zone in the list and click Edit. The Select a Zone dialog box appears. 3. Select your preferred network zone from the Select a Zone: list and click Set Zone. 4. To exit, select Quit from the File menu. 5. Notify everyone on your network of the new zone for your printer so they can select the printer in the Chooser. Selecting Your Printer 1. Select the Chooser from the Apple menu. 2.
6. Click Setup or Create in the Chooser; then, if prompted, select the appropriate PostScript Printer Description file (PPD) for the printer. For more information, see the online documentation (HP LaserJet Printing Guide). 7. Set Background Printing to ON or OFF. If background printing is turned OFF when you send a print job to the printer, status messages appear on your screen and you have to wait until the messages clear before continuing your work.
TCP/IP Configuration for HP Jetdirect 175x external print server/Internet connector for USB and HP Jetdirect 310x external print server/Internet connector for USB ● Summary of TCP/IP Configuration ● Overview of the TCP/IP Protocol ● Using BOOTP and TFTP ● Using DHCP ● Using RARP ● Using the arp and ping commands ● Using Telnet ● Using the embedded web server ● Using a syslog server ● Moving the networked printer to another network ● Ports for IP access to the HP Jetdirect print server
information, see BOOTP/TFTP. ● By using Dynamic Host Configuration Protocol (DHCP). This protocol is supported in HP-UX, Solaris, Red Hat Linux, SuSE Linux, Windows NT/2000, NetWare, and MacOS systems. (Refer to your network operating system manuals to verify that your operating system supports DHCP.) For more information, see DHCP. Note: Linux and UNIX systems: For more information, see the bootpd man page. On HP-UX systems, a sample DHCP configuration file (dhcptab) may be located in the /etc directory.
information, see the embedded web server. Overview of TCP/IP protocol Information to help you gain a basic understanding of TCP/IP: Similar to a common language that people use to communicate with each other, TCP/IP (Transmission Control Protocol/Internet Protocol) is a suite of protocols designed to define the way computers and other devices communicate with each other over a network. TCP/IP is rapidly becoming the most used set of protocols.
no added reliability or guarantee of delivery. UDP is used when acknowledgment and reliability are not required, such as during a “discovery broadcast.” IP Address Every host (workstation or node) on an IP network requires a unique IP address for each network interface. This address is a software address that is used to identify both the network and specific hosts located on that network. Each IP address can be divided into two separate parts: the network portion and the host portion.
Gateways Gateways (routers) are used to connect networks together. Gateways are devices that act as translators between systems that do not use the same communication protocols, data formatting, structures, languages, or architectures. Gateways repackage the data packets and change the syntax to match that of the destination system. When networks are divided into subnets, gateways are required to connect one subnet to another.
The installation sequence for DHCP or BOOTP/TFTP setup 1. Set up the DHCP or BOOTP service. Refer to procedure. 2. Install the hardware; power on the print server. Refer to procedure. 3. For Windows computers, run the Install Network Printer wizard on each client to load driver and set up the print path. Return to the initial screen for this CD, and select the [Install] button for the Install Network Printer wizard.
Item Description Syslog Server IP address IP address of a syslog server to send syslog messages to. If zero (0.0.0.0) or not specified, syslog messages are disabled. Syslog Maximum Messages The number of syslog messages that can be sent by the HP Jetdirect print server on a per-minute basis, from 0 to 1000. This parameter helps to control the syslog file size. The default is 10 messages per minute. If 0, the number of syslog messages is not restricted.
Ways to configure an IP address on the print server The HP Install Network Printer Wizard for Windows—the installation wizard supplied and recommended by HP—configures IP for you or lets you do it. The wizard. You can automatically configure IP over the network each time the print server is powered up by using BOOTP (Bootstrap Protocol) or DHCP (Dynamic Host Configuration Protocol). Auto-configuration.
Install Network Printer Wizard TCP port 9100 (HP proprietary) (raw IP printing) Moving the print server to another IP network When moving an HP Jetdirect print server configured with an IP address to a new network, ensure that the IP address does not conflict with addresses on the new network. 1. First, do one of the following: ❍ Change the IP address to one usable on the new network. ❍ Erase the current IP address and configure another address after you are installed on the new network. 2.
Using BOOTP, TFTP, and DHCP for HP Jetdirect 175x external print server/Internet connector for USB and HP Jetdirect 310x external print server/Internet connector for USB You can have TCP/IP automatically configured on the print server using either BOOTP (Bootstrap Protocol), TFTP (Trivial File Transfer Protocol), or DHCP (Dynamic Host Configuration Protocol, RFC 2131/2132) services, on servers with certain operating systems.
● Windows 2000 or NT servers: On Windows NT or 2000 server systems, use the Microsoft DHCP utilities to set up print server configuration through BOOTP. ❍ When you use the Windows NT DHCP procedure (with the finite lease duration and adding a reservation in step 8), the resulting service will respond to a BOOTP requests as well as to DHCP requests from the print server.
ha — The hardware address tag. The hardware (MAC) address is the link-level or station address of the HP Jetdirect print server. It can be found on the Jetdirect configuration page as the Hardware Address, and also printed on a label attached to the print server. ip — The IP address tag (required). This will be the print server’s IP address. sm 1 The subnet mask tag.
TFTP configuration file To provide additional configuration parameters for your HP Jetdirect print server, such as SNMP (Simple Network Management Protocol) or non-default settings, an additional configuration file can be downloaded using TFTP. This TFTP configuration file’s relative path name is specified in the BOOTP reply using the vendor-specific tag “T144” or the standard BOOTP tag “ef” in the /etc/bootptab file. Example of a TFTP configuration file.
● Other parameters ● Support parameters Tables of TFTP parameters: General parameters for TFTP TFTP Parameter Description passwd: The IP administrative password (up to 16 case-sensitive alphanumeric characters) that allows administrators to control changes of print server configuration parameters through Telnet or embedded web server. sys-location: Identifies the physical location of the printer (SNMP sysLocation object). Only printable ASCII characters are allowed.
buffer-packing: Enables or disables buffer packing for TCP/IP packets: 0 (default) Normal, data buffers are packed before sending to the printer. 1 Disable buffer packing, data is sent to the printer when received. write-mode: Controls the setting of the TCP PSH flag for device-to-client data transfers: 0 (default) Disables this option, flag not set. 1 All-push option. Push bit is set in all data packets. 2 EOI-push option. Push bit is set only for data packets that have an End-of-Information flag set.
slp-config: Enables or disables the Service Location Protocol (SLP) operation on the print server. SLP is used by selected HP software applications to automate device discovery. 0 Disables. 1 (default) Enables. ttl-slp: Specifies the IP multicast Time To Live (TTL) setting for Service Location Protocol (SLP) packets. The default value is 4 hops (the number of routers from the local network). The range is 1–15. When set to -1, multicast capability is disabled.
Enters a host’s IP address into the print server’s SNMP trap destination list. The command format is: trap-dest: trap-dest: ip-address [community name] [port number] ip-address is the host IP adress. community name is optional (the default community name will be used), except in two cases: ● when specifying the port number. If you do not specify a community name, the port number will become the community name. ● when a trap-community-name entry precedes any trap-dest entry.
TFTP Parameter appletalk: Description Enables or disables AppleTalk (EtherTalk) protocol operation on the print server: 0 Disables. 1 (default) Enables. DLC/LLC parameters for TFTP [not for 175x] TFTP Parameter [not for 175x] dlc/llc: Description Enables or disables DLC/LLC protocol operation on the print server: 0 Disables. 1 (default) Enables.
TFTP Parameter Description support-name: Typically used to identify the name of a person to contact for support of this device. support-number: Typically used to specify a phone or extension number to call for support of this device. support-url: A web URL address for product information on this device over the Internet or an intranet. tech-support-url: A web URL address for technical support over the Internet or an intranet.
7. In the Lease Duration section, select Unlimited, then select [OK]. HP recommends that all print servers be assigned infinite leases to avoid problems resulting from IP addresses that change. Be aware, however, that selecting an unlimited lease duration for the scope (as described above) causes all clients in that scope to have infinite leases.
If your server is not listed in the tree, select DHCP and click the Action menu to add the server. 3. After selecting your server in the DHCP tree, click the Action menu and select New Scope. This runs the Add New Scope wizard. 4. In the Add New Scope wizard, click [Next]. 5. Enter a name and description for this scope, then click [Next]. 6. Enter the range of IP addresses for this scope (beginning IP address and ending IP address). Also, enter the subnet mask. Then click [Next].
The print server automatically releases any names and IP addresses associated with the DHCP server and re-initializes the TCP/IP protocol for the print server (unless a BOOTP configuration is currently in effect). At this point, TCP/IP is unconfigured, and the print server begins to send —even before power is cycled—BOOTP requests to acquire new IP configuration information. If no BOOTP reply is received, the IP address remains at the factory default 192.0.0.192. DHCP is disabled.
Using RARP for HP Jetdirect 175x external print server/Internet connector for USB and HP Jetdirect 310x external print server/Internet connector for USB This subsection describes how to configure the print server using the Reverse Address Resolution Protocol (RARP) on UNIX and Linux systems. This setup procedure enables the RARP daemon running on your system to respond to a RARP request from the print server and to supply the IP address to the print server. 1. Switch off the print server. 2.
8. Switch on the print server. 9. To verify that the print server is configured with the correct IP address, use the ping utility. At the system prompt, enter: ping where is the assigned address from RARP. The default IP address is 192.0.0.192. 10. If ping does not respond, see the Troubleshooting section.
Using the arp and ping commands for HP Jetdirect 175x external print server/Internet connector for USB and HP Jetdirect 310x external print server/Internet connector for USB You can configure a print server with an IP address using an ARP (Address Resolution Protocol) command from a supported system. The protocol is not routable, that is, the workstation from which the configuration is made must be located on the same network segment as the print server.
may require a specific format for your system. For example: ● ● In Windows NT 4.0 or Windows 2000: arp -s 192.168.45.39 00-01-E6-a2-31-98 ping 192.168.45.39 In UNIX: arp-s 192.168.45.39 00:01:E6:a2:31:98 ping 192.168.45.39 Note: Once the IP address has been set on the print server, additional arp and ping commands will be ignored. Once the IP address is configured, arp and ping cannot be used unless the print server is reset to factory values (see cold reset).
Using Telnet for HP Jetdirect 175x external print server/Internet connector for USB and HP Jetdirect 310x external print server/Internet connector for USB How to configure the print server using Telnet. Setting up an IP route To use Telnet commands with the print server, a route must be available from your workstation to the print server. This means that there must be a match between the network identification of your system to that of the print server.
Procedure To set configuration parameters, you must set up a Telnet connection from your system to the HP Jetdirect print server. 1. Type the following at the DOS prompt: telnet where: may be the print server’s assigned address from BOOTP, RARP, DHCP, from the printer control panel, or the default IP address. The default IP address is 192.0.0.192. The IP address is listed on the Jetdirect configuration page. 2. A connection to the print server will be displayed.
of this section. is the setting you are assigning to that parameter. Allowed values are described in the second column of the Telnet commands and parameters list at the end of this section. At any time during a Telnet session, you can enter one of the following: ? to view available configuration parameters, the correct command format, and a list of commands. advanced ? to list additional “advanced” commands. / to display the current configuration.
described in the second column of the Telnet commands and parameters list at the end of this section. Caution: Parameter changes are not saved until step 6 below. 4. Repeat the previous step to set any additional configuration parameters. 5. When you have finished entering the configuration parameters, at the Telnet prompt enter one of the following commands, which depend on your system. save exit quit 6. When prompted whether to save settings that you have changed, enter y for “yes”, or n for “no”.
Using Telnet to Erase the Existing IP Address This procedure resets all TCP/IP parameters, but only affects the TCP/IP subsystem. After this has been done the print server should be power cycled. Parameters for other subsystems such as IPX/SPX (Novell NetWare) or AppleTalk are not affected. (To reset all print server configuration parameters to factory default values, use the hardware cold reset procedure.) 1. Enter the Telnet command: cold-reset 2.
advanced Enables the advanced Telnet commands in addition to the ones generally available. Help will include the advanced and general commands. general Disables the advanced Telnet commands; only the general ones will be available. Help will exclude the advanced commands. export Exports the Telnet settings to a file for editing and importing via Telent or TFTP. This command is only supported by systems such as UNIX that support input/output redirection.
ip-config Selects the method for the print server to receive its IP configuration parameters: bootp (default), dhcp, or manual. bootp or dhcp The IP parameters will be automatically configured by a BOOTP or DHCP server each time the print server is powered on. manual The print server will wait for the basic IP parameters to be entered using manual tools, such as this Telnet or other available tools. The status will be “user specified”. See more info, including a caution.
domain-name The domain name for the device (for example, support.hp.com). It does not include the host name—-it is not the Fully Qualified Domain Name (such as printer1.support.hp.com). dns-svr IP address of the DNS (Domain Name System) server. pri-wins-svr The IP address of the primary Windows Internet Name Service (WINS) server. sec-winds-svr The IP address of the secondary Windows Internet Name Service (WINS) server.
write-mode Controls the setting of the TCP PSH flag for device-to-client data transfers: 0 (default) Disables this option, flag not set. 1 All-push option. Push bit is set in all data packets. 2 EOI-push option. Push bit is set only for data packets that have an End-of-Information flag set. mult-tcp-conn Enables or disables multiple TCP connections: 0 (default) Allows multiple connections. 1 Disables multiple connections.
syslog-config Enables or disables syslog server operation on the print server: 0 Disables. 1 (default) Enables. For more information, see syslog. syslog-svr The syslog server’s IP address. It specifies the server to which the print server sends syslog messages. syslog-max Specifies the maximum number of syslog messages that can be sent by the print server on a per-minute basis. This setting allows administrators to control the log file size. The default is 10 per minute.
cold-reset Sets TCP/IP factory defaults. After a cold reset, power cycle the print server. Parameters for other subsystems, such as IPX/SPX or AppleTalk, are not affected. ews-config Enables or disables the print server’s embedded web server to view or change configuration values: 0 Disables. 1 (default) Enables.
Telnet Parameter snmp-config Description and Values Enables or disables SNMP operation on the print server: 0 Disables. 1 (default) Enables. Specifies a password for SNMP GetRequests sent to the print server. This password is optional. If a user-specified get community name is set, the print server will respond to get-community-name either a user-specified community name or the factory-default. The community name must be ASCII characters. The maximum length is 255 characters.
SNMP trap destination list must have a trap daemon to listen to those traps. IPX/SPX parameters for Telnet Telnet Parameter Description and Values ipx-config Enables or disables IPX/SPX protocol operation on the print server: 0 Disables. 1 (default) Eenables. ipx-unitname A user-assigned alphanumeric name assigned to the print server (31 characters maximum). By default, the name will be NPIxxxxxx, where xxxxxx are the last six digits of the hardware address (MAC or LAN address).
ipx-toner-low Enables or disables IPX toner-low notification using PJL: 0 Disables. 1 (default) Enables. AppleTalk parameters for Telnet Telnet Parameter Description and Values at-config Enables or disables AppleTalk (EtherTalk) protocol operation on the print server: 0 Disables. 1 (default) Enables. Device Name (read-only parameter) The name of the printer on the AppleTalk network.
scan-config Enables or disables the web scanning feature in the embedded web server, when connected to a supported device: 0 Disables. 1 (default) Enables. scan-idle-timeout Specifies the number of seconds (1–3600) that an idle scan connection is allowed to remain open. 0 disables the timeout. The default is 300 seconds. Enables or disables the scan-to-email feature in the embedded web server, when connected to a supported device: scan-email-config 0 Disables. 1 (default) Enables.
usb-statpg-lang Specifies the printer job language (PJL) used by the print server to send the Jetdirect configuration page to the printer: Auto (default) The language is auto-detected when the print server is powered on or after a cold reset to factory defaults.
Using the embedded web server for HP Jetdirect 175x external print server/Internet connector for USB and HP Jetdirect 310x external print server/Internet connector for USB HP Jetdirect print servers contain an embedded web server that can be accessed from a compatible web browser over an intranet. You can use any computer on the network to access the configuration and management pages for the print server and the attached network device—the printer or multifunction (MFP or All-in-One) device.
Which Home page is initially displayed by the browser will depend on the printer: ● If the printer (called the “device”) contains a supportable embedded web server, the printer’s Home page will be displayed. ● If the printer does not contain a supportable embedded web server, the Home page of the HP Jetdirect print server is displayed .
❍ ❍ ● ■ USB Settings ■ Other Settings Security: ■ Admin Password ■ Access Control Diagnostics: ■ Network Statistics ■ Protocol Info ■ Configuration Page ■ Refresh Rate Help link Home tab (Home page) The Home page is initially displayed when entering the embedded web server. When it is not displayed, click on the Home tab at the top of the web page.
(Graphic of home page) Jetdirect Home page parameters Host Name Specifies the IP host name assigned to the device and stored on the print server. See TCP/IP settings. System Up Time The length of time since either the print server or the network device was last power cycled. System Contact A text string (stored on the print server) for the name of a person to contact for this device. See TCP/IP settings.
Menu items in the left column and tabs in the second row at the top are listed below. Use the links in the following lists to find the additional pages they access and all the specific items on each page. ● Configuration: ❍ ● ● Network Settings: ■ TCP/IP tab ■ IPX/SPX tab ■ AppleTalk tab ■ SNMP tab ■ (For Advanced tab: see Other Settings.
❍ Network Statistics ❍ Protocol Info ❍ Configuration Page ❍ Refresh Rate Configuration: ● Network Settings ● Support Info ● USB Settings ● Other Settings Network Settings ● TCP/IP tab ● IPX/SPX tab ● AppleTalk tab ● DLC/LLC tab ● SNMP tab Click on the Networking tab at the top of the web page. (Make sure that beneath Configuration in the left column of the page, Network Settings is selected.
Selects the method for the print server to receive its IP configuration parameters: BOOTP (default), DHCP, or Manual. BOOTP or DHCP: the IP parameters will be automatically IP configured by a BOOTP or DHCP server each time the print server Configuration is powered on. Method Manual: basic IP parameters can be manually entered using this web page, or using other available tools. A Caution! Configuration tools. Host Name Specifies a readable IP name (the SNMP SysName object) for the network device.
Syslog Priority Controls the filtering of syslog messages that are sent to the syslog server. The filter range is 0 to 8, with 0 being the most specific and 8 being the most general. Only messages that are lower than the filter level specified (that is, higher in priority) are reported. The default value is 8 which reports all syslog messages. A value of zero effectively disables syslog reporting. Specifies the number of seconds that an idle print connection is allowed to remain open.
IPX/SPX Frame Type The frame type to be used by the print server on your network. After a frame type has been configured, all others will be counted and discarded. ● AUTO (the default) senses all frame types and configures the first one detected. ● EN_8023 limits the frame type to IPX over IEEE 802.3 frames. ● EN_II limits the frame type to IPX over Ethernet frames. ● EN_8022 limits the frame type to IPX over IEEE 802.2 with IEEE 802.3 frames. ● EN_SNAP limits the frame type to IPX over SNAP with IEEE 802.
PJL Configuration [not on 175x] For Printer Job Language (PJL) parameters, enable (check) or disable (clear) the parameters provided: ● Banner Pages (for printing separator pages between print jobs). ● End-Of-Job Notification (if received from the printer, an end-of-job message will be forwarded to a client application). ● Toner Low Notification (if received from the printer, the print server will forward a “toner low” message to a client application).
An SNMP Set Community Name is a password allowing access to configure (or “write”) SNMP control functions on the print server. An incoming SNMP SetRequest must contain a community name Set Community that matches the one stored on the print server before the print server Name will respond. The community name must be ASCII characters and can be up to 32 characters long. The default community name is “public”.
Communication Sets the highest level of USB communication to be used when Mode the print server tries to establish the best level with the printer. ● Automatic is the default setting, allowing the print server to set the highest level it determines to function. The highest level it attempts is 1284.4, a IEEE standard protocol, a mode for printers and multi-function (All-in One) devices that allows multiple channels of simultaneous print, scan, and status communication.
control commands—that are automatically added before or after the print job. You can define up to eight named strings, and you can set up each queue so that any of these named strings precedes the print data (“prepend string name”) or follows the print data (“append string name”). LPD Queues Queue Name Name of the user-defined queue. This name can be up to 32 characters long, and can consist of any displayable ASCII characters. You can define up to six user-defined queues.
The content of the string. The previous parameter names the string; this parameter defines its content. When a string name is specified for a prepend or append string (in the table at the top of the window), the line printer daemon sends the value of that string to the printer before or after the print data (as appropriate). Value Character values can be anywhere in the extended ASCII range of 0 to 255 (hex 00 to FF).
“clear_printer” when asked for a queue name. (For details of setting up the printer, refer to LPD Printing.) After that, any print jobs sent to the printer—either from the server or from a client computer that has set up that printer—will include a reset command at the beginning of the job. Miscellaneous Settings Click on the Networking tab. (Make sure that beneath Configuration in the left column of the page, Other Settings is selected.
Sets the network link speed (10- or 100-Mbps) and communication mode (full- or half-duplex) for the print server. Link Settings Syslog Facility Caution! If you change the link setting, network communications with the print server and the attached printer may be lost. ● AUTO (the default) causes the print server to attempt to automatically configure its port to match the network’s link speed and communication mode. If it fails, then 100-Mbps, half-duplex operation is set.
Specifies the outgoing email server (SMTP) for use of the Email (SMTP) scanning to email feature in the embedded web server. This mail Server (for server will be used when any user scans to email from the MFP (or outgoing All-in-One device) attached to the print server. See also DNS mail) Server above. Scan Idle Timeout Specifies the number of seconds that an idle connection for scanning (either web scanning or the client's full-function scanning software) is allowed to remain open.
Sample entries IP Address Mask Description 192.0.0.0 255.0.0.0 Allow all hosts with network number 192. 192.1.0.0 255.1.0.0 Allow all hosts on network 192, subnet 1. 192.168.1.2 Allow the host with IP address 192.168.1.2. The mask 255.255.255.255 is assumed and is not required. Diagnostics ● Network Statistics ● Protocol Info ● Configuration Page ● Refresh Rate Network Statistics Click on the Networking tab at the top of the web page.
Click on the Networking tab at the top of the web page. In the left column of the page, beneath Diagnostics, select Refresh Rate. The refresh rate is the time period (in seconds) that the diagnostic pages will be automatically updated. To assign a parameter setting, enter the desired value and click [Apply]. The value “0” disables the refresh rate.
Preview button. The preview will be displayed in a small window on the Web Scan page. For a flatbed with a multi-page document feeder (ADF): You cannot preview an image from the feeder. Put the document on the glass flatbed instead. Scan (download) the image Follow these easy steps to scan the document placed in the scanner: Note: Do not press the scan button on the MFP; use buttons on the screen as follows. 1. Select the type of image you are scanning using the Image Type buttons.
If the Email To… button works, but then an error message appears... For a multi-page document feeder (ADF): Click Email To… only once. For a PDF image, one file will be created from all the pages in the feeder. For a TIFF or JPEG image, separate files will be created for each page in the feeder. Each file will be contained in a separate ttachment to the message. 6. Complete the form with the From, To, and Subject information. You also may enter a short message introducing the scanned image. 7.
● A3 (11.69 by 16.54) ● A4 (8.3 by 11.7) ● Executive (7.25 by 10.5) ● 4X6 (4 by 6) ● 5X7 (5 by 7) ● 3X5 (3 by 5) ● 3X3 (3 by 3) Image Format settings The image format settings available depend on the capabilities of the scanner in the specific peripheral pointed to by the embedded web server. They include: ● PDF files for easy interchange with other people. When downloading, the browser typically will start the Adobe Acrobat Reader plug-in to view the file in a browser window.
am unable to select “Save” or “Save As”. Resolution: This is a known issue with various versions of Microsoft Internet Explorer and Windows 95, 98, and NT 4.0. A recommended work-around is to download the latest version of Adobe Acrobat Reader, 4.0 or higher. ● Not prompted to “Save File As” or “Open File” Problem: After I click the Scan button, I am not prompted to “Save File As” or “Open File”. Instead, an application or plug-in is loaded and the scanned image is displayed.
● Scan menu item is missing from the Home page. Problem: On the Home page of my embedded web server the Scan item is missing from the left column. Resolution 1: Only HP multifunction (MFP or All-in-One) devices can be used for scanning; check the type of printer attached to the print server. Resolution 2: Web Scan has been disabled on the print server that networks the multifunction printer.
Enabling/disabling: Both alternatives—the print server's support of the full-function client scanning software and the print server's embedded web server Web Scan facility—are enabled by default and therefore available to the network clients. Either or both can be disabled (and then enabled again) in the print server's configuration.
Netscape Navigator 4.7x, 6.0 HP-UX 11.0: ❍ Microsoft Internet Explorer 5.0 and later ❍ Netscape Navigator 4.72–4.75, 6.0, 6.1 Solaris 2.5x, 2.6, 7, 8: ❍ Microsoft Internet Explorer 5.0 and later ❍ Netscape Navigator 4.7x, 6.0 Linux System: ❍ Netscape Navigator 4.6x, 4.7x, 6.0, 6.1 ❍ ● ● ● For the latest list of compatible web browsers, visit HP's Customer Care Online at www.hp.com/support/net_printing.
Security for HP Jetdirect 175x external print server/Internet connector for USB and HP Jetdirect 310x external print server/Internet connector for USB The print server provides security features that can help to minimize unauthorized access to network configuration parameters. Note: Full security in printing environments consists of system authentication (for both servers and clients), data integrity and privacy, and printer access control.
this IP administrative password. ● ● ● IP host access list ❍ Specifies up to 10 host systems, or networks of host systems, that are allowed access to the print server and the attached networked printing device. ❍ Access is generally limited to host systems specified in the list. However, if the list is empty, then all hosts are allowed access. Also, host systems that use HTTP (via the embedded web server or IPP) are not checked against entries in the access list and are allowed access.
Settings, Telnet Config parameter ). ● HP Web Jetadmin password ❍ Configured on the print server using HP Web Jetadmin and an HP-proprietary SNMP MIB (Management Information Base) object. For instructions, refer to your online help for HP Web Jetadmin. Examples of Access Control Settings Settings ● ● ● ● ● ● ● Level of Access Control Embedded web server , SNMP v1/v2c, or Telnet enabled Administrative password not set SNMP Set Community Name not specified Host access list empty None.
● ● ● Password(s) set: IP administrative password, HP Web Jetadmin password, SNMP Set Community Name Host access list contains entries Telnet disabled Limited. If the password is known, access is limited to: ● systems specified in the host access list, or ● systems that use HTTP (embedded web server or IPP) Best used for a non-trusted environment.
Setting up LPD (LPR) Printing for HP Jetdirect 175x external print server/Internet connector for USB and HP Jetdirect 310x external print server/Internet connector for USB The HP Jetdirect print server contains an LPD (Line Printer Daemon) server module to support LPD printing. Other terms for these services are “LPR (Line Printer Request)”, from the perspective of the printing clients, “BSD printing”, and “Print Services for UNIX”.
last step in the hardware installation procedure—done in step 1 of the initial setup below Setup sequence: 1. Install hardware; power on the print server. Refer to procedure. 2. Configure TCP/IP parameters on the print server. Refer to summary of methods. 3. Find the driver for your printer and install it. 4. Create a TCP/IP port and connect it to the driver. You can use Microsoft LPR port, for example. 5.
Meaning of the queue names: The line printer daemon treats data in an text queue as unformatted or ASCII text, and adds a carriage return to each line before sending it to the printer. (Note that the actual observed behavior is that a PCL line termination command (value of 2) is issued at the beginning of the job.) The line printer daemon treats data in an raw queue as formatted files in PCL, PostScript, or HP-GL/2 languages and sends the data without change to the printer.
Note: You may need your Windows System distribution files or CD-ROMs to install TCP/IP components. 1. Check whether you have Microsoft TCP/IP Printing protocol and TCP/IP printing support. Click Start, Settings, Control Panel. Double-click Network. In the resulting Network dialog box, check under the Protocols tab for TCP/IP Protocol and under the Services tab for Microsoft TCP/IP Printing. If both are listed, the necessary software is already installed. (Skip to “B. Configuring the networked printer”).
4. Click Add Port. 5. Select LPR Port, and click New Port. 6. In the Name or address of server providing lpd box, enter the IP address or name of the HP Jetdirect print server. Note: NT clients can enter the IP address or name of the NT server that is configured for LPD printing. 7. In the Name of printer or print queue on that server box, enter the queue name in lower case (raw, text, auto, binps, or the user-defined queue). Then click [OK]. (See the description of queues above.) 8.
Windows 2000 LPD setup procedure Along with these general instructions, see your system documentation for information on configuring these systems. The process consists of these parts: A. Installing TCP/IP software if not already installed B. Configuring the networked printer with the queue and port A. Installing TCP/IP software This procedure lets you check whether you have TCP/IP installed on your Windows 2000 system, and to install the software if necessary.
subnet mask in the appropriate spaces. 4. Click [OK] to exit. 5. If prompted, exit Windows and restart your computer for the changes to take effect. B. Configuring the networked printer Set up the default printer by performing the following steps. 1. Verify that Print Services for Unix is installed, since it is required for LPR port availability: a. Click Start, Setup, and Control Panel. Double-click the Network and Dial-up Connections folder. b.
9. Choose to keep the existing driver, if prompted. Click [Next]. 10. Enter a printer name, and choose whether this printer will be the default printer. Click [Next]. 11. Choose whether this printer will be available to other computers. If shared, enter a share name that identifies the printer to other users. Click [Next]. 12. If desired, enter a location and other information for this printer. Click [Next]. 13. Choose whether to print a test page, and click [Next]. 14. Click [Finish] to close the wizard.
Setting up LPR/LPD on Macintosh systems for HP Jetdirect 175x external print server/Internet connector for USB and HP Jetdirect 310x external print server/Internet connector for USB The setup for LPD (Line Printer Daemon), also known as LPR (Line Printer Request), involves setting up the print queues and creating a port for printing. Prerequisites: ● Mac OS v.8.6 or higher ● LaserWriter 8, version 8.5.1 or higher ● Desktop Printer Utility 1.0 or higher ● Also verify the general LPD prerequisites.
The line printer daemon treats data in an raw queue as formatted files in PCL, PostScript, or HP-GL/2 languages and sends the data without change to the printer. Data in an auto queue will be automatically processed as text or raw, as appropriate. For the binps queue, the line printer daemon requests the PostScript printer driver to output print data in 8-bit binary form (byte values in the range of 0 to 255, instead of the standard ASCII values in the range of 0 to 127).
B. Configuring the Mac OS system 1. Launch the Desktop Printer Utility. 2. Select Printer (LPR) and click [OK]. 3. In the PostScript Printer Description (PPD) File section, click [Change...] and select the PPD for your printer. 4. In the Internet Printer or the LPR Printer section, depending on your version of the Desktop Printer Utility, click [Change...]. 5. Enter the printer server’s IP address or domain name for Printer Address. 6. Enter the queue name, if used. Otherwise, leave it blank.
FTP Printing for HP Jetdirect 310x external print server/Internet connector for USB Note: Not applicable to 175x Introduction FTP (File Transfer Protocol) is a basic TCP/IP connectivity utility to transfer data between systems. FTP printing is a way to use FTP to send print files from a client system to an HP Jetdirect-connected printer. In an FTP printing session, the client connects and sends a print file to the HP Jetdirect FTP server which in turn passes the print file to the printer.
Using standard FTP, a control connection is opened by the client to the FTP server on the HP Jetdirect print server. FTP control connections are used to exchange commands between the client and the FTP server. The HP Jetdirect print server supports up to four control connections (or FTP sessions) simultaneously. If the number of allowed connections is exceeded, a message indicating that service is not available will be displayed. FTP control connections use TCP port 21.
If the connection is successful, a Ready message will be displayed. After a successful connection, the user is prompted for a login name and password. The default is the client's login name. The Jetdirect FTP server will allow any user name. Passwords are ignored. If login is successful, a message "230" will be displayed on the client system. In addition, the available HP Jetdirect ports for printing will be displayed. HP Jetdirect internal print server cards provide a single port (Port 1).
ascii Configures an FTP ASCII file transfer. HP Jetdirect print servers support only non-print format control for character transfers (standard values for spacing and margins are used). [Ctrl-C] Press the [Ctrl] and [C] keyboard keys simultaneously to abort the FTP service command and any transfer of data. The data connection is closed.
257 "/PORT1" is current directory. "HP Color LaserJet 4500" ftp> bin 200 Type set to I. Using binary mode to transfer files. ftp> put d:\atlas\temp\ftp_test.ps 200 PORT command successful. 150 Opening BINARY mode data connection 226- Ready 226- Processing job 226 Transfer complete 31534 bytes sent in 0.04 seconds <788.
Interpreting the configuration page for HP Jetdirect 175x external print server/Internet connector for USB and HP Jetdirect 310x external print server/Internet connector for USB The configuration page (also called a self-test page or configuration plot) for a print server displays messages, network statistics, and status for the print server. To print a configuration page, press the Test button on the print server.
General Jetdirect Information Provides general print server status and identification information. Message Status Description Current state of the print server. ● I/O Card Ready the print server has successfully connected to the network and is awaiting data. ● I/O Card Initializing the print server is initializing the network protocols. For more information, see the status line for each protocol on the configuration page. ● I/O Card Not Ready there is a problem with the print server or its configuration.
USB Printer 1 Heads the section for the USB printer class descriptor information supplied by the manufacturer of the printing device. The number 1 indicates that the configuration and diagnostic pages will be printed on the printing device attached to print server port 1. See USB Port Information. Back to Top USB Port Information Provides the USB printer class descriptors for the device connected to the port.
SSL/TLS For 310x only. (Secure Sockets Layer, Transport Layer Security) Specifies whether IP communication with the print server’s embedded web server is encrypted and secured with an X.509 certificate. A string of the format CN:common-name specifies the common name (CN) of the digital certificate installed. ● Disabled a digital certificate has not been installed.
Back to Top Network Statistics Provides the current values for various network parameters monitored by the print server. Message Description Total Packets Received Total number of frames (packets) received by the print server without error. This includes broadcast, multicast packets, and packets specifically addressed to the print server. This number does not include packets specifically addressed to other nodes. Unicast Packets Received Number of frames specifically addressed to this print server.
Host Name The host name configured on the print server. It may be truncated. ● Not Specified no host name was specified in a BOOTP response or TFTP configuration file. ● NPIxxxxxx the default name is NPIxxxxxx, where xxxxxx represents the last six digits of the LAN hardware (MAC) address. IP Address The Internet Protocol (IP) address assigned to the print server. This is a required entry for its operation on a TCP/IP network. During initialization, a temporary value 0.0.0.0 is displayed.
BOOTP/DHCP Server Displayed during initialization while the print server attempts to obtain its TCP/IP configuration from a BOOTP or DHCP server. The temporary address displayed is 0.0.0.0. ● Not Specified the configuration server’s IP address could not be determined or was set to zero in the response packet. TFTP Server The IP address of the system where the TFTP configuration file is located. During initialization, the temporary address 0.0.0.0 is displayed.
Status Indicates the current IPX/SPX protocol status. ● Ready the print server is awaiting data over IPX/SPX. ● Disabled IPX/SPX was manually disabled. ● Initializing the print server is registering the node address or name. An additional status message may also be displayed. An error code and message are displayed if the print server is not ready. Node Name [This line appears here only for the 175x For the 310x, this line appears in the Novell/NetWare section instead.
Status Indicates the current NetWare configuration status. ● Ready the print server is awaiting data. ● Disabled IPX/SPX was manually disabled. ● Initializing the print server is registering the node address or name. An additional status message may also be displayed. An error code and message are displayed if the print server is not ready. Node Name [This line appears here only for the 310x For the 175x, this line appears in the IPX/SPX section instead.
Status Indicates the current AppleTalk configuration status. ● Read the print server is awaiting data. ● Disabled AppleTalk was manually disabled. ● Initializing the print server is registering the node address or name. An additional status message may also be displayed. An error code and message are displayed if the print server is not ready. Name The name of the printer on the AppleTalk network.
03 LAN ERROREXTERNAL LOOPBACK The print server is incorrectly connected to your network or is defective. Make sure your print server is correctly attached to your network. In addition, check the cabling and connectors. 07 LAN ERRORCONTROLLER CHIP Check the network connections. If the connections are intact, run the power-on self-test: turn the printer off, then on again. If the error persists, replace the print server. 08 LAN ERRORINFINITE DEFERRAL There is a network congestion problem.
13 NETWORK RECONFIG- MUST REBOOT Reset or power cycle the print server to enable the new configuration values. 15 CONFIGURATION ERROR The configuration information for the NetWare functions is not stored correctly on the print server. Use the installation software, embedded web server, or other tools to reconfigure the print server. If this error persists, there may be a problem with the print server. 16 NOT CONFIGURED The print server has not been configured for NetWare.
1C PRINT SERVER NO DEFINED The file server does not have a print server object that corresponds to the specified NetWare node name. Use printer installation software, a NetWare utility (such as PCONSOLE), or another tool to create the print server object. Note: When the print server is configured for multiple file servers, the error is only displayed on the configuration page if none of the file servers was successfully connected. 1D UNABLE TO CONNECT TO SERVER Remote Printer mode error.
23 UNABLE TO ATTACH TO QUEUE A failure was detected when the print server tried to attach to one of the queues assigned to the print server object. This may be because no servers are allowed to attach to this queue. There may also be a networking or security problem.
2D NDS ERR: CHANGE PSSWRD FAILED Cannot modify the print server password to the value expected by the print server. 2E NDS SERVER PUBLIC KEY ERROR Print Server Object Name mismatch. Unable to read the file server’s public key. Verify object names, or contact the NDS administrator. 2F NDS ERR: SRVR NAME UNRESOLVD The file server on the network cannot be located. The server may not be running at this time or a communications problem may exist.
3A UND ERR: UNABLE TO FIND TREE The NDS tree cannot be located. The message may occur when the file server is not running or when a network communications problem exists. 3B NDS CONNECTION STATE ERROR The print server cannot change the NDS connection state. Check licenses on the spooling server. 3C NDS ERR: UNRESOLVED QUEUE The print queue object cannot be located in the specified NDS context. 3D NDS ERR: CANNOT READ Q HOST Cannot locate the file server on the network.
46 INVALID SERVER ADDRESS The TFTP server IP address specified for the print server (through BOOTP) is an invalid IP address for specifying a single node. Check your Bootptab file for proper entries. 47 INVALID TRAP DEST ADDRESS One of the SNMP trap (Trap PDU) destination IP addresses specified for the print server (through TFTP) is an invalid IP address for specifying a single node. Check your TFTP configuration file.
53 BAD BOOTP TAG SIZE The tagsize in a vendor specific field in the BOOTP reply is either 0, or greater than the remaining number of unprocessed bytes in the vendor specified area. 54 BOOTP/RARP IN PROGRESS The print server is currently in the process of obtaining its basic IP configuration information through BOOTP/RARP. 55 BOOTP/DHCP IN PROGRESS The print server is currently in the process of obtaining its basic IP configuration information through BOOTP/DHCP, and has not detected any errors.
Interpreting the lights on the print server for HP Jetdirect 175x external print server/Internet connector for USB and HP Jetdirect 310x external print server/Internet connector for USB Power/Status light 10 or 100 Link lights USB light Power/Status Light Light Behavior Description Off Print server is not receiving power. On solid green Print server is on and ready. Blinking slowly (green) Print server receiving power but not ready; self-test may still be in process.
Light Behavior Description Off No network connection. On solid green Network connection is established at 10 Mb/s or at 100Mb/s. USB Light Light Behavior Description Off USB is not operational. This is OK before the print server finishes starting up. After startup completes, this could indicate a faulty print server. On solid green USB is enabled and ready for use. This begins before the USB cable is connected. Blinking (green) Software fault occurred for the firmware.
● ● ● Detach the USB cable and power cycle the print server (unplug it and plug it back in). If the USB LED is green and steady, then the print server is OK. If it is blinking amber, then the print server is faulty. Try reconnecting the USB cable to the print server only, and power cycle the print server (unplug it and plug it back in). If the USB LED is green and steady, then the cable is also OK. If it is blinking amber, then the cable may be faulty.
Troubleshooting Overview for HP Jetdirect 175x external print server/Internet connector for USB and HP Jetdirect 310x external print server/Internet connector for USB The questions below will help you troubleshoot your print server quickly. Just answer each question in turn. For each question: ● If your answer is Yes, go on to the next question. ● If your answer is No, there is a problem. Click on the No button for a procedure to solve the problem.
Is one of the print server’s 10/100 link lights ON (solid green)? If Yes, continue with the next question.
Is your printer ON and ONLINE? for HP Jetdirect 175x external print server/Internet connector for USB and HP Jetdirect 310x external print server/Internet connector for USB Check the following items to make sure that your printer is online and ready to print. ● Is the printer plugged in and switched on? Make sure that the printer is plugged in and switched on. If your printer has a front panel display, it should not be blank.
ON and ONLINE? for HP Jetdirect 175x external print server/Internet connector for USB and HP Jetdirect 310x external print server/Internet connector for USB The first step in troubleshooting your print server is to make sure that the attached printer is ready to receive a print job from the print server. To do this, you check the printer's lights or control panel to see whether it is ON and ONLINE.
Does your printer have a control panel display? for HP Jetdirect 175x external print server/Internet connector for USB and HP Jetdirect 310x external print server/Internet connector for USB Is there a display panel on the front of your printer that provides messages about the printer’s status? ©2000, 2001 Hewlett-Packard Company
Check your printer manual. for HP Jetdirect 175x external print server/Internet connector for USB and HP Jetdirect 310x external print server/Internet connector for USB There appears to be a printer error. Please refer to your printer manual for further information on how to correct the error, or for information on how to contact Hewlett-Packard technical support if you can't correct the error. (Note that your printer manual may be either printed on paper or stored electronically on a CD-ROM.
Does the control panel display on your printer show an error message? for HP Jetdirect 175x external print server/Internet connector for USB and HP Jetdirect 310x external print server/Internet connector for USB ©2000, 2001 Hewlett-Packard Company
Check your printer manual. for HP Jetdirect 175x external print server/Internet connector for USB and HP Jetdirect 310x external print server/Internet connector for USB Please refer to your printer manual for further information on what the error means and how to correct it. (Note that your printer manual may be either printed on paper or stored electronically on a CD-ROM.
Check your printer manual. for HP Jetdirect 175x external print server/Internet connector for USB and HP Jetdirect 310x external print server/Internet connector for USB There appears to be a printer error. If the printer is still not online and does not show an error message on the control panel display, please refer to your printer manual for further information on how to correct the error, or for information on how to contact Hewlett-Packard technical support if you can't correct the error.
Is the USB light ON solid green? for HP Jetdirect 175x external print server/Internet connector for USB and HP Jetdirect 310x external print server/Internet connector for USB USB port USB light light on your print server. It should be ON solid Check the USB green (bright green in color and glowing continuously, not blinking). If it is not ON solid green, please follow the troubleshooting steps below. 1.
works with USB printers only. Make sure that the cable is connected firmly to both the printer and the print server. 2. Check that both the printer and the print server are powered on.
USB OK? (USB light ON solid green?) for HP Jetdirect 175x external print server/Internet connector for USB and HP Jetdirect 310x external print server/Internet connector for USB The print server connects to its printer via a USB cable. If the USB connection is working correctly, the USB light on the print server will be ON solid green (bright green in color and glowing continuously, not blinking). If the USB connection is not working correctly, the USB light may be off, blinking green, or blinking amber.
What is the state of the USB light? for HP Jetdirect 175x external print server/Internet connector for USB and HP Jetdirect 310x external print server/Internet connector for USB The behavior of the USB light indicates the status of the USB connection. If the USB light on your print server is not ON solid green, find its state in the list below and click on it to continue troubleshooting.
USB light OFF for HP Jetdirect 175x external print server/Internet connector for USB and HP Jetdirect 310x external print server/Internet connector for USB If the USB light is OFF, it means that the print server’s USB connection is not operational. This is OK before the print server finishes starting up (whether or not a USB cable is attached). If the light remains OFF after startup, then the print server may be faulty.
USB light blinking green for HP Jetdirect 175x external print server/Internet connector for USB and HP Jetdirect 310x external print server/Internet connector for USB If the USB light is blinking green, it indicates that the print server has detected a good connection to a valid USB device, but the print server does not support the device. For example, this would happen if you connected a USB digital camera to the print server.
USB light blinking amber for HP Jetdirect 175x external print server/Internet connector for USB and HP Jetdirect 310x external print server/Internet connector for USB If the USB light is blinking amber, there might be a hardware fault (for example, a short-circuit, faulty cable, or a printer drawing too much power). To verify, disconnect the USB cable at the print server. Switch on the printer if it is off. Power cycle the print server (unplug it and plug it back in). Then reconnect the USB cable.
server), get assistance from HP Jetdirect technical support; click on the No button for information on contacting HP.
Is the Power/Status light ON solid green? for HP Jetdirect 175x external print server/Internet connector for USB and HP Jetdirect 310x external print server/Internet connector for USB power/status light power receptacle light on your print server. It should be ON Check the power/status solid green (bright green in color and glowing continuously, not blinking). If it is not ON solid green, please follow the troubleshooting steps below.
typical power module (to power source) power connector (to print server) 2. If necessary, try plugging the power module into a different power source. 3. Try a different power module/cable if one is available.
Power/Status OK? (Power/Status light ON solid green?) for HP Jetdirect 175x external print server/Internet connector for USB and HP Jetdirect 310x external print server/Internet connector for USB The power/status light provides information on the state of the print server’s power connection and on its physical connection to the network. If connections are working correctly, the power/status light should be ON solid green (bright green in color and glowing continuously, not blinking).
What is the state of the Power/Status light? for HP Jetdirect 175x external print server/Internet connector for USB and HP Jetdirect 310x external print server/Internet connector for USB The behavior of the power/status light indicates the status of the print server’s power connection and its physical connection to the light on your print server is not ON network. If the power/status solid green, find its state in the list below and click on it to continue troubleshooting.
Power/Status light OFF for HP Jetdirect 175x external print server/Internet connector for USB and HP Jetdirect 310x external print server/Internet connector for USB If the power/status light is OFF, your power module may be faulty. Fixing this fault requires assistance from HP Jetdirect technical support; click on the button below for information on contacting HP.
Power/Status light blinking green for HP Jetdirect 175x external print server/Internet connector for USB and HP Jetdirect 310x external print server/Internet connector for USB The power/status light should be ON solid green to indicate that print server power is OK and that the network cable is connected light is blinking properly to the print server. If the power/status green, please try the steps below and make changes as necessary. 1.
Jetdirect technical support; click on the No button for information on contacting HP.
Power/Status light blinking amber for HP Jetdirect 175x external print server/Internet connector for USB and HP Jetdirect 310x external print server/Internet connector for USB Your print server has developed a fault. Fixing this fault requires assistance from HP Jetdirect technical support; click the Contact HP button for information on contacting HP.
Is one of the link lights ON (solid green)? for HP Jetdirect 175x external print server/Internet connector for USB and HP Jetdirect 310x external print server/Internet connector for USB 10 light 100 light Check the link lights on your print server; these lights are built into the network connector. One of the link lights -- either the 10 light or the 100 light, but not both -- should be ON solid green, to indicate a valid network connection.
10/100 link OK? (10 light or 100 light ON solid green?) for HP Jetdirect 175x external print server/Internet connector for USB and HP Jetdirect 310x external print server/Internet connector for USB The link lights -- the 10 light and the 100 light -- indicate whether the print server can initiate a network link at the right speed with your hub, switch, or router.
Check the print server’s I/O status. for HP Jetdirect 175x external print server/Internet connector for USB and HP Jetdirect 310x external print server/Internet connector for USB Check the I/O status of the print server by following these steps: 1. Print a Jetdirect configuration page. To print the page, press the test button on the print server. test button If the configuration page does not print, click here for help in getting it to print. 2.
Does the page indicate “I/O Card Ready”? ©2000, 2001 Hewlett-Packard Company
I/O card not ready for HP Jetdirect 175x external print server/Internet connector for USB and HP Jetdirect 310x external print server/Internet connector for USB Check the following items to see whether you can correct the “I/O Card Not Ready” situation. (If you have already performed these steps earlier in the troubleshooting process, you can skip them and go directly to answering the question at the end of the steps.) 1. Make sure that the network cable is connected securely to the print server.
Error messages for HP Jetdirect 175x external print server/Internet connector for USB and HP Jetdirect 310x external print server/Internet connector for USB If your configuration page shows a status of “I/O Card Not Ready”, you will see a specific error message just below the status line. This error message indicates what is preventing the print server from functioning correctly. From the list below, please click on the error message that you see on the configuration page.
03 LAN Error: EXTERNAL LOOPBACK for HP Jetdirect 175x external print server/Internet connector for USB and HP Jetdirect 310x external print server/Internet connector for USB The print server is incorrectly connected to the network or is defective. Make sure that your print server is correctly attached to your network. In addition, check all other cabling and connectors.
08 LAN Error: INFINITE DEFERRAL for HP Jetdirect 175x external print server/Internet connector for USB and HP Jetdirect 310x external print server/Internet connector for USB There is a network congestion problem. For help in correcting this error, please check your print server documentation or contact HP Jetdirect technical support. Click on the button below for information on contacting HP.
11 LAN Error: RETRY FAULTS for HP Jetdirect 175x external print server/Internet connector for USB and HP Jetdirect 310x external print server/Internet connector for USB There is a problem with your network cabling or with your external network configuration. Verify that your hub/switch/router port is operating correctly. For help in correcting this error, please check your print server documentation or contact HP Jetdirect technical support. Click on the button below information on contacting HP.
12 LAN Error: NO LINKBEAT for HP Jetdirect 175x external print server/Internet connector for USB and HP Jetdirect 310x external print server/Internet connector for USB When the print server is connected to a 10/100 Base-TX port, this message is displayed if the Link Beat signal is not sensed. Check the network cable, and verify that the hub/switch/router is providing Link Beat. For help in correcting this error, please check your print server documentation or contact HP Jetdirect technical support.
Print server OK for HP Jetdirect 175x external print server/Internet connector for USB and HP Jetdirect 310x external print server/Internet connector for USB At this point in the troubleshooting procedure, it appears that: ● your print server hardware is functioning correctly ● your physical network connection is functioning correctly ● the print server and the printer are connected correctly Click on the Continue button below to return to the Troubleshooting Overview page and continue with the next
Link lights OFF for HP Jetdirect 175x external print server/Internet connector for USB and HP Jetdirect 310x external print server/Internet connector for USB Try the steps below and make any necessary corrections. 1. Make sure that the network cable is connected securely to the print server. network cable 2. Check that the network cable is plugged securely into the hub/switch/router, and that the connection is set to the correct network speed.
technical support telephone numbers.
Configuration page does not print, or is unreadable for HP Jetdirect 175x external print server/Internet connector for USB and HP Jetdirect 310x external print server/Internet connector for USB If the configuration page does not print, try these steps. If the configuration page prints but is unreadable, skip to step 4. 1. Make sure your printer is connected to your print server by a USB A-to-B cable. (This is the standard USB cable.
print or will be unreadable if it does print. By default, the print server is configured to determine the appropriate printer language automatically. It is possible that the print server is not able to determine automatically which language it should use for your printer. You can cycle through the 4 printer languages using the following procedure: a. Press and hold the print server’s test button. After about 3 seconds, the power/status LED changes to amber.
information on contacting HP.
Resetting print server to factory defaults (cold reset) for HP Jetdirect 175x external print server/Internet connector for USB and HP Jetdirect 310x external print server/Internet connector for USB Once you configure the HP print server, the configuration settings are retained in memory unless you manually reset them to factory defaults. To reset the print server configuration to factory defaults, follow these steps: 1. Unplug the power module from the back of the print server. on the back of the 2.
Browse HP for HP Jetdirect 175x external print server/Internet connector for USB and HP Jetdirect 310x external print server/Internet connector for USB General Information (http://www.hp.com/support/net printing) (The central location on HP’s web site for the HP Jetdirect print servers and similar products) Online Customer Forum (http://www.hp.com/go/forums) (The central location on HP’s web site for the HP Jetdirect print servers and similar products) Customer Support (http://www.hp.
Colombia Israel Portugal United Kingdom Czech Republic Italy Russian Federation US Viet Nam Asia Pacific Australia (03) 8877 8000 Hours of operation: 9:00 a.m. to 5:00 p.m. Monday through Friday For all spare parts including technical reference manuals, call: 1800 670 054 Hours of operation: 9:00 a.m. to 5:00 p.m. Monday through Friday China + 86 (0)10 6564 5959 Hours of operation: 8:30 a.m. to 5:30 p.m. Monday through Friday India + 91 11 682 6035 Hours of operation: 9:30 a.m. to 5:30 p.m.
Thailand +66 (2) 661 4000 Hours of operation: 8:30 a.m. to 5:30 p.m. Monday through Friday Viet Nam +84 (0) 8 823 4530 Hours of operation: 8:00 a.m. to 5:00 p.m. Monday through Friday and from 8:00 a.m. to 12.00 p.m on Saturday North America Canada 905-206-4663 or (800) 387-3867 Hours of operation: 8:00 a.m. to 8:00 p.m. Monday through Friday US 208-323-2551 Hours of Operation: 6:00 a.m. to 6:00 p.m.
9:00 a.m. to 6:00 p.m. on Saturday Support - HelpPhone : Phone: 0800 157 751 Fax: + 55 (11) 3747-7765 Hours of operation: 8:00 a.m. to 7:00 p.m. Monday through Friday Chile Post-sales Business Computing 800-22-5547 Post-sales Home Office Computing Phone : 800-360-999 Pre-sales 123-800-360-999 Hours of operation: 9:00 a.m. to 6:00 p.m. Monday through Friday Colombia 9-800-91477 Hours of operation: 8:00 a.m. to 6:00 p.m.
France + 33 (0)1 43 62 34 34 Germany + 49 (0)180 52 58 143 (24PF/min) Greece +30 (0) 1 60 73 603 Hours of operation: 9:00 a.m. to 5:00 p.m. Monday through Friday Hungary +36 (0)1 382 1111 Hours of operation: 8:30 a.m. to 6:00 p.m. Monday through Friday Ireland + 353 (0)1 662 5525 Israel Phone: + 972 (0)9 9524848 Fax : + 972 (0)9 9524849 Hours of operation: 9:00 a.m. to 6:00 p.m.
United Arab Emirates Customer Care Reception & Technical Support Phone : 971 4 883 8454 Fax : 971 4 883 9495 This Call Center will answer customer queries from UAE, but also Bahrain, Qatar, Saudi Arabia, Jordan, Palestine, Egypt, Yemen, Lebanon, Kuwait & Oman. The languages supported are English & Arabic. United Kingdom + 44 (0)207 512 52 02 End of troubleshooting.
Can you print a Jetdirect configuration page? for HP Jetdirect 175x external print server/Internet connector for USB and HP Jetdirect 310x external print server/Internet connector for USB To print a configuration page, press the test button server. on the print test button A configuration page should print on the connected printer.
Configuration page prints? for HP Jetdirect 175x external print server/Internet connector for USB and HP Jetdirect 310x external print server/Internet connector for USB The Jetdirect configuration page is a page that the print server sends to the attached printer, both as a test of the connection between the print server and the printer, and as an display of the status of the print server’s functions.
Configuration page does not print, or is unreadable. for HP Jetdirect 175x external print server/Internet connector for USB and HP Jetdirect 310x external print server/Internet connector for USB If the configuration page does not print successfully, try the steps below. If the page prints but is unreadable, note step 4 particularly. 1. Make sure your printer is connected to your print server by a USB A-to-B cable. (This is the standard USB cable.
determine the appropriate printer language automatically. It is possible that the print server is not able to determine automatically which language it should use for your printer. Please refer to your printer documentation to find out which printer languages are supported by your printer. Then check the electronic documentation on the Jetdirect CD-ROM for information on setting a specific printer language for the configuration page, to match one of the languages supported by your printer. 5.
Getting Support and Service ● ● Getting support: ❍ Telephone support ❍ WWW: HP Web support pages ❍ HP forums Getting warranty service HP support by phone Highly trained technicians are ready to take your call. Note: Telephone fees are the responsibility of the caller. Rates may vary. Contact your local telephone company for current rates. For the most recent HP Customer Care telephone numbers worldwide, visit http://www.hp.com/support/support_assistance to access a list of regional telephone numbers.
Jetdirect print server. You can access the user forum for network printing from http://www.hp.com/go/forums.
Software, Driver, and Firmware Image Upgrades HP Jetdirect Print Servers Hewlett-Packard offers downloadable electronic upgrades for HP Jetdirect print servers with internal Flash memory. The electronic upgrades are available on the Web and various online services. Current information about drivers, software versions, and HP Jetdirect firmware images are available from the following: World Wide Web Access HP’s online support at http://www.hp.
Limited Global Warranty Statement and Service for HP Jetdirect 175x external print server/Internet connector for USB and HP Jetdirect 310x external print server/Internet connector for USB ● Getting warranty service ● Your warranty period ● Limited Warranty Statement HEWLETT-PACKARD LIMITED GLOBAL WARRANTY STATEMENT HP Product Duration of Warranty HP Jetdirect 175x external print server/Internet Connector for USB One (1) year HP Jetdirect 310x external print server/Internet Connector for USB Thr
time, to repair or replace any product to a condition as warranted, you will be entitled to a refund of the purchase price upon prompt return of the product. 4. HP products may contain remanufactured parts equivalent to new in performance or may have been subject to incidental use. 5.
SUPPLIERS BE LIABLE FOR LOSS OF DATA OR FOR DIRECT, SPECIAL, INCIDENTAL, CONSEQUENTIAL (INCLUDING LOST PROFIT OR DATA), OR OTHER DAMAGE, WHETHER BASED IN CONTRACT, TORT, OR OTHERWISE. Some countries, states or provinces do not allow the exclusion or limitation of incidental or consequential damages, so the above limitation or exclusion may not apply to you.
If you encounter difficulty, begin by contacting the person who sold you the HP Jetdirect print server to you. Your HP Authorized Dealer will be familiar with your requirements and can provide assistance. HP support for warranty service For warranty service on HP Jetdirect products, call HP support. See phone numbers or visit http://www.hp.com/support/support_assistance. The HP support representative will help you with troubleshooting, and advise you on warranty service.
Specifications for HP Jetdirect 175x external print server/Internet connector for USB and HP Jetdirect 310x external print server/Internet connector for USB ● Networking specs ● Physical specs ● Environmental specs ● Electrical specs ● Electromagnetic specs ● Safety statements ● Regulatory statements Supported networking Physical ● ● Supports unshielded or shielded twisted-pair cabling, using an RJ-45 connector, for: ❍ IEEE 802.3i 10Base-T (Ethernet) ❍ IEEE 802.
Network See network specifications above. USB Female “A” connector, complies with USB version 1.1 specifications Physical dimensions With clip attached Excluding any protrusions for connectors, clips, and so on Width 97 mm (3.8 in) 92 mm (3.6 in) Length 129 mm (5.1 in) 129 mm (5.1 in) Height 45 mm (1.8 in) 36 mm (1.4 in) Weight Weight 108 g (3.
Continental Europe 0950-3349 230 Vac 50 Hz 13 Vdc @ 800 mA 0950-3173 100 Vac 50 Hz 13 Vdc @ 300 mA 0950-3352 100 Vac 50 Hz 13 Vdc @ 800 mA 9100-5168 220–240 Vac 50 Hz 13 Vdc @ 625 mA 0950-3351 220 Vac 50 Hz 13 Vdc @ 800 mA 9100-5171 220–250 Vac 50 Hz 13 Vdc @ 625 mA 0950-3354 220–250 Vac 50 Hz 13 Vdc @ 800 mA United Kingdom, Singapore, Ireland, Hong Kong 0950-3171 220–240 Vac 50 Hz 13 Vdc @ 300 mA 0950-3350 220–240 Vac 50 Hz 13 Vdc @ 800 mA USA, Canada, Latin American, Taiwan 0
radio communications. However, there is no guarantee that interference will not occur in a particular installation. If this equipment does cause interference to radio or television reception, which can be determined by turning the equipment off and on, the user is encouraged to try to correct the interference by one or more of the following measures: ● Reorient or relocate the receiving antenna. ● Increase the separation between the equipment and receiver.
China: Chinese Safety Statement See Chinese Safety Statement.
DECLARATION OF CONFORMITY according to ISO/IEC Guide 22 and EN45014 Manufacturer's Name: Hewlett-Packard Company Manufacturer's Address: 8000 Foothills Blvd. Roseville, CA 95747-5677 U.S.A.
DECLARATION OF CONFORMITY according to ISO/IEC Guide 22 and EN45014 Manufacturer's Name: Hewlett-Packard Company Manufacturer's Address: 8000 Foothills Blvd. Roseville, CA 95747-5677 U.S.A.