HP Pavilion Notebook PC User's Guide
Notice This manual and any examples contained herein are provided “as is” and are subject to change without notice. Hewlett-Packard Company makes no warranty of any kind with regard to this manual, including, but not limited to, the implied warranties of merchantability and fitness for a particular purpose. Hewlett-Packard Co. shall not be liable for any errors or for incidental or consequential damages in connection with the furnishing, performance, or use of this manual or the examples herein.
HP Software Product License Agreement Your HP Pavilion Notebook PC contains factory-installed software programs. Please read the Software License Agreement before proceeding. Carefully read this License Agreement before proceeding to operate this equipment. Rights in the software are offered only on the condition that the customer agrees to all terms and conditions of the License Agreement. Proceeding to operate the equipment indicates your acceptance of these terms and conditions.
Microsoft contained in any such product recovery CD-ROM shall be governed by the Microsoft End User License Agreement (EULA). Transfer of Rights in Software. Customer may transfer rights in the software to a third party only as part of the transfer of all rights and only if Customer obtains the prior agreement of the third party to be bound by the terms of this License Agreement.
Contents Introducing the Pavilion Notebook PC ...........................................................................9 Taking Inventory.........................................................................................................10 Software bundled on your computer .....................................................................10 To buy Pavilion Notebook accessories..................................................................11 To find more information ............................
To take care of your computer...............................................................................47 To safeguard your data ..........................................................................................47 To extend the life of the display ............................................................................48 To get the most from your batteries.......................................................................48 To clean your computer.........................................
Service and Support........................................................................................................89 Hewlett-Packard Limited Warranty Statement ...........................................................90 Getting Support for Your Pavilion PC ........................................................................92 To use the Pavilion Notebook User’s Guide .........................................................92 To get help from the HP notebook website ..........................
Battery Safety ......................................................................................................126 Laser Safety.........................................................................................................126 Regulatory Information .............................................................................................127 U.S.A. ..................................................................................................................127 Canada ..................
Introducing the Pavilion Notebook PC User's Guide 9
Introducing the Pavilion Notebook PC Taking Inventory Taking Inventory • HP Pavilion Notebook PC. • Main battery. • AC adapter and power cord. • Telephone cord. • Quick Start sheet. • The HP Pavilion Notebook PC Setup Guide. • Pavilion Notebook Recovery CD (or CDs), used to restore Windows and all software included with your computer. • Microsoft Encarta CD. • Microsoft Works CD. • Microsoft Money CD. • Microsoft Windows manual.
Introducing the Pavilion Notebook PC Taking Inventory Electronic Registration Permits quick and easy registration of your computer. See “To register your computer ” for details. Adobe Acrobat Reader Allows you to read documents in Acrobat format, which is used frequently on the Web. HP DiagTools Provides hardware diagnostic tests. AudioRack CD Player Controls play of audio CDs. MusicMatch Jukebox Controls play of MP3 music files.
Introducing the Pavilion Notebook PC Taking Inventory To find more information Congratulations! Your Pavilion Notebook PC sets a new standard in personal computing. It is compact and easy to carry, and is infused with the quality and attention to detail that are the hallmark of Hewlett-Packard. The Pavilion Notebook PC Quick Start sheet shows how to get your computer up and running quickly. This table lists other sources of information about your computer.
Introducing the Pavilion Notebook PC Identifying the Parts of the Pavilion Notebook Identifying the Parts of the Pavilion Notebook Front view 1 Latch to open the computer 2 Built-in microphone 3 Blue power button 4 Status lights (see "Status lights") 5 Built-in speakers 6 Touch pad (pointing device) User's Guide 13
Introducing the Pavilion Notebook PC Identifying the Parts of the Pavilion Notebook 7 Click buttons 8 CD player power 9 CD player buttons 10 CD-ROM drive or DVD drive 11 Kensington lock slot (security connector) 12 Modem phone jack Side view 13 PC Card eject button 14 PC Card and CardBus slots (upper and lower) 15 Floppy disk drive 14 User's Guide
Introducing the Pavilion Notebook PC Identifying the Parts of the Pavilion Notebook Rear view 16 Parallel port 17 Serial port 18 VGA port (external monitor) 19 Audio out (external speaker) 20 Microphone jack 21 Infrared port 22 USB port 23 PS/2 port 24 AC adapter jack User's Guide 15
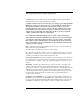
Introducing the Pavilion Notebook PC Identifying the Parts of the Pavilion Notebook Bottom view 24 Battery 25 Battery latch 26 RAM expansion cover 27 Hard disk drive 28 Hard disk drive latch and locking screw 29 System-off button (for resetting computer) 30 Port replicator connector 16 User's Guide
Introducing the Pavilion Notebook PC Identifying the Parts of the Pavilion Notebook Status lights 1 Power 2 AC connected 3 Battery 4 Caps Lock 5 Num Lock 6 Scroll Lock 7 Floppy disk drive access 8 Hard disk drive access 9 CD-ROM or DVD access User's Guide 17
Introducing the Pavilion Notebook PC Identifying the Parts of the Pavilion Notebook CD-ROM drive buttons Selected Pavilion Notebook models have CD-ROM buttons on the front. If you have a CD-ROM drive or a DVD drive, you can use these buttons to play music CDs when the system is off. (When the system is on, use the software controls in the Windows operating system.
Introducing the Pavilion Notebook PC Setting Up the Computer Setting Up the Computer To install the battery WARNING Do not mutilate, puncture, or dispose of batteries in fire. A battery can burst or explode, releasing hazardous chemicals. A rechargeable battery must be recycled or disposed of properly. Your computer is shipped with the battery installed.
Introducing the Pavilion Notebook PC Setting Up the Computer To connect a phone line Your Pavilion Notebook has a built-in modem. If you prefer, you can instead use a PC Card modem or an external modem to connect to a phone line. 1. Plug one end of the phone line into the (modem) phone jack on the computer. Be sure it clicks into place. 2. Plug the other end of the phone line into a telephone jack. (If the phone line does not fit your telephone jack, you may need to use an adapter.
Introducing the Pavilion Notebook PC Setting Up the Computer To turn on the computer Press the blue power button above the keyboard. Windows starts automatically. If you are turning on the computer for the first time, go to “To set up Windows” on page 21. The power status light (see “Status lights” on page 17) reports the following: • Steady green light: computer is on. • Slow blinking: computer is in System Standby or Suspend mode. • No light: computer is off or in Hibernate mode.
Introducing the Pavilion Notebook PC Setting Up the Computer 1. Press the blue power button. 2. The Windows Setup program starts automatically. 3. Follow the instructions as they appear on the screen. During setup, you are prompted to: • Enter a user name. • Register your computer. • Accept the License Agreement. • Select an Internet Service Provider. Note If you experience any connection problems with your modem, you can try redialing.
Introducing the Pavilion Notebook PC Setting Up the Computer By fax If a printer is connected to your computer, you can print a copy of your registration and fax it to HP. You will find the fax number on the registration form. By completing registration, you will: • Record your ownership of the Pavilion Notebook with Hewlett-Packard and gain access to service, support, and information. • Optionally, record your ownership of the Windows operating system with Microsoft.
Using the Pavilion Notebook PC User's Guide 25
Using the Pavilion Notebook PC Operating the Computer Operating the Computer To use the Fn hot keys The combination of the Fn key plus another key creates a hot key—a shortcut key sequence—for various system controls. Press and hold Fn while pressing the appropriate key. (Press and hold Ctrl+Alt with the appropriate key when using an external keyboard.
Using the Pavilion Notebook PC Operating the Computer The Applications key brings up the shortcut menu for the current application. This is the same menu that appears when you click the right mouse button while pointing at the application.
Using the Pavilion Notebook PC Operating the Computer To adjust the display If your computer has an HPA display, you can adjust the display contrast. • To increase the contrast, press Fn+F1. • To decrease the contrast, press Fn+F2. There is no brightness control. If your computer has a TFT display, the contrast and brightness are preset. You cannot adjust them. To adjust the volume From the keyboard • To increase the volume, press Fn+UP ARROW. • To decrease the volume, press Fn+DOWN ARROW.
Using the Pavilion Notebook PC Operating the Computer To use the touch pad The touch pad, a touch-sensitive pointing device that controls the motion and speed of the pointer on the screen, is built into your computer. 1. Move a thumb or finger across the touch pad in the direction you want the pointer to move. 2. Use the click buttons, which function like the left and right buttons on a mouse, to make your selection. You can also tap on the touch pad instead of clicking a button.
Using the Pavilion Notebook PC Securing the Computer Securing the Computer To set up password protection You can protect your computer from access by another user when you set up password protection, which is available either through Windows (software) or through the BIOS Setup utility (hardware). Both provide protection when the computer is rebooted: a user must then enter the password.
Using the Pavilion Notebook PC Securing the Computer 3. Select Change Passwords tab. 4. Click Change Windows Password. 5. Enter your old Windows password, if you had one; if not, leave Old Password blank. 6. Enter your new password twice. 7. Click OK and Close. To activate password protection when resuming in Windows ME: 1. Check that you have set up a Windows password, as described above. 2. Click Start, Settings, Control Panel 3. Double-click Power Options. 4. Select Advanced tab. 5.
Using the Pavilion Notebook PC Securing the Computer 2. Loop the cable to create a slipknot around the stationary object—make sure it can’t slip off. 3. Insert the lock into the computer's security connector and release the key. Store the key in a safe place away from the computer. To use the VirusScan utility Virus software can help protect the integrity of your data. This is especially important when you are connected to the Internet.
Using the Pavilion Notebook PC Working in Comfort Working in Comfort WARNING Improper use of keyboards and other input devices has been associated with ergonomic injury. For more information about reducing your risk, visit our ergonomics Web site at www.hp.com/ergo. Thank you for selecting HP computing equipment. To optimize your comfort and productivity, it is important that you set up your work area correctly and use your HP equipment properly.
Using the Pavilion Notebook PC Working in Comfort RSI also has been observed in those who frequently engage in activities such as carpentry, knitting, housework, gardening, tennis, windsurfing and lifting children. What causes RSI? The specific causes of RSI have not been established. Nevertheless, the incidence of RSI has been associated with a variety of risk factors, including: • Too many uninterrupted repetitions of an activity or motion. • Performing an activity in an awkward or unnatural posture.
Using the Pavilion Notebook PC Working in Comfort Your Chair It's very important that your chair provides a comfortable sitting position and offers the following features: • A stable base, such as five legs with casters. Make sure the casters are designed for the type of floor you have in your workspace, whether it is bare or carpeted. • A height- and tilt-adjustment feature. It should be easy to adjust your chair height from 40 cm to 52 cm (15.5 inches to 20.
Using the Pavilion Notebook PC Working in Comfort • A freely rotating swivel so you can move easily from side-to-side. • Fully adjustable and padded armrests. The chair arms should not interfere with adjusting the chair or moving it close to your work surface. Your Work Surface Ideally, you should be able to adjust the height of your work surface. A simple way to ensure your work surface is at the correct height is to first adjust the height of the seat-pan of your chair.
Using the Pavilion Notebook PC Working in Comfort • Legs: Your thighs should be horizontal or angled slightly downward. Your lower legs should be near a right angle to your thighs. Your feet should rest flat on the floor. If necessary, use a footrest, but double check that you have your seat height adjusted correctly before getting a footrest. • Head: Your head should be upright or tilted slightly forward. Avoid working with your head or trunk twisted.
Using the Pavilion Notebook PC Working in Comfort • The top of your monitor screen should be at or slightly below eye level. Most HP monitors come with a tilt-and-swivel feature that makes it easy to adjust the screen position. • To avoid obscuring your view, the screen should be positioned perpendicular to your line of sight; that is, straight on. • To avoid glare or reflection, try to position the monitor so the screen is at a right angle to your window rather than in front of it.
Using the Pavilion Notebook PC Working in Comfort twisting. Some users prefer a document holder mounted to the monitor while others prefer the document holder positioned between the screen and keyboard. • If the primary task is to view documents rather than using the monitor, the document holder may be placed directly in front of the keyboard with the monitor slightly to the side.
Using the Pavilion Notebook PC Working in Comfort (25 to 30 inches) above the floor and tilt forward and backward to help you find the most comfortable position. Note that research has shown that there may be less muscle tension in shoulders and forearms with the keyboard tilted away from you. • When using your HP keyboard, remember it takes very little pressure or force from your fingers to activate the keys.
Using the Pavilion Notebook PC Working in Comfort • When using a stylus or light pen with a graphics tablet, don't grip the stylus tightly. Keep your hand and fingers relaxed and try to maintain a neutral posture in your hand, wrist and forearm. • If you use your thumb to rotate the ball on a trackball or spaceball, keep it in a relaxed, natural shape, and maintain a neutral posture in your hand, wrist, and forearm. • Hold the mouse gently by draping your fingers over it.
Using the Pavilion Notebook PC Working in Comfort General • Work Surface Height: Adjust either your seat height, work surface, or both, to position the work surface at approximately elbow height. • Work Surface Arrangement: Make sure frequently used equipment is within easy reach. For example, if you are primarily using the keyboard, place it directly in front of you, not to the side. If you are primarily using the mouse, place it in front of your hand or arm.
Using the Pavilion Notebook PC Working in Comfort Overall • Look away from the screen from time to time to help reduce eyestrain. Focus on distant objects briefly, and blink periodically to lubricate your eyes. You also should have your eyes checked on a regular basis and ensure your eyeglass prescription is suitable for working on a monitor screen. • Remember to occasionally shift position and move your body. Keeping your body in one position for long periods is unnatural and stressful.
Using the Pavilion Notebook PC Working in Comfort Preparing Your Mobile Work Environment • Use a chair that provides good support for your lower back. If an adjustable chair is not available, you can use a pillow or rolled-up towel to provide lower back support. • Try to keep your thighs parallel to the floor and your feet flat on the floor. In a mobile environment, you can do this by using a phone book or briefcase to support your feet.
Using the Pavilion Notebook PC Caring for Your Computer Caring for Your Computer The following are recommendations for maintaining your computer during everyday use, as well as preventing potential physical damage or data loss. To protect your hard disk drive Hard disk drives, as well as other internal components, are not indestructible and can be damaged by inappropriate handling and operation. • Avoid bumps or jolts. • Do not operate the computer while traveling over bumpy terrain.
Using the Pavilion Notebook PC Caring for Your Computer • Back up your work regularly. Copy files to floppy, tape or network drives. • Use a virus-scanning program, such as the included VirusScan, to check the integrity of your files and operating system. Since new viruses appear frequently, you will also want to update the program’s virus definitions from time to time; updates are on the Web at www.networkassociates.com. • Check your disk using the scandisk utility.
Using the Pavilion Notebook PC Caring for Your Computer To clean your computer You can clean the computer with a soft cloth dampened either with clean water or with water containing a mild detergent. • Do not use an excessively wet cloth or allow water inside the case. • Do not use any abrasive cleaners, especially on the display. Do not apply any cleaner directly to the display. Instead, apply the cleaner to a soft cloth and then gently wipe the display.
Traveling with Your Computer User's Guide 49
Traveling with Your Computer Managing Power Consumption Managing Power Consumption When you are not using your computer, you will want to maximize battery operating time without compromising performance. It is not necessary to turn the computer off in order to reduce power consumption and extend battery life. With Windows 98 SE and Windows ME, Advanced Power Management (APM) provides both manual and automated tools for reducing power consumption.
Traveling with Your Computer Managing Power Consumption System standby Action Turns off the display and hard disk drive to conserve battery power. Saves current session to RAM. When No activity of the keyboard or mouse, no disk drive access, and no port (serial, parallel, and IR) activity for the specified interval. Resume Press the blue power button to return to your current session. A message box appears 15 seconds before system standby takes effect.
Traveling with Your Computer Managing Power Consumption System standby Action Turns off the display and hard disk drive. Saves current session to RAM. When Fn+F3 or Fn+F4 or Start, Shut Down, Standby. Resume Press the blue power button to return to your current session. System standby can also occur automatically when the timeout setting in the Power Management Properties window is reached. (In Windows 98 and ME, there is no difference between Standby and Suspend.
Traveling with Your Computer Managing Power Consumption Sometimes the system stops responding and you are not able to turn off the computer as described above. To recover, use the following in the order listed. • If you are unable to access the Start menu, you can turn off the system by pressing and holding the blue power button for 4 seconds.
Traveling with Your Computer Using Battery Power Using Battery Power To check the battery status From the battery status light The battery status light (second from left) reports the following information: Green Orange Red AC attached—battery full AC attached—battery charging AC attached—battery will not accept charge From the Windows taskbar The System Tray on the Windows taskbar includes a power icon that allows access to more detailed battery status information.
Traveling with Your Computer Using Battery Power To respond to a low-battery warning The computer automatically alerts you when the battery power drops to a critically low level. First you will hear a high-pitched beep. Then, if you have not taken restorative action within a short time, the system hibernates. You won’t be able to turn the computer on again until you restore power by one of the following actions: • Plug in the AC adapter (see “To connect AC power”).
Traveling with Your Computer Using Battery Power To control the processor speed If your computer contains a high-speed Pentium III processor with Intel SpeedStep Technology, you can change settings that control the processor speed. If the taskbar contains an Intel SpeedStep Technology icon, your computer has this feature. With the default settings, the processor speed changes automatically according to the power source (ac adapter or battery).
Making Connections User's Guide 57
Making Connections Using Your Modem Using Your Modem By connecting your modem to a telephone line, your PC can communicate with other computers throughout the world. You can explore the Internet, send and receive e-mail messages, and use your PC to send and receive faxes.
Making Connections Using Your Modem 2. Double-click the Easy Internet Signup icon on the desktop. This will launch an Internet setup wizard, which will help you locate an Internet service provider in your area. −or− Click Start, Programs, Online Services and select one of the listed providers. This begins the registration process for the online provider you have chosen. To connect to the Internet After you have signed up with an ISP, you can connect to the Internet.
Making Connections Using Your Modem To disconnect from the Internet You remain connected to the Internet until you shut down the computer, disconnect the phone line from the computer, or give a command to hang up the connection. • To disconnect from AOL, use the Sign Off menu. • To disconnect from other ISPs, double-click the connect icon (two connected computers next to the clock) on the taskbar, and click Disconnect.
Making Connections Using Your Modem To send and receive faxes The modem and QuickLink III fax software included with your Pavilion PC enable you to use the computer to send and receive faxes. To start QuickLink III • Click Start, Programs, QuickLink III, QuickLink III. The first time you start QuickLink, the Setup Wizard launches, stepping you through the process of setting options and customizing the program for your personal use. Follow the onscreen instructions.
Making Connections Using Your Modem To view and print a fax 1. In QuickLink III, click the Fax Viewer tool on the toolbar. 2. Click Yes to view the fax now. 3. Click the printer icon to print the fax on the selected printer. 4. To see the next new fax, click the Next Fax button. To select modem modes If you have trouble connecting with your internal modem to other modems, you can try forcing the internal modem to certain modulations and connect rates. To select a modulation, use the +MS command.
Making Connections Using Your Modem For example, to force the internal modem to connect with the V.34 modulation: 1. Click Start, Settings, Control Panel. 2. Double-click Modem. 3. Click Properties. 4. Click the Connection tab. 5. Click Advanced. 6. In the “Extra settings” field, type AT+MS=11 and click OK. Most Windows modem applications use the modulation command in the “Extra settings” field as part of the modem initialization.
Making Connections Connecting PC Cards Connecting PC Cards The PC Card slots are available for storing data and expanding the communication capabilities of the Pavilion Notebook. The Pavilion supports standard Type I, II, and III PC Cards (PCMCIA and CardBus). You can use two Type I or II cards or one Type III card. To insert a PC Card 1. Hold the card with its face up and its connector holes toward the card slot. 2. Slide the PC Card into the slot until it is flush with the Pavilion.
Making Connections Connecting PC Cards 2. Flip the eject button out, so that it is sticks out from the side of the computer. 3. Press the eject button to eject the PC Card. To reestablish network connection after resume When you are using a network PC card, it is possible that you will lose network connection after a Resume operation. If this occurs: 1. Stop the network PC card: • Double-click on the PC card icon in the lower right of your screen. • In PC Card Properties, select your network card.
Making Connections Connecting External Components Connecting External Components External components such as a printer, mouse, monitor, or keyboard may be connected directly to your computer. However, if you have purchased the optional port replicator, you can use it to connect external components without disconnecting them each time you wish to use the computer on the road.
Making Connections Connecting External Components Pavilion Notebook ports 1 Parallel port 2 Serial port 3 VGA port (external monitor) 4 Audio out (external speaker) 5 Microphone jack 6 Infrared port 7 USB port 8 PS/2 port 9 AC adapter jack User's Guide 67
Making Connections Connecting External Components Port replicator ports 9 Serial port 10 Parallel port 11 VGA port (external monitor) 12 PS/2 ports (2) 13 USB ports (2) 14 Audio In 15 Audio Out (external speaker) 16 Microphone jack 17 AC adapter jack To use the port replicator With the optional port replicator, you can connect external components without disconnecting them each time you wish to use the computer on the road. To connect to the port replicator 1.
Making Connections Connecting External Components 3. Press down until the computer clicks into place. Make sure that the dock status light is on. 4. Open the computer and press the blue power button to turn it on. After the computer is turned on, you can close the lid while it is running. When you dock your computer in a port replicator, it automatically turns on (or resumes). If you prefer, you can change this setting using the BIOS Setup Utility: 1.
Making Connections Connecting External Components To connect a printer (or other parallel device) The parallel port uses a standard 25-pin connector, most commonly used for connecting dot-matrix, ink-jet, and laser printers. You may also use it to connect a parallel Zip drive. • Connect the parallel printer cable or other parallel cable to the parallel port.
Making Connections Connecting External Components To connect a USB device Universal serial bus (USB) provides a bidirectional serial interface for adding peripheral devices such as game controllers, serial and parallel ports, and scanners on a single bus. The Pavilion Notebook provides one USB port; the optional port replicator provides two USB ports. • Attach the USB cable to the USB port. Windows automatically recognizes the USB device.
Making Connections Connecting External Components Switching the display to the external monitor • Close the computer lid. –or– • Press Fn+F12 (or CTRL+ALT+F12 on an external keyboard) to cycle through the display options: Pavilion Notebook display, external monitor, both. Adjusting monitor resolution 1. Click Start, Settings, Control Panel, Display. 2. On the Settings tab, adjust the Screen area. Using dual display mode You can extend the desktop by connecting an external monitor to your Pavilion Notebook.
Making Connections Connecting External Components 7. Make sure that the Settings box “Extend my Windows desktop onto this monitor” is checked. You can change the Screen area and Colors settings for the second monitor by selecting Display #2. These settings can be different from your Pavilion Notebook display settings.
Configuring and Expanding Your Computer User's Guide 75
Configuring and Expanding Your Computer Configuring the Pavilion Notebook with the BIOS Setup Utility Configuring the Pavilion Notebook with the BIOS Setup Utility The BIOS (Basic Input and Output System) Setup utility is a menu-driven utility that enables you to make changes to the system configuration and tailor the operation of your notebook to your individual work needs.
Configuring and Expanding Your Computer Configuring the Pavilion Notebook with the BIOS Setup Utility Secondary Master Sets the CD-ROM drive type and various parameters. CD-ROM drive detected and set automatically. Display Device Switches between the built-in display (LCD), an external display (CRT) if attached, and both. LCD/CRT PS/2 Pointing Devices Enables or disables the pointing devices.
Configuring and Expanding Your Computer Configuring the Pavilion Notebook with the BIOS Setup Utility Parallel Port Sets how the parallel port is configured by the BIOS (specified or automatic). Enabled Sets the port to output only, bidirectional, ECP mode, or EPP mode. ECP mode Sets the I/O address. 378 IRQ7 When ECP mode is enabled, sets the DMA channel. DMA 0 Local Bus IDE Adapter Enables the primary (hard drive) and secondary (CD-ROM drive) controllers.
Configuring and Expanding Your Computer Configuring the Pavilion Notebook with the BIOS Setup Utility Password on boot Sets whether a user password is required when the computer boots. Power (APM) Menu* Enabled Default PM Control Disables power management, or enables it either always or when on battery power only. Battery Powered Only Power Savings Sets the combination of power management features for your usage. (Choose Customize if you want to set any of the Timeout options.
Configuring and Expanding Your Computer Configuring the Pavilion Notebook with the BIOS Setup Utility Power Button Mode Sets the action (Suspend or Off) of the blue power button when pressed for less than 4 seconds. Suspend Resume on Modem Ring Sets whether the system resumes from Suspend if a ring signal is received. Off Resume on Time Sets whether the system resumes from Suspend at a defined time of day. Off Resume Time Sets the 24-hour time when the system resumes from Suspend if enabled.
Configuring and Expanding Your Computer Installing RAM modules Installing RAM modules The Pavilion Notebook provides an optional memory expansion slot for installing up to two RAM expansion modules. Use HP SDRAM modules only; EDO RAM is not supported. Your computer’s computer chips are extremely static-sensitive. Static electricity can permanently damage computer chips. Carefully read the following caution information. CAUTION Handle the RAM module only by its edges.
Configuring and Expanding Your Computer Installing RAM modules Note If you add RAM so that your total RAM is greater than 256 MB, you must change the size of the Hibernate partition. This partition is automatically used to save your current session from RAM when battery level is low. As a result, you must provide a sufficiently large Hibernate partition to accommodate all the information stored in RAM; otherwise, you risk losing work in progress. See Expanding the Hibernate Partition.
Configuring and Expanding Your Computer Removing RAM modules Removing RAM modules After you remove the RAM expansion cover, do the following: 1. Release the two latches at the sides of the RAM expansion module by pushing them gently outward (away from the sides of the module). 2. When you release the latches, the free edge of the module pops up. 3. Pull the module out of the connector. 4. Replace the RAM expansion module door.
Configuring and Expanding Your Computer Replacing a hard disk drive Replacing a hard disk drive You’ll need a small Phillips screwdriver to complete this procedure. 1. From the Start menu, shut down the computer. 2. Unplug the AC adapter, if present, and remove the battery. 3. Turn the unit bottom side up. 4. Use a screwdriver to remove the hard disk drive locking screw. 5. Slide and hold the hard disk drive latch. 6. Slide the hard disk drive toward the edge of the computer, then lift out. 7.
Configuring and Expanding Your Computer Expanding the Hibernate Partition Expanding the Hibernate Partition You can create the Hibernate partition by booting from the Recovery CD. The partitioning and recovery process takes approximately 20 minutes—do not interrupt the process or unplug the AC adapter until the process is completed. CAUTION This procedure will format the hard disk drive and erase all data on the disk. Be sure to back up all data from your hard disk before you begin this procedure.
Configuring and Expanding Your Computer Expanding the Hibernate Partition 14. Follow the onscreen instructions for setting up Windows. 15. When Windows setup is complete, reinstall any applications and restore backed up data.
Service and Support User's Guide 87
Service and Support Hewlett-Packard Limited Warranty Statement Hewlett-Packard Limited Warranty Statement 1. HP warrants to you, the end-user customer, that HP hardware, accessories, and supplies will be free from defects in materials and workmanship after the date of purchase, for the period specified in the Warranty Duration sheet included with your HP computer.
Service and Support Hewlett-Packard Limited Warranty Statement 7. TO THE EXTENT ALLOWED BY LOCAL LAW, THE REMEDIES IN THIS WARRANTY STATEMENT ARE YOUR SOLE AND EXCLUSIVE REMEDIES. EXCEPT AS INDICATED ABOVE, IN NO EVENT WILL HP OR ITS SUPPLIERS BE LIABLE FOR LOSS OF DATA OR FOR DIRECT, SPECIAL, INCIDENTAL, CONSEQUENTIAL (INCLUDING LOST PROFIT OR DATA), OR OTHER DAMAGE, WHETHER BASED IN CONTRACT, TORT, OR OTHERWISE.
Service and Support Getting Support for Your Pavilion PC Getting Support for Your Pavilion PC HP offers a number of ways that you can get technical support for your computer. If you have questions or problems, here are the resources available to you: • Look up information in this User’s Guide. • Visit the Pavilion Notebook Web site. • Visit the HP Customer Care Web site. • Call HP support.
Service and Support Getting Support for Your Pavilion PC • latest support telephone numbers for HP products To call HP for Service and Support If you are unable to solve a problem with your computer, you can call the HP Customer Care Center. The Customer Care Center will assist you at no charge during the term of the warranty; you are responsible only for cost of the telephone call.
Service and Support Obtaining Repair Service Obtaining Repair Service To receive warranty repair service To receive warranty repair service, contact the appropriate HP Customer Care Center. Check “To call HP for Service and Support” on page 93 for the phone number. The support technician will help qualify your unit for warranty repair, based on the warranty applicable to your unit and original purchase date, and will provide you with repair processes.
Service and Support Obtaining Repair Service Note If the hard disk drive is defective, you will receive a replacement drive with the original HP software.
Solving Problems with Your Computer User's Guide 95
Solving Problems with Your Computer Troubleshooting Techniques Troubleshooting Techniques Audio Problems If sound is not audible • Press Fn+Up Arrow several times. • Click the speaker icon on the taskbar to ensure that Mute is not checked. • When you are operating your computer in MS-DOS mode (for example, when running MS-DOS games), you may find that the sound does not operate properly. Use Windows applications for full use of sound capabilities.
Solving Problems with Your Computer Troubleshooting Techniques 4. If the default has been changed, select CD-ROM/DVD for first boot device. 5. Exit the BIOS Setup utility. • Reboot the computer. You may also want to test the CD-ROM drive with diagnostics. See Testing Hardware Operation. Display Problems If the computer is on, but the screen is blank • Try pressing Fn+F1 to increase the contrast or Fn+F2 to decrease the contrast.
Solving Problems with Your Computer Troubleshooting Techniques 8. Choose to manually select the monitor type. 9. Select Laptop Display Panel (in Windows 98) or Digital Flat Panel (in Windows ME) and click Next. 10. Click Next and then Finish. 11. Click Close. 12. Reduce the resolution to 800×600 pixels and click Apply. If an external display does not work • Check the connections. • Press Fn+F12 in case the external monitor was disabled. (Do this three times to return to the state you started from.
Solving Problems with Your Computer Troubleshooting Techniques If the DVD is playing erratically • Dirt or smudges can cause a disc to skip. Clean the disc with a soft cloth. If the disc is badly scratched, it will have to be replaced. If a DVD movie stops playing in the middle • The DVD may be double-sided. Open the DVD tray, and read the text near the center hole of the disc. If it says Side A, flip the disc over, close the tray, and then press the Play button to continue playing the movie.
Solving Problems with Your Computer Troubleshooting Techniques Hard Disk Drive Problems If the computer’s hard drive doesn’t spin • Make sure the computer has power. If necessary, connect the AC adapter, making sure it is plugged into a power source and into the rear of the computer. If the hard disk makes a buzzing or whining noise • Back up the drive immediately. • Check for alternate noise sources, such as the fan or a PC Card drive. If files are corrupted • Run the VirusScan program.
Solving Problems with Your Computer Troubleshooting Techniques If the pointing devices don’t work • Don’t touch the touch pad while booting or resuming. • Reset the computer. If a scroll mouse doesn’t work • Suspend or shut down the computer before you attach the scroll mouse, to ensure that the external mouse will be detected properly/ If you want to go back to using the touch pad, you must suspend or shut down the computer before you detach the scroll mouse.
Solving Problems with Your Computer Troubleshooting Techniques MIDI Problems If the computer is sometimes unable to play MIDI files • Download the latest audio driver from the technical support area of the HP Pavilion Notebook Web site (http://www.hp.com/notebooks). Modem Problems If the modem will not connect at 56K speed • The host modem may not support a 56K (V.90) connection speed. • The speed at which you connect depends on several factors, such as the current condition of the telephone line.
Solving Problems with Your Computer Troubleshooting Techniques 4. Click the port to which your modem is attached. 5. Click More Info. • In Windows Help, use the Modem Troubleshooter. If the modem connection is dropped when transferring large files • There may be static or interference on the phone line. Try connecting later. • If a serial or PC card modem is not working, disable the internal modem. 1. Click Start, Settings, Control Panel. 2. Double-click System. 3. Click the Device Manager tab. 4.
Solving Problems with Your Computer Troubleshooting Techniques If a PC card modem is not working • Disable the internal modem. 1. Click Start, Settings, Control Panel. 2. Double-click System. 3. Click the Device Manager tab. 4. Double-click Modem to list the current modem devices. 5. Double-click the internal modem. 6. Select the checkbox “Disable in this hardware profile.” Performance Problems If the computer pauses or runs sluggishly • Press CTRL+ALT+DEL to see if an application is not responding.
Solving Problems with Your Computer Troubleshooting Techniques Port Replicator Problems If a port on a port replicator isn’t working • Check that AC power is connected. • Try using the corresponding notebook port, while undocked. • See the manual for the port replicator. Power and Battery Problems If the computer turns off immediately after it turns on • Battery power is probably extremely low. Plug in the AC adapter or insert a newly charged battery.
Solving Problems with Your Computer Troubleshooting Techniques 3. From the Power menu, make sure Enable Power Saving is enabled. 4. Exit the BIOS Setup utility. If the battery doesn’t charge • Make sure the AC adapter is plugged into the power source and that the light on the adapter is on. • If you're using a power strip, remove the AC adapter from the power strip and plug it directly into a wall outlet. • Check that the battery is fully installed and locked in place.
Solving Problems with Your Computer Troubleshooting Techniques • If the computer is performing an operation, it normally waits for the operation to finish. You may also want to test the power management system with diagnostics. See Testing Hardware Operation. Printing Problems For most printing problems, use the Print Troubleshooter in Windows Help. If a serial or parallel printer doesn’t print • Check that you are using a proper cable or cable adapter, and that the printer is on.
Solving Problems with Your Computer Troubleshooting Techniques • Check the port connection to see if it’s loose. • Check settings in BIOS Setup. 1. From the Start menu, shut down, then restart the computer. 2. When you see the HP logo, press F2 to enter the BIOS Setup utility. 3. From the Components menu, check that Serial Port is enabled. • If you suspend and resume, reboot the computer to reenable the mouse. If a serial modem doesn’t work properly • In Windows Help use the Modem Troubleshooter.
Solving Problems with Your Computer Troubleshooting Techniques 1. From the Start menu, shut down, then restart the computer. 2. When you see the HP logo, press F2 to enter the BIOS Setup utility. 3. From the Advanced menu, check that Parallel Port or Serial Port is enabled. If the USB port is not working • Contact the vendor of the peripheral device, as well as Hewlett-Packard, for the latest versions of the USB drivers. You may also want to test the ports with diagnostics. See Testing Hardware Operation.
Solving Problems with Your Computer Troubleshooting Techniques Suspending and Resuming Problems If the computer takes a long time to resume after being suspended • In Windows 98 and Windows ME, the computer can take a minute or longer to resume when a network card is installed. While the operating system is loading drivers and checking hardware and network connections, you will see a blinking cursor on your display. As soon as the hardware has been re-initialized, the Windows desktop will appear.
Solving Problems with Your Computer Testing Hardware Operation Testing Hardware Operation The Pavilion Notebook DiagTools program provides two levels of testing: • Automated testing using the basic hardware test. • Advanced testing using individual hardware tests. The tests are designed to run after the system reboots. This ensures that the computer will be in a predictable state, so the diagnostic program can properly test the hardware components.
Solving Problems with Your Computer Testing Hardware Operation If you saved a Support Ticket, you can also view it later. From the directory c:\dmi\hpdiags, run the file hpsuppt.exe. The Support Ticket will appear in that directory as hpsuppt.txt.
Solving Problems with Your Computer Recovering and Reinstalling Software Recovering and Reinstalling Software You can use the Recovery CD to recover an original Pavilion Notebook build, or you can use it to install the HP custom software over a user-installed alternate operating system. If you need to recover a specific application, you can reinstall the software directly from your hard drive; for instructions, see “To recover an application”.
Solving Problems with Your Computer Recovering and Reinstalling Software To replace a damaged Recovery CD If you lose or damage the Recovery CD, take your Pavilion Notebook PC to a local HP service center to get a replacement CD. Call the HP Customer Care Center—at (970) 635-1000 in the U. S.—for the address and telephone number of an HP service center near you. To update the Pavilion Notebook BIOS Hewlett-Packard may provide updates to the BIOS to enhance the capabilities of the Pavilion Notebook.
Solving Problems with Your Computer Recovering and Reinstalling Software To recover an application Note The Recovery CDs restore all the software that was originally on your HP Pavilion Notebook PC, but the recovery program erases the hard drive in the process. Therefore, to reinstall specific applications, you will not use the Recovery CDs.
Solving Problems with Your Computer Sending Your Computer for Service Sending Your Computer for Service See “Obtaining Repair Service” to determine if your computer must be sent in for service. If so, prepare your computer for shipment. 1. Important. Back up your hard disk drive. While your computer is being repaired, the hard disk may be replaced or reformatted. 2. Hewlett-Packard cannot guarantee the return of removable components.
Specifications and Regulatory Information User's Guide 117
Specifications and Regulatory Information Hardware and Software Specifications Hardware and Software Specifications For the most up–to–date information on Pavilion Notebook PC specifications, go to the HP Pavilion Notebook Web site at www.hp.com/notebooks. HP Pavilion Notebook PC Hardware Specifications Physical Attributes Size: 311mm×249mm×42mm (12.24”×9.80”×1.64”) closed. Weight: 3.0 kg (6.6 lb.).
Specifications and Regulatory Information Hardware and Software Specifications Keyboard and Pointing Device 87/88-key touch-type keyboard with 101/102 key emulation. Embedded numeric keypad. 12 function (Fn) keys. Touch pad pointing device. Modem 56Kbps (V.90) data speed maximum. 14.4Kbps fax speed, Class 1 and 2. Input/Output Universal serial bus (USB). 9-pin, 115,200-bps serial (16550 UART). 25-pin bi-directional ECP/EPP parallel. Video out: 800×600×16M or 1024x768x64K colors at 75-Hz refresh rate.
Specifications and Regulatory Information Hardware and Software Specifications Major ICs CPU: Intel Pentium III OR AMD-K6. North Bridge: 443DX OR 443BX. South Bridge: PIIX4e or PIIK4m. Video: SMI Lynx EM4 OR Trident Cyberblade 17 AGP. Audio: ESS M-2EM OR ESS M-3. CardBus: TI PCI1225. Keyboard controller: National PC87570. Super I/O: National 97338. Software System Resources The tables on this page show typical resource usage as set up by the Pavilion Notebook BIOS.
Specifications and Regulatory Information Hardware and Software Specifications System Memory 00000 - 9FFFF System memory A0000 – BFFFF Video C0000 - CFFFF Video BIOS D0000 - DBFFF Free (valid uses: upper memory blocks (UMBs) or PC Card memory windows) DC000 - FFFFF System BIOS System Input/Output Addresses (100-3FF) 170-177 Internal CD-ROM drive (secondary IDE controller) 1F0-1F7 Internal hard disk drive (primary IDE controller) 220-22F DOS games (FM decoding) 376 Internal CD-ROM drive (se
Specifications and Regulatory Information Hardware and Software Specifications DMA Channels 0 ECP parallel port (if enabled) 1 DOS games (FM decoding) 2 Floppy disk drive 3 Fast IR (if enabled) 4 Cascade from secondary PMA controller 5 Free 6 Free 7 Free 122 User's Guide
Specifications and Regulatory Information Safety Information Safety Information Power Cords The power cord supplied with the Pavilion Notebook AC adapter should match the plug and voltage requirements for your local area. Regulatory approval for the AC adapter has been obtained using the power cord for the local area. However, if you travel to a different area and need to connect to a different outlet or voltage, you should use one of the power cords listed below.
Specifications and Regulatory Information Safety Information Battery Safety • To avoid risk of fire, burns, or damage to your battery pack, do not allow a metal object to touch the battery contacts. • The battery pack is suitable for use only with compatible HP Pavilion Notebook models. Check the Support and Service section of this User's Guide for your local HP contact. • Do not disassemble. There are no serviceable parts inside. Do not dispose of the battery pack in fire or water.
Specifications and Regulatory Information Regulatory Information Regulatory Information This section presents information that shows how the HP Pavilion Notebook PC complies with regulations in certain regions. Any modifications to the Pavilion Notebook not expressly approved by Hewlett-Packard could void the authority to operate the Pavilion Notebook in these regions. U.S.A. The HP Pavilion Notebook PC generates and uses radio frequency energy and may interfere with radio and television reception.
Specifications and Regulatory Information Regulatory Information Declaration of Conformity (U.S.A.) Responsible Party: Hewlett-Packard Company Manager of Corporate Product Regulations 3000 Hanover Street Palo Alto, CA 94304, U.S.A. (415) 857-1501 declares that the product(s) Trade name: Hewlett-Packard Company Product name: HP Pavilion Notebook PC Complies with Part 15 of the FCC Rules. Operation is subject to the following two conditions: 1. This device may not cause harmful interference, and 2.
Specifications and Regulatory Information Regulatory Information Options: All conforms to the following product specifications Safety: IEC 950:1991+A1,A2 ,A3, A4 / EN 60950 (1992)+A1,A2, A3, A4 GB4943-1995 IEC 825-1:1993/EN60825-1:1994 EMC: CISPR 22:1993 / EN 55022 (1994): Class B [1] GB9254-1988 EN 50082-1:1992 IEC 801-2:1991 / prEN 55024-2 (1992): 4kV CD, 8kV AD IEC 801-3:1984 / prEN 55024-3 (1991): 3V/m IEC 801-4:1988 / prEN 55024-4 (1992): 0.5 kV signal lines, 1.
Index access light location, 17 drive location, 14 A AC adapter connecting, 19 status light, 17 address HP Customer Care Web site, 12 HP Web site, 12 APM, 50 Audio Out jack location on Pavilion, 15 B battery installing, 19 latch location, 16 location, 16 low power warning, 55 recharging, 19 safety, 124 status, 54 status light, 17 troubleshooting, 105 BIOS updating, 90 bottom view, 16 E eject button PC Cards, 14 ergonomics, 33 F factory installation, 113 floppy disk drive access light, 17 location, 14 Fn
battery, 124 laser, 124 power, 123 voltage, 123 safety and comfort, 41 screen saver resetting, 23 Scroll Lock status light, 17 serial port location on Pavilion, 15 setting up, 19 shut down, 52 shutting down, 51 side view, 14 software, 10 license, 3 updates, 90 speakers location, 13 SpeedStep Technology, 56 Start menu, 52 startup troubleshooting, 109 status lights battery, 54 location, 17 power, 21 support, 90 telephone, 91 suspending resuming and, 110 troubleshooting, 110 System standby, 52 system-off butto