HP Insight Control Server Deployment 7.
© Copyright 2003, 2014 Hewlett-Packard Development Company, L.P. Confidential computer software. Valid license from HP required for possession, use or copying. Consistent with FAR 12.211 and 12.212, Commercial Computer Software, Computer Software Documentation, and Technical Data for Commercial Items are licensed to the U.S. Government under vendor's standard commercial license. The information contained herein is subject to change without notice.
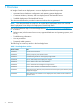
Contents 1 Overview..................................................................................................4 2 Licensing...................................................................................................5 License types............................................................................................................................5 Adding a license file to an existing installation.............................................................................
1 Overview HP Insight Control server deployment is a server deployment solution that provides: • Automated server hardware configuration and operating system deployment. • Consistent Windows, VMware, and Linux deployment on the latest HP servers. • Scalable deployment of ProLiant Blade Servers. This document describes the provided content and outlines how to get started. NOTE: This document does not cover how to use the Altiris Deployment Server.
2 Licensing A license allows Insight Control server deployment to deploy and manage either a physical server or a virtual machine. One license is required to manage each server. After you apply a license to a server, you cannot remove or transfer the license to another server. A license file contains licenses for a predetermined number of servers. Purchased license files are not specific to Insight Control server deployment versions. To view the number of licensed nodes from the console, click Help>About.
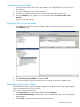
3 Getting started To get started, double-click the Deployment Console icon on the desktop. The Deployment Console, from which you can manage computers and execute jobs, appears. Deployment Console basics • Computers pane This pane shows managed computers. The New Computers group shows computers that have connected to the Deployment Server for the first time. Click View→Show Physical Devices to show the Physical Devices group. • Jobs pane This pane shows the provided jobs.
Connecting server blades 1. 2. 3. 4. Connect the enclosure to the network that contains your Deployment Server, and power up the enclosure. Change the default rack and enclosure names. Insert the server blades into the enclosure and wait for the blades to power up. From the Computer pane, right-click on a server blade and select Power Control→iLO – Interface. The iLO homepage appears. Deploying the first server blade 1. In the Jobs pane, select a Windows scripted install job.
4. 5. 6. Click OK. Select Run this job immediately, and then click OK. If the Windows scripted install job is still running when the warning message appears, click OK. NOTE: HP recommends that HP Insight Control Server Deployment must run only on private secure networks to prevent risk of security compromise.
4 Changing deployment server/solution username or password (after initial installation) Prerequisites Before changing the password perform the following steps: 1. Verify that Insight Control server deployment has been installed and configured correctly with the local SQL server. 2. Verify that all Insight Control server deployment/Altiris servers are running successfully. Changing the password To change the password after Insight Control server deployment installation, perform the following steps: 1.
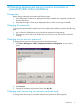
1. 2. 3. Click Start→Run. Type "services.msc" > change the logon password of the services mentioned below by Right-click on the service, click “Properties”, click the “Log On” tab, change the password and confirm password with the new username/password, click “OK” Type services.msc. Change the logon password of the following services.
1. 2. 3. Click Start+All Programs+Altiris+Deployment Solution+Configuration. A new window opens. Click the Option. Select Drive Mapping to change the credentials. Changing the database’s user password (example: SQL Server Express) To change the user password on the database, perform the following steps: 1. Click Start Menu+ All Programs +Microsoft SQL Server 2005+ SQL Server Management Studio Express. 2. Login with your username and password. 3. Click the Security folder and the Logins folder. 4.
5 Reference Design HP delivers content as "features," each of which is a self-contained set of files and jobs. Each feature is independent, and resides in its own folder with key files located in the root folder and other supporting files located in various subfolders. Because the features are independent, their jobs are also independent. That means there are no monolithic jobs that configure the system, configure the smart array, install an operating system and install a support pack.
• All input and output files are stored in the root of the feature. • The bin subfolder contains various scripts and utilities. • For firmware, the components subfolder contains the contents of the \compaq\swpackages directory from the Firmware CD. • For firmware, overwriting the components subfolder with a newer version of the Firmware CD is not supported. • For firmware, the logs subfolder contains output logs from the flashing utility.
Table 3 Typical Windows file layout (continued) File/Subfolder Description Post-deployment scripts for configuration and software installation oem\ Drivers required for deployment drivers\ A small set of smart components required to make the target manageable components\ Table 4 Windows scripted install default settings Component Default setting Administrator password The administrator password is password. For Windows 2003, this password is stored as clear text in the unattend answer file.
Table 6 Typical RHEL and SLES file layout File/Subfolder Description answer files Various support utilities bin\ Distribution files dist\ Post-deployment scripts for configuration and software installation; as needed, boot files for deployment oem\ As needed, drivers required for deployment drivers\ A small set of smart components required to make the target manageable components\ Contains operating system specific updates, installed after operating system installation.
Table 8 Hyper-V scripted install default settings (continued) Component Default setting Computer name The computer name uses the 15 right-most characters of the console display name. Firewall Firewall settings are disabled. Networking Added to workgroup "WORKGROUP". SNMP and WMI are enabled. Table 9 ESX scripted install default setting 16 Component Default setting Root password The root password is password. This password is stored in encrypted form in the kickstart file.
6 Support and other resources Information to collect before contacting HP Be sure to have the following information available before you contact HP: • Software product name • Hardware product model number • Operating system type and version • Applicable error message • Third-party hardware or software • Technical support registration number (if applicable) How to contact HP Use the following methods to contact HP technical support: • In the United States, see the Customer Service / Contact HP U
The service also provides access to software updates and reference manuals in electronic form as they are made available from HP. With this service, Insight Management customers benefit from expedited problem resolution as well as proactive notification and delivery of software updates. For more information about this service, see the following website: http://www.hp.com/services/insight. Registration for this service takes place following online redemption of the license certificate.
Table 10 Typographic conventions Book title The title of a book. On the web, this can be a hyperlink to the book itself. Command A command name or command phrase, for example ls -a. Computer output Information displayed by the computer. Ctrl+x or Ctrl-x A key sequence that indicates you must hold down the keyboard key labeled Ctrl while you press the letter x. ENVIRONMENT VARIABLE The name of an environment variable, for example, PATH. Key The name of a keyboard key.
7 Documentation feedback HP is committed to providing documentation that meets your needs. To help us improve the documentation, send any errors, suggestions, or comments to Documentation Feedback (docsfeedback@hp.com). Include the document title and part number, version number, or the URL when submitting your feedback.
A Manually installing distribution files If you did not copy the Windows, ESX, or Linux distribution files during the installation, you must manually copy the files for the scripted installation jobs to function properly. Manually copying the distribution files produces the same results as copying the files during the installation.
Table 11 Operating system directory names (continued) Operating system Directory name Deploy Windows 2008 R2 SP1 x64 Enterprise (EN-US) /Standard ws7-x64-sp1-en_us Deploy Windows 2008 R2 x64 Enterprise (EN-US)/Standard ws7-x64-en_us Deploy Windows 2008 x64 Enterprise (EN-US)/Standard ws6-x64-en_us Deploy Windows 2008 x86 Enterprise (EN-US) /Standard ws6-x86-en_us 22 Deploy Windows 2012 R2 x64 Standard (EN-US) ws12r2-x64-en_us Deploy Windows 2012 x64 Standard (EN-US) ws12-x64-en_us Deploy Windows
B Manually modifying configuration settings Synchronize display names with computer names option The Deployment Server can use a console display name that is different from the actual computer name. However, the console can always reflect the same name as the computer name. To manually enable synchronization of the display and computer names: 1. In the Deployment Server Console, click Tools>Options. 2. Click the Global tab. 3. Select the Synchronize display names with computer names. 4. Click OK.
Table 12 User Tokens table entries Operating system Windows 7 x64 24 Token name w7-x64-pro-en_us-productkey Windows 2008 R2 SP1 x64 Standard ws7-x64-sp1-std-en_us-productkey Windows 2008 R2 SP1 x64 Enterprise ws7-x64-sp1-ent-en_us-productkey Windows 2008 R2 x64 Standard ws7-x64-std-en_us-productkey Windows 2008 R2 x64 Enterprise ws7-x64-ent-en_us-productkey Windows 2008 x64 Standard ws6-x64-std-en_us-productkey Windows 2008 x64 Enterprise ws6-x64-ent-en_us-productkey Windows 2008 x86 Standard