HP Photosmart M440/M540/ M630 series Digital Camera User Guide 6.
Legal and notice information © Copyright 2007 Hewlett-Packard Development Company, L.P. The information contained herein is subject to change without notice. The only warranties for HP products and services are set forth in the express warranty statements accompanying such products and services. Nothing herein should be construed as constituting an additional warranty. HP shall not be liable for technical or editorial errors or omissions contained herein. Windows® is a U.S.
Contents 1 Getting started Camera top and back ................................................................................................................3 Camera front, side, and bottom..................................................................................................4 Before taking pictures.................................................................................................................4 Install the batteries..............................................................
6 Transferring and printing images Transferring images with HP Photosmart Software..................................................................23 Transferring images without HP Photosmart Software.............................................................24 Connecting to the computer...............................................................................................24 Using a memory card reader..............................................................................................
1 Getting started Use this section to get familiar with camera controls, set up your digital camera for use, and begin taking pictures. Camera top and back 1 2 3 4 5 6 7 8 11 1 10 9 Power light. 2 button. 3 Shutter button. 4 Delete button—Accesses the Delete function while in Instant Review (see “Instant Review” on page 9) and Playback (see “Deleting images” on page 18). 5 Flash button— Accesses the flash settings while in the flash” on page 13).
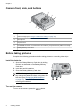
Chapter 1 Camera front, side, and bottom 1 2 3 6 5 4 1 Flash. 2 Self-Timer light (see “Using the Self-Timer setting” on page 15). 3 Microphone. 4 Tripod mount. 5 Dock/USB connector—Provides direct and indirect (via optional dock) USB connectivity. 6 Battery/Memory Card door. Before taking pictures Complete the following procedures before taking pictures or recording video clips. Install the batteries 1.
Choose the language Use press to choose the language you want, then . To change the language later, use the Camera Setup Menu (see “Using the Camera Setup Menu” on page 31). Set the region Along with the language setting, the region setting determines the default date format. Use .
Chapter 1 Install and format an optional memory card This camera supports standard, high speed, and high capacity Secure Digital (SD and SDHC) memory cards, 32MB to 8GB. 1. Turn off the camera and open the Battery/ Memory Card door. 2. Insert the memory card in the smaller slot as shown. Make sure the memory card snaps into place. 3. Close the Battery/Memory Card door and turn on the camera.
Windows: 1. Close all programs and temporarily disable any virus protection software. 2. Insert the HP Photosmart Software CD into the CD drive and follow the on-screen instructions. If the installation screen does not appear, click Start, click Run, type D: \Setup.exe, where D is the letter of your CD drive, then click OK. 3. When the software has finished installing, re-enable virus protection software. Macintosh: 1. Insert the HP Photosmart Software CD into the CD drive. 2.
2 Taking pictures and recording video clips You can take pictures when you are in Picture Capture and you can record video when you are in Video Record. Slide to to take pictures or to to record video clips. The Image Display resembles the following: 1 2 12 0:15 • • Picture Capture indicator. Video Record indicator. • • When taking pictures, pictures remaining count.
Recording video clips You can record a video clip when the camera is set to Video Record. 1. Slide to . 2. Frame the subject in the Image Display. 3. Press the Shutter button halfway down to measure focus and exposure. The focus brackets in the Image Display turn solid green when focus is locked (see “Auto focus and exposure” on page 9). 4. Press the Shutter button all the way down and release to begin recording video. 5. To stop recording video, press and release the Shutter button again.
Chapter 2 Focusing on the subject When you press the Shutter button halfway down, the camera searches for focus within the focus brackets. When it finds focus, the focus brackets turn green. If the focus brackets do not frame your subject, use Focus Lock (see “Using Focus Lock” on page 11). Optimizing focus When the camera cannot auto focus, the focus brackets turn red. This indicates the picture may be out of focus because the subject is out of the focus range or the scene has low contrast.
Using Focus Lock Use Focus Lock to focus on a subject that is not in the center of the picture, to capture action shots more quickly by pre-focusing in the area where the action will occur, or to focus in low light or low contrast situations. 1. Frame the subject for your picture within the focus brackets. In low light or low contrast situations, frame a brighter or higher contrast object. 2. Press the Shutter button halfway down. 3. Hold the Shutter button halfway down and reframe. 4.
Chapter 2 Optical zoom Optical zoom moves the lens between wide angle (1x) and telephoto (3x). While in Picture Capture or Video Record, use the buttons on the Zoom lever to control zoom. Press to zoom in to zoom out. and NOTE: You can set the optical zoom to the position you want just before recording video clips. However, you cannot use optical zoom while the video clip is recording.
3 Setting options for taking pictures and recording video clips Your camera's default settings work well for most shooting situations. For some situations, however, the features described in this chapter can improve the pictures you take and the video clips you record.
Chapter 3 Using the Picture Capture and Video Record menus The Picture Capture and Video Record menus allow you to adjust camera settings that affect the characteristics of the pictures and video clips you capture. The Picture Capture Menu displays only those features available for taking pictures while the Video Record Menu displays only features available for recording video clips. 1. Slide to or , then press . 2. Use to highlight an option, then press to display the option’s menu. 3.
(continued) M540 series: • • • • • 6MP Best—For enlarging or printing images greater than 28 x 36 cm (11 by 14 in). Normal (6MP) (Default)—For printing images up to 28 x 36 cm (11 by 14 in). 4MP—For printing images up to 20 x 25 cm (8 by 10 in). 2MP—For printing images up to 13 x 18 cm (5 by 7 in). VGA—For sending images via e-mail or posting them to the Internet. M440 series: • 5MP Best—For enlarging or printing images greater than 28 x 36 cm (11 by 14 in).
Chapter 3 TIP: If you want to include yourself in the picture, place the camera on a tripod or stable surface, then press the Shutter button all the way down. The camera locks focus and exposure just before the end of the countdown, allowing you time to place yourself in the scene. The Self-Timer setting resets to Off after the image is taken.
4 Reviewing images and video clips You can review and manipulate images and video clips in Playback as described here. For information about enhancing images, see “Using the Design Gallery Menu” on page 21. 1. Slide to . to scroll through your images and video clips. 2. Use Press to view video clips. Press to pause a video clip; press to resume playing the video clip, or press to return to the Playback Menu.
Chapter 4 Deleting images To delete a displayed image during Playback: 1. Press . 2. Use to select an option, then press . • This Image—Deletes the image or video clip. • All Except Favorites—Deletes all images except those tagged as Favorites. This menu option only appears if you have images tagged as Favorites (see “Tagging images as Favorites” on page 20). • All Images (in Memory/on Card)—Deletes all stored images and video clips.
3. Use to select an image or video clip, press instructions. , and follow any on-screen NOTE: To hear audio associated with video clips, transfer them to your computer (see “Transferring and printing images” on page 23). 4. To exit the selected Playback option, press . 5. To exit the Playback Menu, hold until the menu disappears. Remove Red Eyes—Allows you to remove red eyes in images containing human subjects (see “Removing red eyes” on page 19).
Chapter 4 The red-eye removal process takes a few seconds, after which the image displays with green boxes around corrected areas, along with the Remove Red Eyes menu: • • Save Changes (Default)—Saves a copy of the original image with the changes and returns to the Playback Menu. View Changes—Displays a magnified view of the image with green boxes around the corrected areas. To exit the Remove Red Eyes menu without saving changes, press .
5 Using the Design Gallery Menu M630/M540 series: You can use the captured images. Design Gallery features to enhance your 1. While in Playback, use to scroll to an image, then press . 2. Use to highlight Design Gallery, then press . 3. Use to highlight an option, then press and follow any on-camera instructions. Modify Color—Allows you to apply a color effect to an image (see “Modifying colors” on page 21). Add Borders—Allows you to add a border to an image (see “Adding borders” on page 21).
Chapter 5 Add Borders allows you to add one or more predefined borders to the displayed image. To add a border: 1. From the Design Gallery Menu, use to select Add Borders, then press . 2. Use to select a border type and preview the effect it has on the image. • Soft Edge—Applies a soft, vignetted frame to the image. • Oval—Adds an oval matte border with beveled edges. • Rectangle—Adds a rectangular matte border with sharp corners. 3. Press to select the border and display the Add Borders menu.
6 Transferring and printing images Regularly transferring images to your computer and deleting them from the memory card will reduce the time it takes to turn on your camera, to review images, and to transfer images. You can transfer pictures and video clips with or without the HP Photosmart Software that came with your camera. However, the HP Photosmart Software has several features for transferring and managing your images and also guides you through the transfer process.
Chapter 6 3. Connect the camera and computer using the USB cable that came with your camera. 4. Turn on the camera. When the Image Display indicates that the camera is connected to the computer, follow the instructions on the computer screen. For more information, see the Help feature in the HP Photosmart Software. NOTE: If the camera does not successfully connect to the computer, see “My camera stalls when establishing a connection to the computer.” on page 36.
Using a memory card reader You can put your camera’s optional memory card into a (separately purchased) memory card reader. Some computers and HP Photosmart printers have built-in memory card slots which act as a memory card reader. 1. Insert your camera’s memory card into the memory card reader (or into your computer’s memory card slot, if your computer has one). 2. Your computer's image transfer software starts automatically and guides you through the process of transferring images. 3.
Chapter 6 4. When the Image Display on the camera shows an image: to display an image you want to • If you want to print one or more images, use to specify the number of copies, then press . In the Print print, use . Options menu, highlight Print This Image Now, and press • If you want to print a group of images or modify the printer settings, press , highlight Print Menu..., then press again. Highlight the option you want.
7 Using HP Photosmart Express With HP Photosmart Express, you can select pictures in your camera to print automatically (see “Marking images for printing” on page 27), to buy prints online (see “Buying prints online” on page 29), or to send to custom destinations (see “Sharing images” on page 29) the next time you connect the camera to your computer or printer. You must have the HP Photosmart Software installed on your computer to use some features in the Photosmart Express Menu.
Chapter 7 individual images, all images, or groups of images tagged as Favorites (see “Tagging images as Favorites” on page 20). 1. While in the Photosmart Express Menu, use to highlight Print, then . press Print menu, highlight an option, then 2. In the . press • This Image—Marks the image currently displayed. You can scroll to a different image using . • All Favorites...—Displays the Print All . This option is Favorites entry.
Buying prints online You can mark images you want to order as prints. The next time you connect the camera to a computer with the HP Photosmart Software installed, you can order prints of the marked images online. 1. While in the Photosmart Express Menu, use to highlight Buy Prints Online, then press . 2. In the Buy Prints Online menu, highlight an option, then press . • This Image—Marks the image currently displayed. You can scroll to a different . image using • All Favorites...
Chapter 7 Sending images to online destinations After you have set up online destinations in the camera, you can mark images to be sent to these custom destinations the next time you connect your camera to your computer. 1. While in the Photosmart Express Menu, use to highlight Share, then press . 2. In the Share menu, highlight an option, then . press • Custom Destinations—Selects the destination to send the image displayed in the background.
8 Using the Camera Setup Menu The Camera Setup Menu allows you to set preferences for the camera’s behavior. The Camera Setup Menu is available from the Picture Capture, Video Record, and Playback menus. 1. While in the Picture Capture, Video Record, or Playback menu, use to highlight Camera Setup..., then press . 2. Use to highlight a menu option, then press to display the menu option’s menu. 3. Use to highlight a setting, then press . 4. To exit the Camera Setup Menu, hold down until the menu disappears.
9 Troubleshooting Use this section to find information on: • • Resetting the camera (see “Resetting the camera” on page 32) Possible problems and solutions (see “Problems and solutions” on page 32) Resetting the camera If your camera does not respond when you press buttons, reset the camera. 1. 2. 3. 4. Turn off the camera. Remove the memory card and batteries for at least 5 seconds. Reinsert the batteries and close the Battery/Memory Card door. Turn on the camera.
I have to recharge the NiMH batteries frequently. • New batteries or batteries that have not been charged recently must be recharged to reach full capacity. • If you have not used the batteries for two months or longer, recharge them. • For tips on conserving battery life, see “Extending battery life” on page 39. The NiMH batteries will not charge. • Try charging the batteries again after they have drained awhile.
Chapter 9 My image is blurry. • Use Focus Lock (see “Using Focus Lock” on page 11). • Use a tripod to hold the camera steady, or improve lighting conditions. • Use Steady Photo shooting mode (see Steady Photo under “Using the Picture Capture and Video Record menus” on page 14). Auto Flash or Flash On and set the shooting mode to • Set the flash to Action. My image is too bright. • Turn the flash off (see “Setting the flash” on page 13). • Move back from the subject and use zoom. My image is too dark.
I have two memory cards that are the same size, but one stores many more pictures than the other. • Your memory card may contain files that are not images or videos recognized by the camera. Save any data on the memory card that you want to keep, then format the memory card (see “Install and format an optional memory card” on page 6). • If your memory cards are 4GB or larger, the card that stores fewer images may have been improperly formatted by a device that does not support 4GB or larger cards.
Chapter 9 The camera gets warm (or even hot) to the touch. This is normal. However, if anything seems out of the ordinary, turn off the camera and allow the camera to cool. Then examine the camera and the batteries for signs of possible damage. For best image quality, turn off the camera when not using. Always store the camera in a cool place. My camera stalls when establishing a connection to the computer. • Your memory card may have a large number of images stored on it.
My camera shuts down unexpectedly. • A power surge or electrostatic discharge may have affected the camera. Remove the batteries and reset the camera (see “Resetting the camera” on page 32). Then reinstall the batteries and turn on the camera. • Recharge the batteries. • Connect the camera to AC power via an optional HP Photosmart dock, then turn on the camera. • Replace the batteries. I am having a problem installing or using the HP Photosmart Software.
10 Product support Use this section to find support information for your digital camera, including links to helpful websites and an overview of the support process. Helpful websites Camera tips, product registration, newsletter subscriptions, driver and software updates, purchase HP supplies and accessories www.hp.com Customers with disabilities www.hp.com/hpinfo/community/accessibility (English only) Hewlett-Packard Technical Support; firmware, software, and driver updates; support information www.
A Managing batteries Your camera uses two AA batteries, either Alkaline, Photo Lithium, or rechargeable Nickel Metal Hydride (NiMH). Photo Lithium and NiMH batteries provide longer battery life than Alkaline batteries. Top points about batteries • • • • • • The batteries shipped with your camera are AA Alkaline. These batteries have a short life and are intended to let you begin using your camera immediately.
Appendix A • • • Do not disassemble or modify batteries. Immediately discontinue use of a battery if, while using, charging, or storing the battery, the battery emits an unusual smell, feels excessively hot (note that it is normal for the battery to feel warm), changes color or shape, or appears abnormal in any other way. In the event batteries leak and the fluid gets into one’s eye, do not rub the eye. Rinse well with water and immediately seek medical care.
The following table shows how Alkaline, Photo Lithium, and rechargeable NiMH batteries perform in different types of use scenarios: Type of Use Alkaline Photo Lithium NiMH Most economical if you take more than 30 pictures per month Poor Fair Good Most economical if you take fewer than 30 pictures per month Fair Good Fair Heavy use of flash, frequent pictures Poor Good Good Heavy use of video Poor Good Good Heavy use of Image Display Poor Good Good Overall battery life Poor Good Fa
B Specifications Resolution Pictures, M630 series: • 7.2MP (3088 by 2320) effective pixel count • 7.2MP (3096 by 2328) total pixel count Pictures, M540 series: • 6.2MP (2864 by 2152) effective pixel count • 6.2MP (2872 by 2160) total pixel count Pictures, M440 series: • 5MP (2592 by 1936) effective pixel count • 5.1MP (2600 by 1944) total pixel count Video clips (QVGA): 320 by 240 total pixel count, 24 frames/sec Sensor M630/M540 series: Diagonal 7.34 mm (1/2.
(continued) Image Display 6.0 cm (2.36 in) color LTPS TFT LCD with backlight, 115,200 pixels (480 by 240) total pixel count Storage • • • • • 16MB internal flash memory. Slot for memory card. This camera supports standard, high speed, and high capacity SD and SDHC memory cards, 32MB to 8GB. This camera supports storing a maximum of 2000 images on a memory card. The number of images or video clips that can be saved in memory depends on the Image Quality settings (see “Memory capacity” on page 43).
Index A F Action mode 14 adding borders 21 arrow buttons 3 assistance 38 Auto mode 14 F-number 42 Favorites 20 flash red-eye reduction 13 setting 13 working range 42 Flash button 3 focal length 42 focus auto focus 9 brackets 9 focus lock 11 optimizing 10 format memory card 6 memory capacity 43 card 6, 8, 43 card door 4 Menu/OK button 3 menus Camera Setup 31 Design Gallery 21 Photosmart Express 27 Picture Capture 14 Playback 18 Video Record 14 microphone 4 modifying colors 21 Move Images to Card 19 G N
Index print images 25, 27 prints, buy online 29 problems and solutions 32 R record video clips 9 red-eye removal 19 Region 5 remaining pictures count 8 removing red eyes 19 resolution 42 reviewing images 17 S V video clips 9 Video Record Menu 14 View Slideshow 20 viewing thumbnails 18 Vista support 38 W weight 43 Windows Vista support 38 Z zoom 11, 12, 42 Zoom lever 3 safety precautions for batteries 39 selecting images for destinations 29, 30 selecting images for printing 27 Self-Timer light 4 Self-T
Regulatory / Geltende Richtlinien / Informations règlementaires Geräuschemission LpA < 70 dB Am Arbeitsplatz Normaler Betrieb nach DIN 45635 T. 19 FCC statement The United States Federal Communications Commission (in 47 CFR 15.105) has specified that the following notice be brought to the attention of users of this product. This equipment has been tested and found to comply with the limits for a Class B digital device, pursuant to Part 15 of the FCC Rules.