HP Wireless USB Keyboard and Mouse User’s Manual © Copyright 2004 Hewlett-Packard Development Company, L.P. The information contained herein is subject to change without notice The only warranties for HP products and services are set forth in the express warranty statements accompanying such products and services. Nothing herein should be construed as constituting an additional warranty. HP shall not be liable for technical or editorial errors or omissions contained herein.
HEALTH WARNING There may be a risk of serious physical injuries from working at your computer workstation. Some studies have suggested that long periods of typing, improper workstation setup, incorrect work habits, stressful work conditions and relationships, or problems in your personal health may be linked to injuries. These injuries could include carpal tunnel syndrome, tendonitis, tenosynovitis, and other musculoskeletal disorders.
Contents Welcome Installation User Setup Identifying Special Keyboard Buttons Special Keyboard Buttons Troubleshooting 4 5 7 10 11 16 -3-
Welcome Congratulations on the purchase of your new HP Wireless USB Keyboard and Mouse. This guide will provide you the necessary steps to installing and maintaining your keyboard and mouse.
Installation Software Installation Insert the CD into your CD-ROM drive. If the setup program does not appear, click Start, then click Run. Type :\setup. Click Ok. (For example, if the disk is in drive D, enter D:\Setup.) Follow the onscreen instructions. You will be asked to reboot your PC. Hardware Installation STEP 1 - Power on your system. STEP 2 - Connect the USB receiver to any available USB port or hub connected to your computer. STEP 3 - Continue on to the User Setup on Page 7.
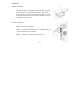
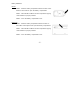
Battery Installation Mouse STEP 1 - Press the battery compartment release located on the bottom of the mouse to open the battery compartment. STEP 2 - Install the two batteries into the compartment paying close attention to proper polarities. STEP 3 - Close the battery compartment cover.
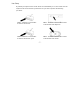
User Setup By default your keyboard and mouse should work immediately. If not, the receiver and the keyboard and mouse must be synchronized and you need to perform the following procedure. STEP 1 - Press the Connect button located on the receiver. STEP 2 - Press the Connect button located on the bottom of the keyboard. STEP 3 - Press the Connect button located on the receiver again. STEP 4 - Press the Connect button located on the bottom of the mouse.
Configuration Customize your keyboard settings using “Control Panel” Windows XP – Category View Click on Start, select Settings / Control Panel / Printers and Other Hardware / Keyboard, to customize your keyboard settings. Windows 98SE, Me, 2000 and XP – Classic View Click on Start, select Settings / Control Panel / Keyboard, to customize your keyboard settings.
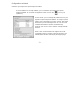
Configuration continued Customize your keyboard’s special keyboard buttons Once the software is correctly installed, you can customize your keyboard’s special keyboard buttons. To access the configuration screen, click on the icon in your system tray. On this screen, you can change the preset actions of your keyboard’s special keyboard buttons. To change a preset button, click on the button you wish to change, then select the function you want the keyboard to do.
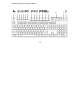
Identifying Special Keyboard Buttons A B C D E F G H I J K - 10 - L M N O P Q
Special Keyboard Buttons Access and Internet Buttons Figure Key Icon Feature Description A Standby Puts PC into or out of power-saving mode. Hold key for 5 seconds. May take 10-30 seconds before screen reappears. B C D E F G Back Forward Returns to the last web page you visited. Views the next web page you viewed before. Home Opens your home page using your default browser. Search Opens the search menu. Favorites Refresh Opens the Internet “My Favorites” folder.
Special Keyboard Buttons Continued Office Buttons Figure Key H I J K L M N Icon Feature F Lock My Computer My Documents Description Toggles F Lock (See page 13 for more information) Opens the My Computer folder. Opens the My Documents folder. Word Opens Microsoft Word. Excel Opens Microsoft Excel. Calculator Email Opens Microsoft Calculator. Opens the default program you use for email.
Special Keyboard Buttons Continued Office Hot Keys This keyboard features 12 integrated Office Hot Keys along the row of the F1 through F12 key. When you press the key the Office Keys keys. This feature is toggled by the feature is activated. To turn off the Office Keys feature, press the key again. F1: New F2: Forward F3: Reply F4: Reply All F5: Undo F6: Redo F7: Save F8: Send F9: Cut F10: Copy F11: Paste F12: Spell Creates a new file in the application you are using (new e-mail for instance).
Special Keyboard Buttons Continued Media Control or Playback Options Figure Key Icon Feature Description O Media controls Operates CD or DVD player. See table on page 15. P Volume Control Volume knob: Increase speaker volume when turned clockwise and decreases when turned counterclockwise. It can be turned indefinitely, even after maximum sound has been reached. Q Mute Mute sound. Push again to turn the mute off.
Special Keyboard Buttons Continued Figure Key Icon a c b f Feature d e g Description a b Log Off Logs the user out of Windows. c Media Opens your default media player (Windows Media Player or iTunes in most cases).* (see page 14) d Play / Pause Plays/Pauses the current track/file. e f g Stop Eject Previous Next Opens/Closes the CD-ROM tray. Stops the current track/file. Skips to the previous track/file. Skips to the next track/file.
Troubleshooting • • If you have Windows 95 or Windows NT, these operating systems do not support this device. The Universal Serial Bus Controller and USB root hub may not be properly installed on your system. Contact your computer manufacturer for details. Technical Support For technical assistance call 1-866-314-7239 or visit www.microinv.com/hp Technical Support hours of operation: Monday - Friday 8:30am to 10:00pm E.S.T.
FCC STATEMENT This device complies with part 15 of FCC Rules. Operation is subject to the following two conditions: (1) this device may not cause harmful interference, and (2) this device must accept any interference received, including interference that may cause undesired operation. This equipment has been tested and found to comply with the limits for a Class B digital device, pursuant to part 15 of FCC Rules.