DVD Player User's Manual Changing Entertainment. Again. RC5240P 15739290.
Important Information WARNING RISK OF ELECTRIC SHOCK DO NOT OPEN To reduce the risk of electric shock, do not remove cover (or back). No user serviceable parts inside. Refer servicing to qualified personnel. This symbol indicates “dangerous voltage” inside the product that presents a risk of electric shock or personal injury. This symbol indicates important instructions accompanying the product. FCC NOTE (for U.S.A.
Table of Contents Chapter 1: Connections and Setup Things to Consider Before You Connect ......................................................................... 6 Types of Discs Your DVD Player will Play .................................................................. 6 Choose Your Connection .................................................................................................. 7 Cables Needed to Connect Components to Your TV ...............................................
Table of Contents Chapter 3: Playing Audio CDs and MP3 Discs Loading and Playing an Audio CD ................................................................................. 34 Audio CD Playback Features .......................................................................................... 34 Skipping Tracks ......................................................................................................... 34 Time Search ............................................................................
Table of Contents Chapter 6: Other Information Troubleshooting .............................................................................................................. 54 Warranty ......................................................................................................................... 56 Accessories Order Form .................................................................................................. 59 Index ......................................................................
This page intentionally left blank. 15739290.
Chapter 1 Connections & Setup Chapter Overview: • Things to Consider • Choose your Connection • The Jacks on the Back of the DVD Player • Front Panel Controls • Installing the Batteries • How to Find Your TV’s Input Channel • The Remote Control Changing Entertainment. Again. 5 15739290.
Connections and Setup Things to Consider Before You Connect Protect Against Power Surges • Connect all components before you plug any of their power cords into the wall outlet. • Turn off the TV and/or components before you connect or disconnect any cables. • Make sure all antennas and cables are properly grounded. Refer to the Important Safeguards sheet packed with your DVD player. Protect Components from Overheating • Don’t block ventilation holes on any of the components.
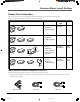
Connections and Setup Choose Your Connection There are several ways to connect your DVD player. Please use the following chart to determine which connection is best for you. Turn to the appropriate page and connect your DVD player. Components Cables Needed Connection Title Go to...
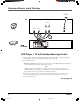
Connections and Setup CABLE OR OFF-AIR SIGNAL TV AUDIO OUT R TV AUDIO IN VIDEO IN S-VIDEO L R L 2 ANT IN 1 DIGITAL AUDIO OUT VIDEO OUT AUDIO OUT R COAXIAL DVD DVD PLAYER 1 R 2 Y L 1 OPTICAL L PB 2 S-VIDEO PR DVD Player + TV with Audio/Video Input Jacks 1. Connect the audio cables to the AUDIO OUT L (left – white) and R (right – red) jacks on the back of your DVD Player, and to the corresponding Audio Input jacks on your TV. 2. Connect the video cable.
Connections and Setup TV AUDIO OUT R AUDIO IN VIDEO IN S-VIDEO L R TV ANT IN L 2 1 4 DIGITAL AUDIO OUT VIDEO OUT AUDIO OUT R COAXIAL DVD PLAYER DVD Y L 1 1 R 2 OPTICAL L PB 2 S-VIDEO PR CABLE OR OFF-AIR SIGNAL VCR R L OUT TO TV OUT AUDIO VIDEO IN FROM ANT IN VCR L 3 R DVD Player + TV + VCR 1. Connect the audio cables to the AUDIO OUT L (left – white) and R (right – red) jacks on the back of your DVD Player, and to the corresponding Audio Input jacks on your TV. 2.
Connections and Setup CABLE OR OFF-AIR SIGNAL TV AUDIO OUT R AUDIO IN VIDEO IN S-VIDEO L R TV ANT IN L 1 3 DIGITAL AUDIO OUT VIDEO OUT AUDIO OUT R COAXIAL DVD DVD PLAYER 1 R 2 Y L 1 OPTICAL L PB 2 S-VIDEO PR 2 DOLBY DIGITAL or DTS RECEIVER DIGITAL IN AUDIO IN L ver cei e R er al igit Receiv D S lby Do /or DT d an R Dolby Digital® and DTS® Both Dolby Digital and DTS are audio formats used to record 5.
Connections and Setup DVD Player + TV + Dolby Digital or DTS Receiver To Connect the DVD Player 1. Connect the left and right audio cables to your audio/video receiver and to the AUDIO OUT L (left – white) and R (right – red) jacks on the back of your DVD Player. 2. If you have a Dolby Digital or DTS receiver, insert an optical digital cable (not provided) to the DIGITAL AUDIO OUT jack on the DVD player to the Digital Input jack on the back of the receiver.
Connections and Setup CABLE OR OFF-AIR SIGNAL TV AUDIO OUT R TV AUDIO IN VIDEO IN S-VIDEO L R ANT IN L 2 3 DIGITAL AUDIO OUT VIDEO OUT AUDIO OUT R COAXIAL DVD DVD PLAYER 1 R 2 Y L 1 OPTICAL L PB 2 S-VIDEO PR 1 PRO LOGIC OR STEREO RECEIVER ic Log r o r e P eiv lby Do Rec reo Ste AUDIO IN L or R 12 15739290.
Connections and Setup DVD Player + TV + Dolby Pro Logic or Stereo Receiver To Connect the DVD Player 1. Connect the left and right audio cables to your audio/video receiver and to the AUDIO OUT FRONT L (left – white) and R (right – red) jacks on the back of your DVD Player. 2. Connect the video cable. • Basic video connection – Connect the video cable (yellow) to the VIDEO OUT jack on the back of your DVD Player, and to the Video Input jack on your TV.
Connections and Setup TV AUDIO OUT R AUDIO IN VIDEO IN S-VIDEO L R TV ANT IN L 2 1 4 DIGITAL AUDIO OUT VIDEO OUT AUDIO OUT R COAXIAL 1 DVD PLAYER DVD Y L 1 R 2 OPTICAL L PB 2 S-VIDEO PR VCR R L OUT TO TV OUT AUDIO VIDEO IN FROM ANT IN L VCR R 3 SATELLITE SATELLITE RECEIVER SIGNAL IN FROM ANT SATELLITE IN OUT CABLE S-VIDEO S-VIDEO e ellit Sat VIDEO R OR L OFF-AIR SIGNAL OUT TO TV 14 15739290.
Connections and Setup DVD Player + TV + VCR + Satellite Receiver 1. Connect the audio cables to the AUDIO OUT L (left – white) and R (right – red) jacks on the back of your DVD Player, and to the corresponding Audio Input jacks on your TV. 2. Connect the video cable. • Basic video connection – Connect the video cable (yellow) to the VIDEO OUT jack on the back of your DVD Player, and to the Video Input jack on your TV.
Connections and Setup The Jacks on the Back of the DVD Player When connecting, make sure you connect Output jacks to Input jacks, Video to Video, Right Audio to Right Audio, etc. AUDIO OUT R and L Insert audio cables (left and right) from these jacks on your DVD player to the corresponding Audio Input jacks (left and right) on your TV or receiver. VIDEO OUT (Composite Video Output) Connect a video cable to this jack and to the Video Input jack on your TV.
Connections and Setup Front Panel Controls 1 2 4 3 5 OPEN • CLOSE ON • OFF SKIP BACK STOP - 13 PAUSE SKIP FWD SCAN REV SCAN FWD + 12 10 11 9 8 7 6 1. ON•OFF Use to turn the power on and off. 2. Disc Tray Discs are inserted here. Press OPEN•CLOSE to open and close disc tray. 3. OPEN•CLOSE Press to open and close the disc tray. 4. SKIP BACK During playback, moves to the beginning of the preceding title, chapter, or track on a disc. 5.
Connections and Setup Install Batteries in the Remote 1. Remove the battery compartment cover on the back of the remote. 2. Insert new batteries. Match the polarities (+ and –) on the batteries with the diagram on the remote. 3. Put the battery compartment cover back on the remote. Important Battery Information insert batteries • If you’re not going to use the remote for a month or more, be sure to remove the batteries because they can leak and cause damage.
Connections and Setup How to Find Your TV’s Video Input Channel You need to tune your TV to the Video Input Channel (or S-Video Channel if you connected the S-Video cable to your TV and to your DVD Player) to see the DVD Player’s menu and to see the content that’s on a disc. The video channel on TVs varies for different brands and different models. In order for your DVD remote to work, your TV must be set on the correct video input channel.
Connections and Setup A Quick Tour of The Remote ON•OFF DVD TV SUBTITLE AUDIO ANGLE MUTE ZOOM You can use this remote to control compatible components. The component buttons are programmed to operate some Proscan, RCA and GE components. The buttons must be programmed to operate other brands of components. (See “Programming the Remote” in chapter 5.
Connections and Setup GUIDE Accesses the DVD disc guide (if available). When playing a VCD, brings up the index menu. ON•OFF DVD TV INFO Brings up the Info Display. SUBTITLE AUDIO ANGLE MUTE ZOOM PLAY MODE VOL VOL CH + OK/SELECT Begins disc play and selects menu items. Arrow buttons Use the arrow buttons (left, right, up, and down) to move through the on-screen menus. You highlight a menu item by pressing the arrow buttons and select a highlighted item by pressing the OK button.
This page intentionally left blank. 15739290.
Chapter 2 Playing DVDs Chapter Overview: • Regional Coding • Using Different Menus • Loading and Playing Discs • Using a Disc Menu • DVD Playback Features • Special Features Changing Entertainment. Again. 23 15739290.
Playing DVDs Regional Coding Both the DVD player and the discs are coded by region. These regional codes must match in order for the disc to play. If the codes don’t match, the disc won’t play. This player’s code is region 1. Using Different Menus Each disc is programmed with different features. There are three separate ways to access features: • The Disc menu – The Disc menu is part of each disc and is separate from the DVD player’s menu.
Playing DVDs To Load and Play a Disc CC Turn on the TV and your DVD player (press ON•OFF on the player or the remote control). 'tt CCaattcchh UUp p an 1. Press the OPEN•CLOSE button on the remote control or the front of the DVD Player. 2. Place a disc gently into the tray with the disc’s label facing up (double-sided discs have content on both sides, so you can place either side up). 3. Press the OPEN•CLOSE or PLAY button on the front of the player to close the disc tray.
Playing DVDs 2. Press the up/down arrow buttons to highlight the menu item you want to choose, and press OK. In the example on the left, Language has been highlighted. In this example, The Language setting is highlighted. To see language options, press OK on the remote. 3. Press the up/down arrows to select a language, and press OK. 4. Press MENU to resume playback. Note: Any settings you change on the disc menu only override the settings in the DVD Player’s menu temporarily.
Playing DVDs DVD Playback Features Fast Motion Playback (Picture Scan) You can search in forward or reverse mode. 1. Press the REVERSE or FORWARD button on the remote during playback to search through a disc. 2. Press the button again on the remote to search at the next speed. Picture Scan has four speeds. With each consecutive press of the button, the search speed increases. If you press the button five times, Picture Scan cycles back to normal playback. 3.
Playing DVDs Play Mode Random The Random option plays a disc’s chapters in random order. If there is more than one title, the title with the most chapters is selected. If there is more that one title and all titles have an equal amount of chapters, the first title is selected. If each title has only one chapter each, the titles/chapters will be played in random order. 1. Press STOP to stop playback. 2. Press PLAY MODE on the remote control (the Play Mode info banner appears). 3.
Playing DVDs Selecting a Chapter Number 1. Press the INFO button on the remote control to bring up the Info banner. 2. Press INFO again to highlight the Chapter number. Use the number buttons to enter the chapter you want to play. Selecting a Title Number In the example above, the Chapter number is highlighted. Use the number buttons on the remote to enter the desired chapter number. 1. Press the INFO button on the remote control to bring up the Info banner. 2.
Playing DVDs Subtitles When a DVD is recorded with subtitles, you can use the Subtitle feature to view the subtitles on-screen. To turn subtitles on: 1. Press the SUBTITLE button on the remote. The Subtitle info banner appears. By default, subtitles are off. The info banner will display SUBTITLES OFF. If no subtitles are available, the icon will appear. 2. To display subtitles, press the SUBTITLE button again.
Playing DVDs Using the Repeat Feature There are four repeat options: • Off • Chapter – repeats the chapter that is playing • Title – repeats the title that is playing • A-B Repeat – repeats a selected segment of the disc Repeating a Chapter or Title The REPEAT button toggles between chapter repeat, title repeat, AB repeat and off. Press the REPEAT button to select Chapter, Title or AB Repeat. Use A-B Repeat to set a specified segment to repeat. 1.
This page intentionally left blank. 15739290.
Chapter 3 Playing Audio CDs and MP3 discs Chapter Overview: • Loading and Playing an Audio CD • Audio CD Playback Features • Playing MP3 Discs Changing Entertainment. Again. 33 15739290.
Playing Audio CDs and MP3 Discs Loading and Playing an Audio CD Before you load a disc, make sure that it is compatible with the player. Note that the following discs CANNOT be used with this player: Laserdisc • CD-I, CD-ROM, DVD-ROM • MiniDisc • CD-G discs play audio only, not graphics To Load and Play an Audio CD o us Surf Sou n uito biq the Pacific Northw ds f t es U • 1. Wavin' Good Day 2. surfin' in the rain 3. Born on Thursday 4. Smarter than you 5.
Playing Audio CDs and MP3 Discs Play Mode Random The Random option plays a disc’s tracks in random order. 1. Press STOP to stop playback. 2. Press PLAY MODE on the remote control (the Play Mode info banner appears). 3. Press the PLAY MODE button until the Random option is displayed. 4. Press OK. To resume normal playback, press STOP and PLAY or press PLAY MODE until the PLAY option is displayed. Program The Program playback option allows you to enter the order in which you want tracks to play. 1.
Playing Audio CDs and MP3 Discs Using the Repeat Feature There are four repeat options: • Repeat Off – Repeat is turned off • Disc – repeats the entire disc • Track – repeats the track that is playing • A-B Repeat – repeats a selected segment of the disc To Repeat a Track or Disc: 1. While a disc is playing, press REPEAT (the repeat info banner appears and displays REPEAT ONE TRACK). 2. The current track will repeat until you turn Repeat off or select another Repeat option. 3.
Playing Audio CDs and MP3 Discs Playing MP3 discs When you play a MP3 disc, the MP3 menu will be displayed instead of the DVD player menu. The DVD player menu is not available when playing MP-3 discs. MP3 TRACK TOTAL: 164 1. Press the OPEN•CLOSE button on the front of the DVD player. 2. Place a disc gently into the tray with the disc’s label facing up. 3. Press OPEN•CLOSE to close the disc tray. The number of tracks on the disc is displayed at the top of the screen.
This page intentionally left blank. 15739290.
Chapter 4 Playing Video CDs Chapter Overview: • What is Video CD? • The Video CD Disc Menu • Loading and Playing a Video CD • Video CD Playback Features VIDEO CD Changing Entertainment. Again. 39 15739290.
Playing Video CDs What is a Video CD? Like DVD video discs, Video CDs contain picture and sound content. Video CDs (VCDs) are encoded in a different format. VCDs don’t hold as much information as DVD discs and the picture quality is not as high. VCDs can have more than one title. Each title is divided into tracks (similar to chapters on a DVD disc).
Playing Video CDs Resuming Playback Control To resume the Playback Control mode, press MENU (the disc’s menu appears). Using the Time Search Feature You can use the Time Search feature to begin playback from any point on the disc (in the currently playing title) by entering the elapsed time. For example, if you have a favorite scene that begins 12:34 minutes into the movie, you can go directly to that point in the title. 1.
This page intentionally left blank. 15739290.
Chapter 5 The Menu System Chapter Overview: • The Display Menu • The Sound Menu • The Password Menu • The Preferences Menu Changing Entertainment. Again. 43 15739290.
The Menu System The Setup Menu The Display Menu Image Depending on the type of television you have, you may want to adjust the screen setting (aspect ratio). The default setting is 4x3 (pan & scan). 4x3 PS (Pan & Scan) 4x3 Letterbox 1. With no disc playing, press MENU (the main menu appears). 2. Use the arrow buttons to highlight the Display option. Press OK to select it. (The Display menu is appears). 3. Use the up/down arrow buttons to highlight the Image option.
The Menu System DISPLAY MENU IMAGE VIDEO OUT LANGUAGE S-VIDEO COMPONENT MAIN MENU Video Out The VIDEO OUT option is used to select the correct video connection. If you connected your DVD player with ad S-Video cable, select the S-Video option. If you used component cables to connect your player, select the Component option. Menu Language SET VIDEO TYPE Use this feature to change the language for the player’s on-screen menu system. The default is English.
The Menu System The Sound Menu Selecting Digital Output Type If you have a receiver with a digital signal input, use this feature to select your player’s type of digital output. OFF No signal is output from the optical or coaxial port. BITSTREAM Select this option when the DVD player is connected with a power amplifier through optical or coaxial port. The power amplifier connected must have Dolby Digital, DTS and MPEG decoding.
The Menu System Speakers The Front Speaker feature has two options: • STEREO+ If you have a Dolby Pro Logic receiver hooked up, select this option so the receiver can decode the signals and reproduce a surround sound effect. • STEREO Select this option if you have a stereo receiver hooked up. SOUND MENU DIGITAL OUT RANGE SPEAKERS STEREO+ STEREO MAIN MENU 1. With no disc playing, press MENU (the main menu appears). 2. Select the Sound option (the Sound menu appears). 3.
The Menu System The Password Menu Creating a Password You can use a password to control what types of movies your family watches. PASSWORD MENU PASSWORD PASSWORD MODE CHANGE MAIN MENU 1. With no disc playing, press MENU (the main menu appears). 2. Use the down arrow to highlight Password (the Password menu appears). 3. Highlight the Password option. 4. Press the right arrow to highlight the Change option and press OK to select it (the Change Password screen appears). 5.
The Menu System The Preferences Menu If the Password mode is on, the Preferences menu will appear grayed out and you won’t be able to select it. In order to use the Preferences menu, Password mode must be turned off. If Password mode is on, turn it off in the Password menu and exit the menu system completely. Press the Menu button to bring up the main menu again. Selecting the Audio Preference Use the Audio menu to select the soundtrack language that you prefer.
The Menu System Changing the Disc Menu Language Use the Disc Menu option to select the language you want a DVD’s disc menu to be displayed in (not the same as the player menu). 1. With no disc playing, press MENU (the main menu appears). 2. Use the down arrow to highlight Preferences (the Preferences menu appears). 3. Highlight the Disc Menu option. A list of languages appears on the right. 4. Use the right arrow to move to the language choices. Use the up/down arrows to highlight the desired choice.
The Menu System Dimming the Front Display The DIMMER option is used to dim the display on the front of the player. 1. With no disc playing, press MENU (the main menu appears). 2. Use the down arrow to highlight Preferences (the Preferences menu appears). 3. Highlight the Dimmer option. 4. Use the right arrow to move to the dimmer options. Use the up/down arrows to highlight the desired setting. 5. Press OK to select the option. 6. Press the left arrow to return to the Preferences menu.
This page intentionally left blank. 15739290.
Chapter 6 Other Information Chapter Overview: • Troubleshooting • Limited Warranty • Accessory Ordering Information Changing Entertainment. Again. 53 15739290.
Reference Troubleshooting Common Problem Solution No Power Insert the power cord’s plug securely into the outlet. Power turns itself off The power is automatically turned off after approx 30 minutes have elapsed in the stop mode (auto power-off feature). Turn power back on. Player fails to start, even when PLAY is pressed • • Ensure that the disc is installed with the label side facing up. This player plays only DVD discs, Audio CDs and Video CDs.
Reference Troubleshooting DVD Problem l Solution Subtitle and/or audio language is not the one selected from the initial setting If the subtitle and/or audio language does not exist on the disc, the initial settings will not be seen/heard. The disc’s priority language is selected instead. Set the subtitle and or audio language initial setting manually. No on-screen display The OFF setting is selected for OSD Display; select ON in the Setup menu.
Reference Limited Warranty RCA Digital Video Disc (DVD) Player What your warranty covers: • Defect in materials or workmanship. For how long after your purchase: • • • 90 days from date of purchase - Unit exchange, which includes parts and labor. 91 days to 1 year from date of purchase - Unit exchange, which includes parts only; you pay the labor. The warranty for rental units begins with the first rental or 45 days from date of shipment to the rental firm, whichever comes first.
Reference Thomson assumes no responsibility for warranty shipments from the customer to the factory if not shipped in the manner prescribed by Thomson. Return transportation, storage, handling and insurance costs are your responsibility. We accept no responsibility in case of damage or loss. To receive a replacement unit after we have received your unit: • • • • • Write the SR number on the outside of the carton used to return the unit. Make sure you insure your shipment in case of damage or loss.
This page intentionally left blank. 15739290.
Reference Accessory Order Form for Your DVD Player Accessories and Order Form Optical Plug to Optical Plug DV3 (3 ft.) DV6 (6 ft.) Optical Plug to Optical Plug DV3 (3 ft.) DV6 (6 ft.) Description Part No. Price Optical Plug to Optical Plug (3 ft.) DV3 $15.95 Optical Plug to Optical Plug (6 ft.) DV6 $19.95 Optical Plug to Mini Plug (3 ft.) DV3M $15.95 Optical Plug to Mini Plug (6 ft.) DV6M $19.95 Coaxial Digital Audio Cable (3 ft.) DT3A $9.95 Coaxial Digital Audio Cable (6 ft.
Reference To Place an Order: Charge your order on your VISA, MasterCard, or Discover Card by filling in below U S E Y O U R C R E D IT To place your order by phone, have your Visa, MasterCard or Discover Card ready and call the toll-free number listed below. C A R D ® I M P O R TCopy A Ncomplete T : account number from your VISA card Use this number only to place an order for accessory items listed on this order form.
Reference Index Symbols D M 16 x 9 wide 44 4 x 3 Letterbox 44 4 x 3 Standard 44 Defaults 51 DIGITAL AUDIO OUT jack 10, 16 Digital output type, selecting 46 Dimming the Front Display 51 Disc loading and playing 24 Disc menu 24 Disc Menu Language 51 Discs digital video discs 24 types you can't play 24 Display, dimming 51 Dolby Digital 11 Dolby Pro Logic 11, 13 DTS 10 DVD playback features 27 Menu button 21 MP3, playing files 37 Motion Pictures Association of America 50 MUTE button 20 A A-B repeat Audio
Reference S T S-VIDEO jack 16 Satellite connecting 15 Search fast motion playback 27 Selecting Chapter number 29 Title number 29 Skipping Chapters 27 Skipping Tracks CDs 34 MP3 37 VCDs 40 Sound Menu 46 Speakers 47 STOP button 21 Subtitles turning on/off 30 selecting a language 30 codes 52 SUBTITLE button 20 Time Search feature 41 Title repeating 31 Title Number selecting 29 Troubleshooting 54 TV's Video Input Channel 19 Types of Discs the Player Can Play 18 V VCDs 40 Video CDs 40 Video Input Channel 19
Please do not send any products to the Indianapolis address listed in this manual or on the carton. This will only add delays in service for your product. Thomson multimedia Inc. 10330 North Meridian Street Indianapolis, IN 46290 ©2001 Thomson multimedia Inc. Trademark(s)® Registered Marca(s) Registrada(s) Printed in China TOCOM 15739290 15739290.