Bar Code Label Design and Printing from mySAP™ Business Suit via ® SAP Smart Forms™ Zebra® Printers and SAP Smart Forms June 30, 2005 Rev 3 ©2004 ZIH Corp. ZTools is a Zebra trademark, and Zebra, ZPL II, BAR-ONE and ZebraNet are registered trademarks of ZIH Corp. All rights reserved. SAP, mySAP, Smart Forms and SAP NetWeaver are the trademarks or registered trademarks of SAP AG in Germany and in several other countries. PCL is a registered trademark of Hewlett-Packard Company.
Driving Zebra Printers from Smart Forms Table of Contents UPGRADING SMART FORMS FOR BAR CODING ............................................................................. 2 SUPPORT PACKS .......................................................................................................................................... 2 Smart Forms Bar Code Rendering Library (BRL)..................................................................................
Driving Zebra Printers from Smart Forms Upgrading Smart Forms for Bar Coding Support Packs SAP’s Smart Forms design tool now supports native bar code design and industrial bar code printing. These features can be enjoyed by users of mySAP™ Business Suite 4.6c onwards. Support Packs are available direct from SAP AG for enabling this technology. For more information on this upgrade, please refer to SAPnet notes 750002 and 750772.
Driving Zebra Printers from Smart Forms Smart Forms and Zebra Device Types One of the following device types must be uploaded to mySAP Business Suite before you can drive Zebra printers from Smart Forms. These device types will also ship with SAP NetWeaver 05. Smart Forms only supports the Zebra Programming Language (ZPL II). IBM® CodePage 850 - CG Triumvirate Bold Condensed Font (Scaleable) Zlzeb6.pri All 600 dpi ZPL-II printers Zlzeb3.pri All 300 dpi ZPL-II printers Zlzeb2.
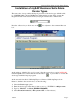
Driving Zebra Printers from Smart Forms Installation of mySAP Business Suite Zebra Device Types The next series of steps outline the import procedure of the device type definition file, i.e., ZLBZEB2.PRI to the mySAP Business Suite printing system. First, execute the Program Execution transaction SA38 by keying in /nSA38 at the command line: Press the key or click once on the box. box adjacent to the command line text © SAP AG 2004. All rights reserved.
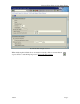
Driving Zebra Printers from Smart Forms © SAP AG 2004. All rights reserved. When all the required fields above are entered correctly, click on execute button or press to start the import process. Ignore all other options.
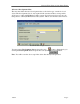
Driving Zebra Printers from Smart Forms Allocate a Development Class The user must either allocate a development class to the device type or make it a local object. The development class is only required if the customer wishes to transport this device type to other mySAP Business Suite systems. Local object device types can’t be transported to other mySAP Business Suite systems. This is done from the screen below: © SAP AG 2004. All rights reserved.
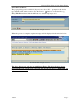
Driving Zebra Printers from Smart Forms Select the local driver. The pop-up dialog text box labeled “Import from a Local File ” prompts for the device type definition file and its location. Use the browse button to locate the file, e.g., ZLB_ZEB.PRI and then click the OK button to start the upload process. © SAP AG 2004. All rights reserved. When the process is complete, update messages will be displayed in the window below. © SAP AG 2004. All rights reserved.
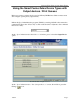
Driving Zebra Printers from Smart Forms Using the Smart Forms Zebra Device Types with Output devices / Print Queues Before we can use a printer (device type) in SAP mySAP Business Suite we must create and configure a print queue (output device). Initiate the Spool Administration program, SPAD, by entering /nSPAD in the transaction command line. Press the key or click on the check box adjacent to the command line text box entry.
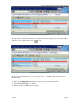
Driving Zebra Printers from Smart Forms © SAP AG 2004. All rights reserved. You should now see the screen below, exactly the same as the previous screen but with a new line of icons. Press the Create icon. © SAP AG 2004. All rights reserved. At the “Spool Administration: Create Output Device”, similar to the screen below, do the following: 1) Allocate the Output Device name. You may also allocate a shortname 2) Select the Device Type, i.e.
Driving Zebra Printers from Smart Forms © SAP AG 2004. All rights reserved. Press the TAB. © SAP AG 2004. All rights reserved.
Driving Zebra Printers from Smart Forms For testing and demonstration purposes only, we recommend that you use “Front End Printing.” We do not recommend this access method for volume or mission-critical industrial printing.
Driving Zebra Printers from Smart Forms U or S PC with Windows® 95/98/NT4/2000 (requires SAPlpd running) Destination Host (Like the name of the target PC / print server) This is not required for F-Front End Printing as the destination host is the client PC that the print request was made from (requires SAPlpd running). For U or S, This must be the Host Name of the PC that will have SAPlpd running on it or the Host Name of a dedicated Print Server with print queues setup.
Driving Zebra Printers from Smart Forms © SAP AG 2004. All rights reserved. SAPlpd needs to be run on any PC that requires a Windows printer driver to be used with mySAP Business Suite. This is the case if you are using Generic Text drivers or fullblown Windows drivers. Note: We do not recommend using SAPlpd for volume or mission-critical industrial printing.
Driving Zebra Printers from Smart Forms Test Printing from Smart Forms to an Output Device / Print Queue Please ensure that the form you test print with has been designed for your device. Do not try and print a form that has been designed with “HELVE” on an ANDALE Unicode Device type (zlzebuX). Please follow the following procedure to do a test print directly from Smart Forms: Open the form you wish to print (/nSmart Forms), Type in the Form Name and press “Change.
Driving Zebra Printers from Smart Forms © SAP AG 2004. All rights reserved. Press the Test Icon again (or press F8). You will now see a screen similar to that below: © SAP AG 2004. All rights reserved. Press the execute Icon (or press F8).
Driving Zebra Printers from Smart Forms © SAP AG 2004. All rights reserved. You must enter/edit the following fields: Output device Print immediately Delete after print New Spool request Enter the name of the print queue. Ensure this is checked/ticked. Ensure this is checked/ticked. Ensure this is checked/ticked. Press the Print button. If the print was successful then the Zebra printer should print out your form.
Driving Zebra Printers from Smart Forms Designing a Simple Smart Form Disable PC Editor Before starting to design your form, we advise that you use the old editor for full screen editor operations within Smart Forms. This can be achieved as follows: Start the “Standard Text: Request” transaction by entering /nSO10 in the command line text box located just below the menu bar of the current active window of mySAP Business Suite system.
Driving Zebra Printers from Smart Forms Smart Styles—Planning for Smart Forms Before starting to lay out your form, you must determine what text and bar code objects you will require. You actually need to build a collection of all of the derivatives of text and bar codes you will use within the Smart Form. All of these objects need to be created and collected within a Smart Style.
Driving Zebra Printers from Smart Forms © SAP AG 2004. All rights reserved. • Enter in the bar code name “C39_20” and the Short text of “C39 20mm high 0.25 narrow bar” and press OK © SAP AG 2004. All rights reserved. • Select C39 as the Symbology and press OK © SAP AG 2004. All rights reserved.
Driving Zebra Printers from Smart Forms © SAP AG 2004. All rights reserved. • • • • • Enter 6 (entered at 600 dpi/24 dpm but we will print at 200 dpi(¼ of 24=6)) Enter 480 (entered at 600 dpi/24 dpm but we will print at 200 24*20=480) Leave the check digit enabled Leave the ration at 3:1 Press OK © SAP AG 2004. All rights reserved. • Press “Yes” to Save © SAP AG 2004. All rights reserved.
Driving Zebra Printers from Smart Forms © SAP AG 2004. All rights reserved. • Press OK You have now successfully created the “New Technology” based bar code. Repeat this for all bar codes that you will need. (No need to do any more for this exercise.
Driving Zebra Printers from Smart Forms Creating Smart Styles to Select Text and Barcodes Please follow the following procedure: • Execute Transaction /nSmartStyles • Enter a the Style Name “ZZEBRA_SHIPPING” and press the “Create” button We are now going to add a bar code to our Smart Style: • Select “Character Formats” from the tree, and press the right mouse button and then select “Create Node” © SAP AG 2004. All rights reserved. • Enter C3 as the Character Format and press OK © SAP AG 2004.
Driving Zebra Printers from Smart Forms We now need to add our Text Styles to the Smart Style: • Select “Character Formats”, from the tree, and press the right mouse button and then select “Create Node”. © SAP AG 2004. All rights reserved. • Enter “TS” (Text Small) as the Character format and press OK © SAP AG 2004. All rights reserved.
Driving Zebra Printers from Smart Forms © SAP AG 2004. All rights reserved.
Driving Zebra Printers from Smart Forms We now need to make a default Paragraph for our Header Data: © SAP AG 2004. All rights reserved. • Select “Paragraph Formats”, from the tree, and press the right mouse button and then select “Create Node” © SAP AG 2004. All rights reserved.
Driving Zebra Printers from Smart Forms © SAP AG 2004. All rights reserved. • We can use all of the defaults—no need to change any other settings for the Paragraph Format. You now need to double click on “Header data” © SAP AG 2004. All rights reserved.
Driving Zebra Printers from Smart Forms We now need to save our Smart Style: • Press the “Save” Icon © SAP AG 2004. All rights reserved. • • Press “Local object” You now need to Select “Style | Activate” from the main menu. You have now successfully created and activated your Smart Styles.
Driving Zebra Printers from Smart Forms Laying out the Smart Form Start the “Smart Forms” transaction by entering /nSMART FORMS in the command line text box located just below the menu bar of the current active window of mySAP Business Suite system. Press the key or click on the check box adjacent to the command line text box entry. © SAP AG 2004. All rights reserved. • 13760L Enter the name “ZZEBRA_FORM” as the Form and press Create button.
Driving Zebra Printers from Smart Forms Map to Smart Style You should now see a screen similar to that below: © SAP AG 2004. All rights reserved. • We now need to map our Smart Style to this Form. Double click on Form attributes. © SAP AG 2004. All rights reserved.
Driving Zebra Printers from Smart Forms © SAP AG 2004. All rights reserved.
Driving Zebra Printers from Smart Forms Add Text and Bar Code Fields © SAP AG 2004. All rights reserved. • • Press the right mouse button on “MAIN Main Window” tree Select “Create | Window”. We are basically going to create a separate Window for each field, in the Main Window (think of the Main Window as the Label) © SAP AG 2004. All rights reserved.
Driving Zebra Printers from Smart Forms • • • Press the right mouse button on “%Windows1 New Window” tree Select “Create | Text”. Press the “General Attributes” TAB (if needed) © SAP AG 2004. All rights reserved. • • Enter “Date: “ Press the “insert field icon” © SAP AG 2004. All rights reserved.
Driving Zebra Printers from Smart Forms © SAP AG 2004. All rights reserved. • • Select highlight “Date: &SYST-DATUM& by dragging over it. You could make this a multi-line field (paragraph). Pick Character Format “TS HELVE 12 PT”. You can pick any text or bar code style that you have created. Bar codes will just show as text on this screen. You now can repeat the above process for each field you need to add.
Driving Zebra Printers from Smart Forms Add Lines and Boxes You should now see a screen similar to that below: © SAP AG 2004. All rights reserved.
Driving Zebra Printers from Smart Forms © SAP AG 2004. All rights reserved. • • • • Enable/check the “Line width” checkbox Enter Point size of line width (or change units of measurement) Enable “Always draw box and shading” Enter 100 for “Gray Value” if you want a solid box (leave as blank or 0 for lines or boxes) You need to create a separate Window for each box you wish to draw. You can also draw boxes around any existing Window used for text, bar codes or graphics.
Driving Zebra Printers from Smart Forms Add Logos/Graphics You should now see a screen similar to that below: © SAP AG 2004. All rights reserved.
Driving Zebra Printers from Smart Forms © SAP AG 2004. All rights reserved. • Press the “browse graphic” icon © SAP AG 2004. All rights reserved.
Driving Zebra Printers from Smart Forms © SAP AG 2004. All rights reserved. • Double click on the logo you require (we will use ENJOY) For detailed information on logos, refer to “Tips and Tricks: Logos / Graphics” on page 47.
Driving Zebra Printers from Smart Forms Saving and Activating the Smart Form • Press the Save Icon © SAP AG 2004. All rights reserved.
Driving Zebra Printers from Smart Forms Tips and Tricks for Smart Forms and Zebra Printers Smart Forms was originally developed for “Form” and “Report” design, not labels. Smart Forms can now be successfully used to design labels on high performance bar code label printers, but you need to be aware of the tips and tricks not documented within the original Smart Forms manuals.
Driving Zebra Printers from Smart Forms Note: The command ^FWR in the command node has no effect on printing barcodes, as these have their own parameters for rotation. Define the barcodes needed for the landscape label in SE73 with the necessary rotation. Field Positioning—X, Y Coordinates Labels normally use a “field” concept whereas Smart Forms use a “Page Window” style of design. Label fields normally have a fixed “origin” whereas text in forms is much more dynamically positioned.
Driving Zebra Printers from Smart Forms Text Objects Smart Forms supports Zebra preloaded printer-resident scaleable fonts. It also supports TrueType font downloading and TrueType fonts stored in Zebra printer Flash memory. We strongly recommend that you use printer-resident fonts for simplicity and maximum printer throughput. Western European—IBM CodePage 850 You will normally design your forms/labels for Zebra printers using the SAP “HELVE” font.
Driving Zebra Printers from Smart Forms © SAP AG 2004. All rights reserved. For detailed information on how to upload a TrueType font, refer to OSS Note 130658 In the case of ZPL II printers, this font is automatically downloaded to the printer at the beginning of the print run as an IBM Codepage 850 scaleable font, and then deleted at the end of the print run.
Driving Zebra Printers from Smart Forms Modify the Zebra SAP Device Type Select Transaction SE73 (Printer Fonts) and press “Change” Scroll down and Double click on the target device type (This must be one of the IBM Codepage 850 device types Zlzebx (x=2, 3 or 6) Double click on the TrueType font (for example ZArial) Enter the name of the font that you downloaded to the printer (for example “ARIAL”—don’t specify the memory location) Font Licensing (TTF) / Disclaimer It is the responsibility of the end users
Driving Zebra Printers from Smart Forms Logos/Graphics Colored bitmap graphics from Smart Forms are changed to black and white when you print from the Zebra printer driver. If the picture quality deteriorates following this conversion, you should convert the graphic to black and white using a graphics program (such as PaintShop Pro) and import it into Smart Forms as a black-and-white graphic. The driver does not convert monochrome graphics.
Driving Zebra Printers from Smart Forms Printer Settings Command Nodes allow you to set printer specific settings from within individual Smart Forms. Each Smart Form may have different settings associated with it. This means that you can have a Smart Form set the printer’s darkness (burn temperature) and print speed (as well as many more settings). Command Nodes are set by selecting a page Windows and pressing the Right Mouse Button over the tree structure and then select “Create | Command.
Driving Zebra Printers from Smart Forms Below is a list of supported command Nodes: Description Human Readable Command Node S_LZPL_HR S_LZPL_HR1 S_LZPL_HR2 S_LZPL_HR2 Supported Values System Bar Code Style Name Print Speed (^PR) Media Tracking (^MN) S_LZPL_SETUP_SPD Supports 2,3,4,5,6,8,9,10,11,12 S_LZPL_SETUP_MTR N Y W M Media Type (^MT) Print Mode (^MM) Top Position (^LT) Tear Off Position (~TA) Media Darkness (^MD) Generic commands S_LZPL_SETUP_MT S_LZPL_SETUP_PM S_LZPL_SETUP_TP S_LZPL_SETUP_TO S_L
Driving Zebra Printers from Smart Forms Bar Codes Bar Codes are managed via transaction /nSE73. See the screen below: © SAP AG 2004. All rights reserved. Individual bar code “types” need to be created for each flavor of bar code. A Smart Style then needs to be created to include bar code “types” for each Node. Firstly you need to create/configure “printer bar codes” or “system bar codes.” Printer Bar Codes “Printer bar codes” are bar codes that are specific to a specific printer.
Driving Zebra Printers from Smart Forms © SAP AG 2004. All rights reserved. System Bar Codes “System bar codes” can either use the “old barcode technology “and use a specific “printer bar code” based on the device type selected, or alternatively use the “new bar code technology.
Driving Zebra Printers from Smart Forms © SAP AG 2004. All rights reserved. Note: Bar code parameters “Height” and “Module Width” are entered at a resolution of 600 dpi independent of the resolution of the target printer. This means that a bar code height of 120 would print 10 mm on a 203-, 300- or 600-dpi printer. For more information on this “New Technology” see OSS Note 430887.
Driving Zebra Printers from Smart Forms Resources Visit www.zebra.com/sap to keep up-to-date on bar code printing and RFID solutions for SAP End Users. Additional Smart Forms information can be found by visiting the SAP Developer Network website at www.sdn.sap.com. Refer to SAPnet notes 750002 and 750772.