
Reference Guide


1-3
Installation
Installing the Module
Installation
5. Slide the handle to the closed position.
6. Turn on the power to the HP AdvanceStack hub by plugging in the power
cord (there is no On/Off switch).
When power is applied, the hub will begin its power-on self-test, followed
by the module’s self-test. With the module installed, the combined self-
test time is approximately 20 seconds. (The module may perform a second
self-test; the second test is normal during the first power-up and can take
an additional 20 seconds.)
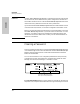
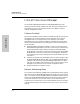
If the HP 100VG SNMP/Bridge Module is installed and functioning
correctly, the Expansion Slot (“Exp Slot”) LED on the front of the hub will
be lit (solidly ON) after the self-tests have completed. The following
illustration shows the location of the Exp Slot LED on the front of the HP
J2415A AdvanceStack 100VG Hub-14.
If the “Exp Slot” LED begins to blink at a higher rate than during
self-test and continues to blink for an extended period of time, refer to
chapter 4, “Troubleshooting” in this guide.
If you are connecting the SNMP/Bridge module to a busy 100VG network,
the 10 Mbit/s LED on the back of the module may flash slowly while the
bridge learns all of the addresses on the network. After a while, the LED
should stop flashing.
You have now completed installation and verification of the module.
Bridge Operation
The bridge feature of the HP 100VG SNMP/Bridge Module allows you to use
an HP AdvanceStack 100VG hub to connect a 100VG LAN to a 10 Mbit/s
Ethernet/IEEE 802.3 LAN. When using the bridge, an optional 10Base
transceiver module must be installed in the module and connected to an
Ethernet/IEEE 802.3 LAN.
Expansion Slot LED