
- Hewlett-Packard Fax Machine User Guide


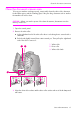
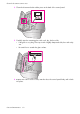

Table Of Contents
- HP 1040/1050 Fax series
- Load paper 1
- Load documents to fax or copy 2
- Send a fax 2
- Receive a fax 3
- Make a copy 3
- Make a telephone call 4
- The HP Fax 1040/1050 6
- The menus 12
- Overview of menu options 13
- Loudspeaker-HP 1040 Fax 16
- Speakerphone-HP 1050 Fax 16
- Navigate the menus 17
- Enter dates, times, text, and telephone numbers 18
- Speed dialing 21
- Paper types and sizes 23
- Document types and sizes 23
- Set document resolution and contrast for a single copy 24
- Adjust volume 25
- Automatic fax redial 26
- Receiving via an extension telephone (HP 1040 Fax only) 26
- Set rings to answer 27
- Use Caller ID 28
- Block junk fax numbers 28
- Scan & Fax Mode 29
- Image TCR 29
- Distinctive ring (DRPD) 30
- Answer/receive mode 31
- Turn on the message center 35
- Record your greeting 36
- Play your greeting 36
- Screen or monitor your calls 37
- Announcement only 37
- Play back messages 37
- Erase messages 38
- Remote Access 39
- Message paging 41
- Record a conversation 41
- Broadcasting 43
- Delayed fax 44
- Polling 45
- To cancel the scheduled job 46
- Forward faxes 47
- Set the date and time 49
- Turn on and off sounds 49
- Set the fax header information 50
- Print reports 51
- Reprinting faxes 52
- Clearing memory 53
- Loudspeaker-HP 1040 Fax 53
- Speakerphone-HP 1050 Fax 53
- Redial a number in memory 54
- Print cartridge information 55
- View ink level 55
- Print the self test 56
- Replace the print cartridge 56
- Clear jammed documents and paper 58
- Maintain the print cartridge 59
- Clean the document scanner area 61
- Adjust the scanner 63
- LCD error messages 63
- Troubleshooting 66
- Paper types and sizes 71
- Document types and sizes 71
- Print cartridge 72
- Product specifications 72
- A sample of ITU #1 test chart (reduced to 60.5%) 74
- Environmental product stewardship program 75
- Regulatory notices 76
- Declaration of conformity 78
- Use Hewlett-Packard support services 79
- Hewlett-Packard LIMITED WARRANTY STATEMENT 80
- Contents
- Quick start
- HP Fax basics
- The HP Fax 1040/1050
- The menus
- Overview of menu options
- Loudspeaker-HP 1040 Fax
- Speakerphone-HP 1050 Fax
- Navigate the menus
- Enter dates, times, text, and telephone numbers
- Speed dialing
- Paper types and sizes
- Document types and sizes
- Set document resolution and contrast for a single copy
- Adjust volume
- Automatic fax redial
- Receiving via an extension telephone (HP 1040 Fax only)
- Additional features
- Digital message center (HP 1050 Fax only)
- Advanced faxing
- Feature reference
- Care and maintenance
- Specifications and regulatory information
- Index

CARE AND
MAINTENANCE
CARE AND
MAINTENANCE
CARE AND
MAINTENANCE
CARE AND
MAINTENANCE
CARE AND
MAINTENANCE
CARE AND
MAINTENANCE
CARE AND
MAINTENANCE
Care and maintenance 59
Maintain the print cartridge
If the paper is jammed in the paper feed area
1. Remove the jammed paper as shown.
If the paper tears when it is being removed
check to ensure that no small pieces have
been left inside the machine.
2. Reload new paper with the print side facing
toward you.
3. Press Cancel when finished.
4. If this was a fax, reprint the fax. For more
information, see Reprinting faxes on
page 52.
Maintain the print cartridge
To maintain good printing quality, we recommend you occasionally maintain the print
cartridge and its associated parts:
Clean the print cartridge nozzles
If characters are not printing completely or white streaks appear in your text, you may
have clogged nozzles. Clean the print cartridge as described below:
1. Press Menu repeatedly until
TOOLS
appears and press Start/Enter.
2. Scroll to
Clean Cartridge
by pressing !" and press Start/Enter.
3. Examine the printed test pattern.
• If print quality does not improve, reinstall the cartridge and repeat these steps.
• If the line is still broken, wipe the nozzles and contacts. For more information, see
Wipe the print nozzles and contacts on page 59.
Wipe the print nozzles and contacts
If cleaning the print cartridge nozzles as discussed above does not help and you are
certain the cartridge has plenty of ink, the problem may be caused by dried ink on the
print cartridge nozzles and contacts or the print cartridge carrier contacts. Follow these
two sets of instructions for manual cleaning.
Clean the nozzles
1. Press Access Cartridge.
2. Open the control panel and cartridge compartment cover and remove the cartridge.
See Replace the print cartridge on page 56.
3. Gently blot and wipe the contacts and nozzles dry.
• Use a clean cloth dampened with water to gently clean
the entire copper-colored area, including the nozzles and
contacts.
• To dissolve any dried ink, hold the damp cloth against the
nozzles for about three seconds.