
Manual


To deploy the spare primary node:
1. Shut down all nodes on the VLS.
Because the original primary node has failed, he secondary nodes should be shut down from
the command line of each node. Log in to the administrator account on each secondary node
using the serial port or keyboard and mouse. At the prompt, enter shutdownNode.
2. Cable the spare primary node exactly as the original primary node was cabled:
a. Move all Fibre Channel cables from the original primary node ports to the corresponding
spare primary node ports.
b. Move all Ethernet cables including the USB Ethernet adapter from the original primary
node ports to the corresponding spare primary node ports.
c. Connect to the serial port or use the keyboard and mouse ports to connect to the console
of the spare primary node.
3. Power on the spare primary node.
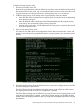
The node will run cable checks and configuration checks. After several minutes, a menu will
appear on your monitor asking whether the node is a primary (master, m) or secondary (slave,
s) node.
4. Record the backend Fibre Channel WWPN from the console and configure them for the EVA
and the automigration tape libraries.
The Fibre Channel host port WWPNs on the spare primary node will be set to the same as
the original primary node when the VLS configuration is restored.
The Fibre Channel storage port WWPNs are not set to the same as the original primary node
when the VLS configuration is restored, so the Fibre Channel storage port WWPNs must be
added to the EVA storage presentation and any configured automigration tape library storage
presentations.
Recovering from a Primary Node Failure using a Cold Spare Primary Node 171