User Guide HP Engage Imaging Barcode Scanner II
© Copyright 2019-2020 HP Development Company, L.P. Windows is either a registered trademark or trademark of Microsoft Corporation in the United States and/or other countries. The information contained herein is subject to change without notice. The only warranties for HP products and services are set forth in the express warranty statements accompanying such products and services. Nothing herein should be construed as constituting an additional warranty.
About this guide WARNING! Indicates a hazardous situation that, if not avoided, could result in serious injury or death. CAUTION: Indicates a hazardous situation that, if not avoided, could result in minor or moderate injury. IMPORTANT: Indicates information considered important but not hazard-related (for example, messages related to property damage). Warns the user that failure to follow a procedure exactly as described could result in loss of data or in damage to hardware or software.
iv About this guide
Table of contents 1 Getting started ............................................................................................................................................. 1 Barcode scanner components ............................................................................................................................... 1 Hands-free stand ...................................................................................................................................................
Multiple label reading ........................................................................................................................ 19 3 Light and beep indications ............................................................................................................................ 20 4 Troubleshooting .......................................................................................................................................... 21 5 Ergonomic recommendations ....................
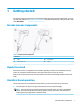
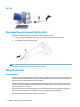
1 Getting started For safety and regulatory information, see the Product Notices provided in your documentation kit. To access the latest user guide, go to http://www.hp.com/support and follow the instructions to find your product. Then select User Guides. Barcode scanner components Table 1-1 Barcode scanner components Components (1) Light (3) Scan window (2) Cable release hole (4) Trigger Hands-free stand A hands-free stand or an integrated stand is available, depending on model.
Decoding The barcode scanner decodes all standard 1D (linear) and 2D bar codes, including GS1 DataBar linear codes, postal codes (China Post), and stacked codes (such as GS1 DataBar Expanded Stacked, GS1 DataBar Stacked, GS1 DataBar, Stacked Omnidirectional). The scanner sends the data stream from a decoded symbol to the host computer, and then the scanner is available to read another symbol.
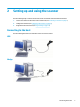
2 Setting up and using the scanner Use the following steps to connect the barcode scanner and initiate communication with the host: 1. Connect the cable to the barcode scanner and the host (see Connecting to the host on page 3). 2. Configure the interface (see Configuring the interface on page 6). 3. Program the barcode scanner (see Programming on page 13). Connecting to the host Use the following illustrations to determine how to connect the scanner.
RS-232 Disconnecting and connecting the cable To remove the interface cable from the barcode scanner, follow these steps: 1. Insert the end of a straightened paper clip into the release hole on the back of the handle. 2. As you apply pressure, pull out the cable. TIP: When inserting the cable, make sure that the connector clip is on the same side as the barcode scanner release hole, and then insert the cable until it clicks into place.
Good read green spot LED indicator: Relative size and location of aiming system pattern: 2D matrix symbol: Linear bar: Using the scanner 5
Selecting the interface type After connecting the barcode scanner to its host, scan the appropriate barcode for your system’s interface type.
RS-232 RS-232 interface Select RS232-STD ———————————————————————— RS-232 Wincor-Nixdorf Select RS232-WN ———————————————————————— RS-232 for use with OPOS/UPOS/JavaPOS Select RS-232 OPOS ———————————————————————— USB Com to simulate RS-232 interface Select USB-COM-STD USB-OEM USB-OEM (can use for OPOS/UPOS/JavaPOS) Select USB-OEM Selecting the interface type 7
USB-Composite USB-Composite Select USB-Composite IBM46xx IBM46xx Port 9b Select IBM46xx Port 9b USB for terminals USB HID POS Select USB HID POS ———————————————————————— USB Toshiba TEC Select USB Toshiba TEC USB for Magellan scanners USB for Magellans Select for USB Magellan Scanners 8 Chapter 2 Setting up and using the scanner
Keyboard interface Use the programming barcodes to select options for USB keyboard and wedge interfaces.
USB Keyboard with alternate key encoding Country mode This feature specifies the country or language supported by the keyboard.
———————————————————————— Country mode = Czech Republic* ———————————————————————— Country mode = Denmark* ———————————————————————— Country mode = France ———————————————————————— Country mode = French Canadian* ———————————————————————— Country mode =Germany ———————————————————————— Country mode = Hungary* ———————————————————————— Selecting the interface type 11
Country mode = Italy ———————————————————————— Country mode = Japan 106 key* ———————————————————————— Country mode = Lithuanian* ———————————————————————— Country mode = Norway* ———————————————————————— Country mode = Poland* ———————————————————————— Country mode = Portugal* ———————————————————————— 12 Chapter 2 Setting up and using the scanner
Country mode = Romania* ———————————————————————— Country mode = Spain ———————————————————————— Country mode = Sweden ———————————————————————— Country mode = Slovakia* ———————————————————————— Country mode = Switzerland* ———————————————————————— *Supports only the interfaces listed in the country mode feature description. Programming The barcode scanner comes configured with a set of standard default features.
1. Scan an Enter or Exit barcode once to enter Programming Mode. 2. Scan the parameter settings. 3. Scan the Enter or Exit barcode to accept the changes. This scan exits programming mode and returns the barcode scanner to normal operation. Resetting product defaults If you want to restore the barcode scanner to its initial configuration, scan the following barcode. NOTE: Factory defaults are based on the interface type.
Caps Lock state This option specifies the format in which the barcode scanner sends character data. This applies to keyboard wedge interfaces. This does not apply when an alternate key encoding keyboard is selected.
Aiming system Several options for customizing control of the aiming system are available. For more information and programming bar codes, see Aiming system on page 4. Good read green spot duration The barcode reader can project a green spot to indicate a successful read. Use the following barcodes to specify the duration of the good read pointer beam after a successful read.
Operating modes Scan mode You can set the scanner to operate in one of several scanning modes, as follows: Trigger Single (default) – This mode is associated with typical handheld barcode scanner operation. When the trigger is pulled, illumination is turned on, and the scanner attempts to read a label. Scanning is activated until one of the following occurs: ● The programmable maximum scan on time has elapsed. ● A label is read. ● The trigger is released.
Scan Mode = Trigger Hold Multiple ———————————————————————— Scan Mode = Flashing ———————————————————————— Scan Mode = Always On ———————————————————————— Scan Mode = Stand Mode ———————————————————————— 18 Chapter 2 Setting up and using the scanner
Pick mode Pick mode specifies the ability of the barcode scanner to decode labels only when they are close to the center of the aiming pattern, which is the area indicated by the red cross. Pick mode is a decoding and transmission process in which barcodes that are not within the configurable distance from the center of the aiming pattern are not acknowledged or transmitted to the host. It is active only while the scanner is in Trigger Single mode.
3 Light and beep indications The scanner’s beep sounds, and its illumination flashes or changes color to indicate various functions or errors on the barcode scanner. A green spot also lights to indicate a good read. The following table lists these indications. Table 3-1 Light and beep indications 20 Indication Light Beep Power up Upper light blinks on turn on, however, this may be too rapid to view. With a USB interface, the light blinks until pairing with the host is completed.
4 Troubleshooting Table 4-1 Troubleshooting Problem Cause Solution Nothing happens when you pull the trigger. There is no power to the scanner. Check system power. Make sure that power supply is connected. Interface or power cables are loose. Make sure that all cable connections are secure. Barcode label is unreadable. Check the label to make sure that it is not defaced. Try scanning another barcode type. Distance between scanner and bar code is incorrect.
5 Ergonomic recommendations CAUTION: 22 To avoid or minimize the potential risk of ergonomic injury, see the following recommendations: ● Reduce or eliminate repetitive motion. ● Maintain a natural position. ● Reduce or eliminate excessive force. ● Keep objects that are used frequently within easy reach. ● Perform tasks at correct heights. ● Reduce or eliminate vibration. ● Reduce or eliminate direct pressure. ● Provide adjustable workstations. ● Provide adequate clearance.
6 Cleaning Exterior surfaces and scan windows exposed to spills, smudges, or debris accumulation require periodic cleaning to ensure best performance during scanning operations. Use the following procedures to keep the scanner in good operating condition. CAUTION: Be sure to turn off power and unplug the device from the electrical outlet before cleaning. IMPORTANT: Do not use abrasive pads or cleaning agents.
7 Accessibility HP and accessibility Because HP works to weave diversity, inclusion, and work/life into the fabric of the company, it is reflected in everything HP does. HP strives to create an inclusive environment focused on connecting people to the power of technology throughout the world. Finding the technology tools you need Technology can unleash your human potential. Assistive technology removes barriers and helps you create independence at home, at work, and in the community.
As a founding member, HP joined to participate with other organizations to advance the field of accessibility. This commitment supports HP’s accessibility goal of designing, producing, and marketing products and services that people with disabilities can effectively use. IAAP will make the profession strong by globally connecting individuals, students, and organizations to learn from one another. If you are interested in learning more, go to http://www.accessibilityassociation.
● Assistive Technologies sorted by impairment type ● Assistive Technologies sorted by product type ● Assistive Technology vendors with product descriptions ● Assistive Technology Industry Association (ATIA) Standards and legislation Standards Section 508 of the Federal Acquisition Regulation (FAR) standards was created by the US Access Board to address access to information and communication technology (ICT) for people with physical, sensory, or cognitive disabilities.
● United Kingdom ● Australia ● Worldwide Useful accessibility resources and links The following organizations might be good resources for information about disabilities and age-related limitations. NOTE: This is not an exhaustive list. These organizations are provided for informational purposes only. HP assumes no responsibility for information or contacts you encounter on the Internet. Listing on this page does not imply endorsement by HP.
HP links Our contact webform HP comfort and safety guide HP public sector sales Contacting support NOTE: ● Customers who are deaf or hard of hearing who have questions about technical support or accessibility of HP products: – ● 28 Support is in English only. Use TRS/VRS/WebCapTel to call (877) 656-7058 Monday through Friday, 6 a.m. to 9 p.m. Mountain Time.
8 Specifications Scanner specifications Table 8-1 Scanner specifications Metric U.S. Length 10.9 cm 4.3 in Width 6.8 cm 2.7 in Height 16.6 cm 16.6 in Without stand 161 g 5.7 oz With stand 374 g 13.
Depth of field (DOF) (typical)* Table 8-2 Depth of field Symbology SR HD Code 39 5 mil: 7.0 to 38.0 cm (2.7 in to 14.9 in) 3 mil: 5.0 to 15.0 cm (2.0 in to 5.9 in) 10 mil: 2.2 to 58.0 cm (0.8 in to 22.8 in) 5 mil: 0.5 to 25.0 cm (0.2 in to 9.8 in) 20 mil: FOV lim. to 110 cm (up to 43.3 in) 10 mil: 0.5 to 45.0 cm (0.2 in to 17.7 in) 7.5 mil: 9.0 to 30.0 cm (3.5 in to 11.8 in) 7.5 mil: 2.0 to 23.5 cm (0.8 in to 9.2 in) 13 mil: 1.0 to 71.0 cm (0.4 in to 27.9 in) 13 mil: 1.0 to 40.0 cm (0.