User Guide HP Engage One Column Printer
© Copyright 2020 HP Development Company, L.P. Windows is either a registered trademark or trademark of Microsoft Corporation in the United States and/or other countries. The information contained herein is subject to change without notice. The only warranties for HP products and services are set forth in the express warranty statements accompanying such products and services. Nothing herein should be construed as constituting an additional warranty.
About This Guide This guide provides basic information for upgrading this computer model. WARNING! Indicates a hazardous situation that, if not avoided, could result in death or serious injury. CAUTION: Indicates a hazardous situation that, if not avoided, could result in minor or moderate injury. IMPORTANT: Indicates information considered important but not hazard-related (for example, messages related to property damage).
iv About This Guide
Table of contents 1 Getting started ............................................................................................................................................. 1 Components .............................................................................................................................................................................. 1 Paper feed button ..............................................................................................................................
vi
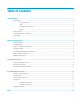
1 Getting started The column printer is easy to install, use, and maintain. The clamshell design allows you to snap open the receipt cover and drop the paper roll in place. You do not need to change a printer ribbon or cartridge because the printer uses thermal print technology. Components Paper feed button During normal use, the paper feed button advances the paper. You can also use it to access the configuration menu. See Entering configuration mode on page 9.
Light The green light indicates basic information about the printer status. A solid green light means that the printer is on and operating normally. A blinking light means that the printer needs operator assistance, probably because the cover is not fully shut. Try opening and closing the cover until the flashing stops, or see Troubleshooting the printer on page 12. Communication interfaces You can connect the printer to the system via USB.
4. While holding the paper in place, close the receipt cover (3) making sure to apply a little more pressure after the first click to ensure that it is fully latched. When fully latched with paper installed, the light stops blinking. 5. To test that the paper is loaded correctly, advance the paper with the paper feed button (1), and then tear the excess paper off against the knife on the cover. A solid green light (2) means that the printer is on and operating normally.
Latch failsafe In the event that the receipt cover becomes stuck, the printer has a failsafe to release the cover’s latches. Using a thin pointed object, press the rectangular button adjacent to the printhead. With enough pressure, the latches should release, and the receipt cover should open.
2 Using the column printer Standard features Table 2-1 Standard features and their descriptions Standard features Description Interface USB Memory/firmware 8 MB flash memory, History EEROM, 4 K buffer Energy-savings Option to configure printer to enter low-power (1 W) idle state if no data is received after user-specified number of minutes Resident character sets PC code pages 437 (US), 720 (Arabic), 737 (Greek), 775 (Baltic), 850 (Multilingual), 852 (Latin II), 857 (Turkish), 858 (with Eurosymbo
When to change the receipt paper Change the paper when it is near the end of the roll or when the roll is empty. When the paper is low, you must monitor usage to avoid running out part of the way through a transaction. When the roll is empty, you must load a new roll immediately or data may be lost. ● When the paper is low, a colored stripe appears on the receipt paper (if the paper purchased has a stripe), indicating that enough paper remains for a small transaction.
Table 2-2 Allowable duty cycle (measured over 1 minute of continuous printing) Amount of solid coverage 25°C ambient temperature 35°C ambient temperature 50°C ambient temperature 20% 100% 50% 20% 40% 50% 25% 10% 100% 20% 10% 4% A typical receipt with text (contains some blank spaces) is approximately 12% dot coverage. A full line of text characters (every cell on the line has a character in it) is approximately 25% dot coverage. Graphics are approximately 40% dot coverage.
Table 2-3 Qualified manufacturers of monochrome (black ink) paper (continued) Qualified manufacturers Phone/Fax Paper grade Kanzaki Specialty Papers (USA) Voice: (888) 526–9254 20 Cummings St. Fax: (413) 731–8864 P30023 (was P–300), P31023 (was P–310), P35024 (was P–350), P35032 (was P–354), Ware, MA 01082–2002 http://www.kanzakiusa.com/ P39023 (BPA free, was P–390), P30521 (BPA free), P30523 (BPA free), P31523 (BPA free), P35532 (BPA free) Koehler UK Ltd.
3 Configuring the printer The configuration menu allows the user to set general printer parameters. The test prints the diagnostics form, which details settings for all functions. The printer partially cuts the paper between each variation. The printouts might vary. The test ends with a partial cut of the paper. A complete test printout might require the use of several feet of paper. You might not need to change the configuration of the printer.
6. Continue until you are asked to save new parameters. Enter a long click for yes. 7. To verify the new settings with a diagnostic printout, restart the printer, open the receipt cover, and then press and hold the paper feed button while closing the receipt cover. Energy-savings mode This function makes it possible to set the number of minutes that the printer remains idle before entering a lowpower (1 W) idle state. 1. Enter the configuration menu. See Entering configuration mode on page 9. 2.
When the printer prints high-density print lines (text or graphics), it automatically slows down. 1. Enter the configuration menu. See Entering configuration mode on page 9. 2. Select Set Hardware Options. 3. Scroll to Set Print Density, and then select Yes. A warning is printed, followed by the density adjustment selections. 4. Enter short clicks for your selection, and then hold the paper feed button down for at least 1 second to validate your selection.
4 Troubleshooting the printer The printer is usually trouble-free; however, unexpected conditions can arise. See the following sections to diagnose and solve these printer conditions. To resolve complex issues, you might have to contact an authorized HP service representative. Printer tone and green LED Table 4-1 Printer tone and light conditions, causes, and solutions Condition Possible causes Possible solutions Where to go for more information Green LED, quick steady flashing. Paper roll is empty.
Table 4-2 Printer issues conditions, causes, and solutions (continued) Condition Possible causes Possible solutions Where to go for more information Thermal printhead is dirty. Use recommended thermal receipt paper and clean the printhead with 99% isopropyl alcohol. See Thermal paper specifications on page 7. Always clean the printhead after using unrecommended paper. Variations in paper. Increase print density in Set Hardware Options of printer configuration menu to 110% or 120% as needed.
● Use only recommended paper. See Thermal paper specifications on page 7. ● Clean the printer regularly to clear debris near the knife. See Cleaning the printer on page 14. ● Do not pull on or tear the receipt until it has completely finished printing. ● Be sure that you load the paper correctly. See Loading the printer receipt paper on page 2. Resolving a paper jam ▲ If there is a paper jam, wait 30 seconds and then open the printer cover to clear the paper.
Index C column printer changing paper 6 cleaning 14 features 5 latch failsafe 4 paper specifications 7 qualified paper grades 7 troubleshooting 12 configuration 9 configuration mode 9 E energy-savings mode P paper jam 10 13 Index 15