User Guide HP Sure Recover
© Copyright 2020 HP Development Company, L.P. Microsoft and Windows are either registered trademarks or trademarks of Microsoft Corporation in the United States and/or other countries. Confidential computer software. Valid license from HP required for possession, use or copying. Consistent with FAR 12.211 and 12.212, Commercial Computer Software, Computer Software Documentation, and Technical Data for Commercial Items are licensed to the U.S. Government under vendor's standard commercial license.
User input syntax key Text that you must enter into a user interface is indicated by fixed-width font.
iv User input syntax key
Table of contents 1 Getting started ............................................................................................................................................. 1 Performing a network recovery ............................................................................................................................. 1 Performing a local drive recovery .........................................................................................................................
vi
1 Getting started HP Sure Recover helps you to securely install the operating system from the network with minimal user interaction. Systems with HP Sure Recover with Embedded Reimaging also support installation from a local storage device. IMPORTANT: Back up your data before using HP Sure Recover. Because the imaging process reformats the drive, data loss will occur. Recovery images that HP provides include the basic Windows 10® installer.
You can also create a scheduled task to copy the agent to the SR_AED partition and the image to the SR_IMAGE partition. You can then use the HP Client Management Script Library to send a service event informing the BIOS that it should validate the contents and copy to the embedded reimaging storage device on the next reboot.
2 Creating a corporate image Most companies use the Microsoft Deployment Tools, Windows 10 Assessment and Deployment kit, or both to produce files containing an image within a Windows Imaging (WIM) file format archive. Requirements ● The latest version of Windows 10 Assessment and Deployment Kit (Windows ADK) ● PowerShell ● OpenSSL (or other solution for generating RSA private/public key pair) Use to generate the RSA key pair used to secure the integrity of the corporate image you create and host.
ensure one specific edition is used for all of your target systems, then you need to be sure that only one index is in the installation image. 4. Check the contents of the installation image using the following command: dism /Get-ImageInfo /ImageFile:C:\staging\.wim The following shows sample output from an installation image that supports five editions (to be matched based on the BIOS of each target system): Details for image: my-image.
reassigned. Therefore, you should delete from highest to lowest index numbers. Run Get-ImageInfo after each deletion to visually confirm which index you will delete next. dism /Delete-Image /ImageFile:C:\staging\my-image.wim /Index:5 dism /Delete-Image /ImageFile:C:\staging\my-image.wim /Index:4 dism /Delete-Image /ImageFile:C:\staging\my-image.wim /Index:2 dism /Delete-Image /ImageFile:C:\staging\my-image.wim /Index:1 Choose only one index of the edition (for this example, Professional).
NOTE: refers to the USB drive. Replace with the correct drive letter. Edit the “my-image” part of file name, and the description, as needed. dism /Capture-Image /ImageFile:<\my-image>.wim /CaptureDir:C:\ / Name: 4. Copy the image from USB to the staging area on your working system using the following command: robocopy \ C:\staging .wim You should have the following image file: C:\staging\my-image.wim. 5. Go to Splitting the image on page 6.
$header = "mft_version=1, image_version=$imageVersion" Out-File -Encoding UTF8 -FilePath $mftFilename -InputObject $header $swmFiles = Get-ChildItem "." -Filter "*.swm" $ToNatural = { [regex]::Replace($_, '\d*\....$', { $args[0].Value.PadLeft(50) }) } $pathToManifest = (Resolve-Path ".").Path $total = $swmFiles.
[System.IO.File]::WriteAllLines($pathToManifest + '\' + $mftFilename, $content, $encoding) 2. Save the script. 3. Execute the script. powershell .\generate-manifest.ps1 Generating manifest signature Sure Recover validates the agent and image using cryptographic signatures. The following examples use a private/public key pair in X.509 PEM format (.PEM extension). Adjust the commands as appropriate to use DER binary certificates (.CER or .CRT extension), BASE-64 encoded PEM certificates (.CER or .
NOTE: If you use IIS as your hosting solution, you must configure your MIME entries to include the following extensions, all configured as "application/octet-stream:" ● .mft ● .sig ● .swm ● .wim Provisioning your target systems You can provision your target systems using the HP Client Management Script Library, HP Client Security Manager (CSM)/Sure Recover or the Manageability Integration Kit (MIK) (https://www.hp.com/go/ clientmanagement). Provide the following information for this provisioning: 1.
3 Using the HP Sure Recover Agent Within a Corporate Firewall The HP Sure Recover agent can be hosted on a corporate intranet. After you install the HP Sure Recover SoftPaq, copy the agent files from the HP Sure Recover agent directory from the installation location to an HTTP or FTP distribution point. Then provision the client system with the URL of the distribution point and the HP public key named hpsr_agent_public_key.pem, which is distributed with the HP Sure Recover agent SoftPaq.
NOTE: Do not include the file name for the agent manifest in the URL because the BIOS requires it to be named recovery.mft. 7. After the policy is applied to the client system, restart it. 8. During initial provisioning, a prompt appears for you to enter a 4-digit security code to complete HP Sure Recover activation. For more details, go to hp.com and search for the HP Manageability Integration Kit (MIK) for Microsoft System Center Manager white paper.
4 Working with the HP Client Management Script Library (CMSL) The HP Client Management Script Library allows you to manage HP Sure Recover settings with PowerShell. The following example script demonstrates how to provision, determine status, change configuration, and deprovision HP Sure Recover. NOTE: Several of the commands exceed the line length of this guide but must be entered as a single line. $ErrorActionPreference = "Stop" $path = 'C:\test_keys' $ekpw = "" $skpw = "" Get-HPSecurePlatformState
-SigningKeyPassword $skpw ` -SigningKeyFile "$path\sk.pfx" ` -Image OS ` -ImageKeyFile "$path\os.pfx" ` -username test -password test ` -url "http://www.hp.com/custom/image.mft" $p | Set-HPSecurePLatformPayload $p = New-HPSureRecoverImageConfigurationPayload ` -SigningKeyPassword $skpw ` -SigningKeyFile "$path\sk.pfx" ` -Image agent ` -ImageKeyFile "$path\re.pfx" ` -username test -password test ` -url "http://www.hp.
Start-Sleep -Seconds 3 $p = New-HPSureRecoverDeprovisionPayload ` -SigningKeyPassword $skpw ` -SigningKeyFile "$path\sk.pfx" $p | Set-HPSecurePlatformPayload Start-Sleep -Seconds 3 Write-host 'Deprovisioning P21' $p = New-HPSecurePlatformDeprovisioningPayload ` -verbose ` -EndorsementKeyPassword $pw ` -EndorsementKeyFile "$Path\kek.
openssl pkcs12 -inkey kek.key -in kek.crt -export -out kek.pfx -CSP "Microsoft Enhanced RSA and AES Cryptographic Provider" -passout pass: # Create a command signing key openssl req -sha256 -nodes -newkey rsa:2048 -keyout sk.key -out sk.csr subj "/C=US/ST=State/L=City/O=Company/OU=Org/CN=www.example.com“ openssl x509 -req -sha256 -in sk.csr -CA ca.crt -CAkey ca.key CAcreateserial -out sk.crt openssl pkcs12 -inkey sk.key -in sk.crt -export -out sk.
A Troubleshooting Drive partitioning failed Failed drive partitioning can occur if the SR_AED or SR_IMAGE partition is encrypted with Bitlocker. These partitions are normally created with a gpt attribute that prevents Bitlocker from encrypting them, but if a user deletes and recreates the partitions or creates them manually on a bare metal drive, then the Sure Recover agent is unable to delete them and exits with an error when repartitioning the drive.
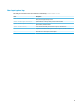
HP Secure Platform Management (Source ID = 84h) Table A-1 HP Secure Platform Management Event ID Device count (All/DaaS) Event count (All/DaaS) Description Notes 40 256/178 943/552 The platform OS recovery process was started by the firmware. Platform recovery started 41 221/147 588/332 The platform OS recovery process has successfully completed. Platform recovery completed 42 54/42 252/156 The platform OS recovery process failed to complete successfully.
description: The platform OS recovery process failed to complete successfully. data: 00:00:00:00 HP Sure Recover uses the following Event Specific Codes.