
HP Notebook PC (Intel) * Models: 15-ay000 - 15-ay099 HP 250 G5 Notebook PC HP 256 G5 Notebook PC - Maintenance and Service Guide
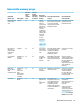

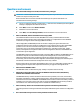
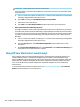

Table Of Contents
- Product description
- HP Notebook PC; Intel 7th generation and Pentium/Celeron processors; non-touch models
- HP Notebook PC; Intel 5th and 6th generation and Pentium/Celeron processors; non-touch models
- HP Notebook PC; Intel 7th generation Core and Pentium/Celeron processors; touch models
- HP Notebook PC; Intel 5th and 6th generation and Pentium/Celeron processors; touch models
- HP 250/256 G5 Notebook PC models
- External component identification
- Illustrated parts catalog
- Removal and replacement procedures preliminary requirements
- Removal and replacement procedures for Customer Self-Repair parts
- Removal and replacement procedures for Authorized Service Provider parts
- Using Setup Utility (BIOS) in Windows 7
- Using Setup Utility (BIOS) in Windows 10
- Backing up, restoring, and recovering in Windows 7
- Backing up, restoring, and recovering in Windows 10
- Using HP PC Hardware Diagnostics (UEFI)
- Specifications
- Statement of memory volatility
- Power cord set requirements
- Recycling
- Index

IMPORTANT: Resetting will result in the loss of information.
These steps will not reset Custom Secure Boot Keys. See question and answer 7 for information about
resetting the keys.
a. Turn on or restart the computer, and then press esc while the "Press the ESC key for Startup Menu"
message is displayed at the bottom of the screen.
b. Select Main, and then select Reset BIOS Security to Factory Default.
c. Follow the on-screen instructions.
d. Select Main, select Save Changes and Exit, and then follow the on-screen instructions.
7. How can the Custom Secure Boot Keys be reset?
Secure Boot is a feature to ensure that only authenticated code can start on a platform. If you enabled
Secure Boot and created Custom Secure Boot Keys, simply disabling Secure Boot will not clear the keys.
You must also select to clear the Custom Secure Boot Keys. Use the same Secure Boot access procedure
you used to create the Custom Secure Boot Keys, but make the selection to clear or delete all Secure
Boot Keys.
a. Turn on or restart the computer, and then press esc while the "Press the ESC key for Startup Menu"
message is displayed at the bottom of the screen.
b. Select the Security menu, select Secure Boot Conguration, and then follow the on-screen
instructions.
c. At the Secure Boot Conguration window, select Secure Boot, select Clear Secure Boot Keys, and
then follow the on-screen instructions to continue.
Using HP Sure Start (select models only)
Select computer models are congured with HP Sure Start, a technology that continuously monitors your
computer's BIOS for attacks or corruption. If the BIOS becomes corrupted or is attacked, HP Sure Start
restores the BIOS to its previously safe state, without user intervention. Those select computer models ship
with HP Sure Start congured and enabled. HP Sure Start is congured and already enabled so that most
users can use the HP Sure Start default conguration. The default conguration can be customized by
advanced users.
To access the latest documentation on HP Sure Start, go to http://www.hp.com/support. Select Find your
product, and then follow the on-screen instructions.
120 Chapter 13 Statement of memory volatility