
HP Notebook PC (Intel) * Models: 15-ay000 - 15-ay099 HP 250 G5 Notebook PC HP 256 G5 Notebook PC - Maintenance and Service Guide


Table Of Contents
- Product description
- HP Notebook PC; Intel 7th generation and Pentium/Celeron processors; non-touch models
- HP Notebook PC; Intel 5th and 6th generation and Pentium/Celeron processors; non-touch models
- HP Notebook PC; Intel 7th generation Core and Pentium/Celeron processors; touch models
- HP Notebook PC; Intel 5th and 6th generation and Pentium/Celeron processors; touch models
- HP 250/256 G5 Notebook PC models
- External component identification
- Illustrated parts catalog
- Removal and replacement procedures preliminary requirements
- Removal and replacement procedures for Customer Self-Repair parts
- Removal and replacement procedures for Authorized Service Provider parts
- Using Setup Utility (BIOS) in Windows 7
- Using Setup Utility (BIOS) in Windows 10
- Backing up, restoring, and recovering in Windows 7
- Backing up, restoring, and recovering in Windows 10
- Using HP PC Hardware Diagnostics (UEFI)
- Specifications
- Statement of memory volatility
- Power cord set requirements
- Recycling
- Index
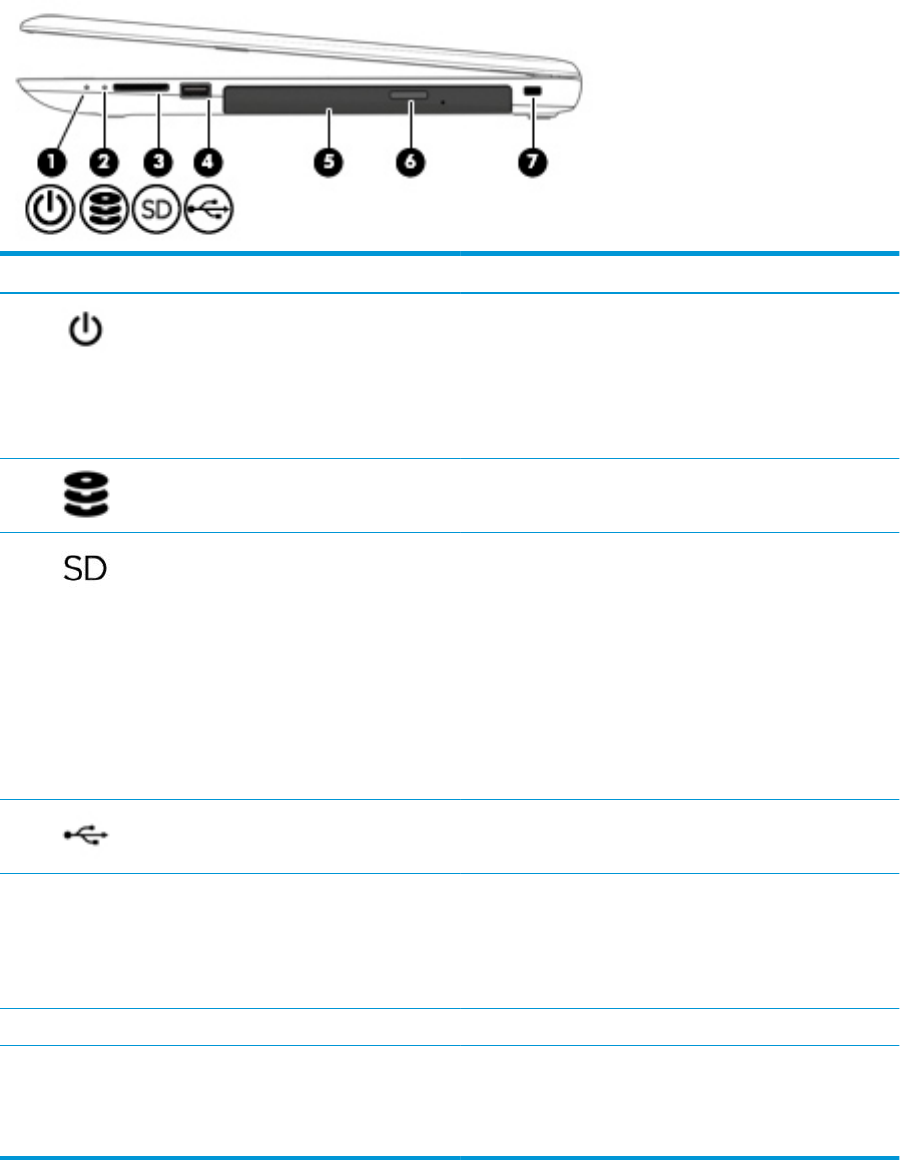
Right side
Component Description
(1) Power light
●
On: The computer is on.
●
Blinking: The computer is in the Sleep state, a power-
saving state. The computer shuts o power to the display
and other unneeded components.
●
O: The computer is o or in Hibernation. Hibernation is a
power-saving state that uses the least amount of power.
(2) Drive light
●
Blinking white: The hard drive is being accessed.
(3) Memory card reader Reads optional memory cards that enable you to store, manage,
share, or access information.
To insert a card:
1. Hold the card label-side up, with connectors facing the
computer.
2. Insert the card into the memory card reader, and then
press in on the card until it is rmly seated.
To remove a card:
▲ Pull the card out of the slot.
(4) USB 2.0 port Connects an optional USB device, such as a keyboard, mouse,
external drive, printer, scanner or USB hub.
(5) Optical drive (select products only) Depending on your computer, reads an optical disc or reads and
writes to an optical disc.
NOTE: For disc compatibility information, type help in the
taskbar search box, select Help and Support, and then type
disc compatibility in the search box.
(6) Optical drive eject button (select products only) Releases the optical drive disc tray.
(7) Security cable slot Attaches an optional security cable to the computer.
NOTE: The security cable is designed to act as a deterrent, but
it may not prevent the computer from being mishandled or
stolen.
22 Chapter 2 External component identication