
RAID - User Guide
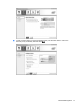


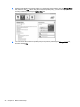

4. Once Create Volume is selected, you are informed that the array has been created. Click the OK
button. The array migration continues to run in the background. The computer can be used
normally while the migration continues.
5. When you are notified that the array migration has completed, close all open programs, and then
restart the computer. When the computer is restarted, the operating system detects the newly-
created array and prompts you to restart the computer a second time.
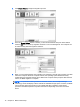
6. After you have restarted the computer a second time, the RAID migration is complete.
NOTE: Although the total capacity of the RAID 5 volume appears in the Console, the extra capacity
created with the addition of the three hard drives appears to the system as unallocated space. After
the system reboots, you must allocate the unallocated space. Windows contains additional
capabilities that allow you to create a single RAID 5 volume.
NOTE: Due to the complexity of the RAID 5 volume, it will take longer for the computer to enter
HIbernation than it does for other operations. After entering Hibernation, ensure that all computer
activity has ceased and that all the lights are turned off before storing the computer in an enclosed
space such as a computer carrying case.
Using Intel Rapid Storage Technology Recovery Console
features
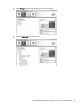
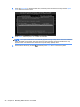
When using the Recovery Console, you can select how often the recovery hard drive is updated:
continuously or on-request. Continuous Updates is the default update policy (see Mirror update
policies on page 11). The steps to change the update policy to on-request are as follows:
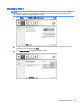
1. Open the Intel Rapid Storage Technology Console:
●
Windows 8 — From the Start screen, type Intel, and then select Intel Rapid Storage
Technology.
●
Windows 7 — Select Start > All Programs > Intel > Rapid Storage Technology.
22 Chapter 5 RAID volume setup