
HP Easy Shell - Administrator Guide


Conguration2
This chapter outlines conguration settings for HP Easy Shell.
Creating an HP Easy Shell conguration
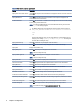
The following table describes the settings available in each panel in the HP Easy Shell Conguration utility.
Table 2-1 Conguration options
Panel Description
Settings Allows you to do the following:
● Create custom Easy Shell proles for specic users and domains (see Adding a custom Easy
Shell prole on page 12).
● Enable kiosk mode, which makes the traditional Windows interface (such as the desktop and
taskbar) inaccessible to standard users.
NOTE: This global setting aects all standard user accounts in all Easy Shell proles.
● Customize the user interface for an Easy Shell prole (see Customizing the user interface on
page 4 for more information).
● Set up a reboot schedule for the thin client.
Applications Allows you to add applications to an Easy Shell prole (see Adding an application on page 7).
Connections Allows you to add Citrix ICA, RDP, and VMware connections to an Easy Shell prole (see Adding a
Citrix ICA, RDP, or VMware connection on page 8).
StoreFront Allows you to add Citrix StoreFront connections to an Easy Shell prole (see Adding a Citrix
StoreFront connection on page 10).
Websites Allows you to add internet, network, and Citrix Web Interface sites and set the default site for an
Easy Shell prole (see Adding an internet, network, or Citrix Web Interface site on page 11).
Customizing the user interface
The settings under the User Settings heading let you enable or disable access to specic system settings for
standard users. Select the Advanced button for quick access to HP Logon Manager and HP Hotkey Filter.
NOTE: For information about HP Logon Manager, see the administrator guide for your operating system.
For information about HP Hotkey Filter, see the administrator guide for HP Hotkey Filter.
The settings under the Behavior Settings heading let you specify an action to occur when a smart card is
removed from the system: Log O, Restart, or Shut down.
The following table describes the settings under the User Interface heading.
For more customization options, see Customizing through the registry on page 17.
4
Chapter 2 Conguration