
Deploying Windows Updates using WSUS and MBSA (Windows-based HP Thin Clients)

9
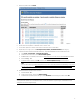
4. Notice the updates listed as Critical.
5. Verify that there is enough flash memory on the thin client by determining the total size of all critical updates.
6. Download all critical updates to a USB flash drive or network drive.
7. Access these updates from the thin client and follow the instructions to install them.
8. Repeat steps 3 through 7, but for the Developer Tools, Runtimes, and Redistributables issue category.
9. If the thin client OS is Windows Embedded Standard 7, verify that KB2852386 has been installed as follows:
A. Select Start > Control Panel > Programs and Features.
B. On the left side of the window, select View installed updates.
C. If KB2852386 is not installed, download it from https://support.microsoft.com/en-us/kb/2852386
and install it.
D. Run cleanmgr.exe.
E. In the Disk Cleanup window, select OK, and then select Windows Update Cleanup to free disk space.
Note
For more information, go to https://blogs.technet.microsoft.com/askpfeplat/2013/10/08/breaking-news-reduce-
the-size-of-the-winsxs-directory-and-free-up-disk-space-with-a-new-update-for-windows-7-sp1-clients/ and
see the “How to Automate Windows Update Cleanup” section.
10. Disable the Windows Update service as follows:
A. Run services.msc.
B. In the Services window, double-click Windows Update.
C. In the Windows Update Properties dialog box, select Disabled for the startup type, and then select OK.
Note
To apply the same updates across multiple thin clients, use HP ThinUpdate to copy the image to a USB flash drive and
reimage the thin clients using that image.