
HP ThinPro 5.1 - Administrator Guide

The button at the top of the Desktop page can be used to switch between the ThinPro and Smart
Zero configurations. See
Comparison of ThinPro and Smart Zero on page 1 for more information
about the differences between the two configurations.
NOTE: When switching from ThinPro to Smart Zero, if you have configured a single connection, that
connection is used automatically as the Smart Zero connection. If you have configured multiple
connections, you are prompted to select the connection to use.
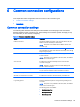
The following table describes the rest of the options available on the Desktop page.
Option Description
Launch the Connection Manager
at start up
When enabled, the Connection Manager launches automatically at system startup.
Enable/disable right click Disable this option to disable the context menu that appears when you right-click the
desktop
Allow user to switch to admin
mode
Disable this option to remove the Administrator/User Mode Switch option from the
Control Panel in User Mode.
Enable X host access control
security
When enabled, only the systems listed in the XHost Access Control List area are
allowed to remotely control the thin client.
Enable USB Update Enables updates to be installed from a USB flash drive. See
USB updates on page 69
for more information.
Authenticate USB Update Disable this option to allow standard users to install updates via USB.
Use the Connections and Applications pages to select which connection types and Control Panel
applications are available in User Mode.
Use the Taskbar page to configure the taskbar.
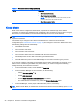
HP ThinState
HP ThinState allows you to capture and deploy an HP ThinPro image or configuration (profile) to
another client of compatible model and hardware.
Managing an HP ThinPro image
Capturing an HP ThinPro image to an FTP server
To capture an HP ThinPro image to an FTP server:
IMPORTANT: The directory on the FTP server where you intend to save the captured image must
already exist before initiating the capture.
1. Select Management > ThinState in the Control Panel.
2. Select the HP ThinPro image, and then click Next.
3. Select make a copy of the HP ThinPro image, and then click Next.
4. Select a FTP server, and then click Next.
5. Enter the FTP server information in the fields.
NOTE: The name of the image file is set by default to be the client’s hostname.
HP ThinState 19