
Troubleshooting Guide HP t520 Flexible Thin Client

Removing and replacing the access panel
Removing the access panel
WARNING! To reduce the risk of personal injury or equipment damage from electric shock, hot surfaces, or
fire, ALWAYS operate the thin client with the access panel in place. In addition to enhancing safety, the access
panel may provide important instructions and identification information, which may be lost if the access
panel is not used. DO NOT use any access panel except the one that is provided by HP for use with this thin
client.
Before removing the access panel, be sure that the thin client is turned off and the power cord is
disconnected from the electrical outlet.
To remove the access panel:
1. Remove/disengage any security devices that prohibit opening the thin client.
2. Remove all removable media, such as USB flash drives, from the thin client.
3. Turn off the thin client properly through the operating system, and then turn off any external devices.
4. Disconnect the power cord from the power outlet, and disconnect any external devices.
CAUTION: Regardless of the power-on state, voltage is always present on the system board as long as
the system is plugged into an active AC outlet. You must disconnect the power cord to avoid damage to
the internal components of the thin client.
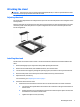
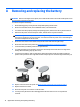
5. Remove the thin client from the stand.
6. Lay the unit flat on a stable surface with the right side up.
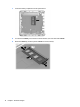
7. Remove the two screws from the back I/O panel (1).
8. Slide the access panel approximately 6 mm (.24 in) toward the back of the chassis, and then lift the
panel off of the thin client (2).
Removing and replacing the access panel 9