
Troubleshooting Guide HP t520 Flexible Thin Client

A Removing and replacing the battery
WARNING! Before removing the access panel, be sure that the thin client is turned off and the power cord is
disconnected from the electrical outlet.
To remove and replace the battery:
1. Remove/disengage any security devices that prohibit opening the thin client.
2. Remove all removable media, such as USB flash drives, from the thin client.
3. Turn off the thin client properly through the operating system, and then turn off any external devices.
4. Disconnect the power cord from the power outlet, and disconnect any external devices.
CAUTION: Regardless of the power-on state, voltage is always present on the system board as long as
the system is plugged into an active AC outlet. You must disconnect the power cord to avoid damage to
the internal components of the thin client.
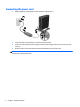
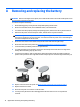
5. Remove the thin client from the stand and lay the thin client down with the right side up.
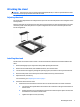
6. Remove the thin client access panel. See
Removing and replacing the access panel on page 9.
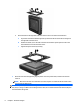
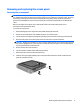
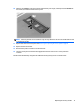
7. Locate the battery and battery holder on the system board.
8. To release the battery from its holder, squeeze the metal clamp that extends above one edge of the
battery. When the battery pops up, lift it out (1).
9. To insert the new battery, slide one edge of the replacement battery under the holder’s lip with the
positive side up. Push the other edge down until the clamp snaps over the other edge of the battery (2).
10. Replace and secure the access panel. See Removing and replacing the access panel on page 9.
11. Replace the thin client stand.
12. Reconnect the power cord and turn on the thin client.
13. Lock any security devices that were disengaged when the thin client cover or access panel was
removed.
14 Appendix A Removing and replacing the battery