HP MSA Software Tools User Guide Abstract This document provides overviews, installation instructions, and operational information for the following HP Modular Smart Array (MSA) software tools: • HP P2000/MSA2000 Modular Smart Array Software Support/Documentation DVD • HP MSA Device Discovery Tool • HP P2000 MSA Firmware Update Tool • HP P2000 MSA Performance Tool • HP P2000 Software Plug-in for VMware VAAI vSphere HP Part Number: 635663-001 Published: October 2011 Edition: 1
© Copyright 2011 Hewlett-Packard Development Company, L.P. Confidential computer software. Valid license from HP required for possession, use or copying. Consistent with FAR 12.211 and 12.212, Commercial Computer Software, Computer Software Documentation, and Technical Data for Commercial Items are licensed to the U.S. Government under vendor's standard commercial license. The information contained herein is subject to change without notice.
Contents 1 HP P2000/MSA2000 Software Support / Documentation DVD.......................5 Obtaining a DVD.....................................................................................................................5 Creating a physical DVD......................................................................................................5 Accessing the DVD or DVD ISO..................................................................................................5 Getting started...................
Viewing Performance Tool version information............................................................................35 Viewing online help................................................................................................................35 5 HP P2000 Software Plug-in for VMware VAAI vSphere..................................36 System prerequisites................................................................................................................
1 HP P2000/MSA2000 Software Support / Documentation DVD The HP P2000/MSA2000 Software Support / Documentation DVD provides deployment and maintenance support for HP P2000 G3 Modular Smart Array (P2000), HP 2000 G2 Modular Smart Array (MSA2000 G2), and HP 2000 Modular Smart Array (MSA2000) products. This DVD contains a common Windows/Linux navigation HTML framework to provide a common user experience.
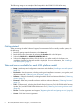
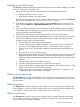
The following image is an example of the Setup tab for the P2000 G3 SAS MSA array. Getting started When accessing the MSA Software Support/Documentation DVD to initially install a system, do the following: 1. Read the getting started information in the Home tab. 2. Read release note information by selecting the Readme link in the left pane. 3. Select the P2000 G3 or MSA2000/MSA2000 G2 tab. 4. Select to the Setup tab and then click the link for your MSA model in the left pane.
Installing a new MSA system The Setup tab provides an interactive checklist of the key steps of successfully installing a new MSA system. To use this tab, do the following: 1. Obtain the following documents that are needed when installing an MSA array: • Racking installation instructions poster • MSA systems installation instructions poster If printed versions of the posters are not available, obtain PDF versions from the DVD Documents tab. For more information, see “Obtaining user documents” (page 7).
Obtaining and running software tools The Tools tab provides a listing of several software tools. In addition to downloading the tools to the local system, they can be run from the DVD.
2 HP MSA Device Discovery Tool The HP MSA Device Discovery Tool locates and displays information about the following MSA array and drive enclosures: • HP 2000 Modular Smart Array (MSA2000 and MSA2000 G2) • HP P2000 Modular Smart Array Systems (P2000 G3) Information is displayed for systems that are across a network, in the local subnet, and directly attached. Installing the tool This software tool is delivered as a Smart Component on the HP MSA Software Support/Documentation DVD or on the HP website.
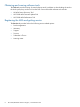
Configuring the tool In the initial display window, select one of the following options to control the scope of the discovery: • Local Subnet Discovery—Searches for MSA devices in the subnet of the host on which the Tool is running. • Range Based Discovery—Searches for MSA devices in a specified range of IP addresses. When this option is selected, the page display changes to include fields in which to enter the IP address range to search.
Exit—Exits the MSA Device Discovery Tool. Discovery menu The following options are available in the Discovery menu: Discover—Initiates a discovery search using the Advanced Discovery Options settings in the initial display window. For more information, see “Configuring the tool” (page 10). You can also perform this task using the Discover button in the initial display window. Refresh—Refreshes the displayed list of discovered devices.
• Password—Password for the user account. • User Name for selected device—Account to log into the selected array. This account must be manage-level and have FTP permissions enabled. • Password for selected device—Password to log in to the selected array. • Max Size for Archive Files—The maximum allowable size of the log file. When the log file limit is reached, the oldest entries are automatically deleted from the file. Enter the size in MB. The default value is 256 MB.
3 HP P2000 MSA Firmware Update Tool The Firmware Update Tool simplifies firmware management across multiple MSA arrays from a single interface. The Firmware Update Tool examines installed firmware versions on discovered MSA-family arrays and locates available firmware updates and advisories on HP websites. Per user direction, the tool then downloads and installs the updates on selected arrays.
Getting started When accessing the Firmware Update Tool for the first time, do the following: 1. Read the introductory information in the Getting Started tab. 2. Go to the Settings menu to enter parameters. For more information, see “Configuring the tool” (page 15). 3. Go to the Arrays tab to perform a search to discover MSA arrays in the network, based on the newly entered parameters. You can also initiate the installation of firmware on the discovered devices.
Configuring the tool The Settings menu provides options for customizing discovery, including entering network IP addresses and fields for scheduling the tool to run automatically. NOTE: To protect against accidentally changing values, you must first select the Change Credentials check box to access the parameter fields. After changing any settings, a confirmation pop-up window appears.
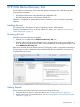
Discovering arrays and updating firmware The Arrays tab lists the HP P2000 MSA and MSA2000 arrays in the network and provides an easy method to update firmware on those arrays. The following actions can be performed in the Arrays tab: • To update firmware on arrays in the table, select the check box to the left of the System Name, and then click the Start Firmware Update button. (To select all arrays in the table, select the check box in the table heading. To clear a selection, clear the check box.
Array Health Status icons include OK , Critical , Degraded , and Unknown information about icons, see “Viewing icon definitions” (page 19). . For more Product Identifier—HP branding of the array IP Address—IP addresses of the array controllers If two IP addresses are listed, two controllers are installed in the array.
The following actions can be performed in the Catalog tab: • To limit or control the display, expand the Filter By: drop-down menus. Filter options include Supported Devices, Type, Recommendation, Version, and Name. Depending on the filter selected, the with value as drop-down menu provides appropriate options. After selecting these limits, the table is automatically repopulated, using the selected filters. • To print the catalog, click Print Catalog.
Viewing advisories The Advisories tab lists all available customer advisories and notifications. The following actions can be performed in the Advisories tab: • To limit or control the display, expand the Filter By: drop-down menus. Filter options include Product and Severity. Depending on the filter selected, the with value as drop-down box provides appropriate options. After selecting these limits, the table is automatically repopulated, using the selected filters.
Viewing Firmware Update Tool version information The About menu opens a window, displaying the following information about the tool: Version—Version number assigned to the software release Release Date—Date the software was released to the HP website Viewing online help The help icon opens the HP P2000 MSA Firmware Update Tool Online Help. Detailed screen and field definitions and use suggestions are included.
4 HP P2000 MSA Performance Tool The HP P2000 MSA Performance Tool simplifies the monitoring of performance across multiple HP P2000 G3 MSA System arrays. As specified for each discovered array, the tool collects current configuration information and performance metrics in regular intervals. Data is collected for array host ports, controllers, vdisks, volumes, and drives. Using a collection, you can graph the performance data against different metrics, such as I/O per second and cpu load.
Getting started When accessing the Performance Tool for the first time, do the following: 1. Read the introductory information in the Getting Started tab. 2. Go to the Settings menu to enter discovery parameters. At initial startup, the tool automatically discovers arrays in the local subnet of the host computer. The settings menu includes options for indicating additional or different IP addresses. For more information, see “Configuring the tool” (page 23). 3. 4. 5.
• About—Version information (“Viewing Performance Tool version information” (page 35)) • Logs—Event log (“Viewing logs” (page 34)) • Help— Online help (“Viewing online help” (page 35)) Configuring the tool The Settings menu provides options for customizing discovery, including entering network IP addresses and array access credentials.
The following actions can be performed in the Arrays tab: • To perform a new search for arrays within the IP address range specified in the Settings and discover newly added arrays, click the Rediscover Arrays button. As the tool performs the task, progress information is displayed at the bottom of the window. When the update is complete, “Refreshing the view Complete” is displayed.
NOTE: An offine icon indicates that the management connection is no longer available. This does not reflect I/O or health status of the array. IP Address—IP addresses of controllers in the array If two IP addresses are listed, two controllers are installed in the array. If one IP address is listed, only one controller is installed in the array OR two controllers are installed, but only one of the controllers is accessible from the host on which the tool is running.
Sections in the display provide different types of configuration and performance data: • Discovered Arrays—A navigation tree of all discovered arrays • Configuration Summary—A table of basic system information for the selected array • Performance Collection Summary—A table summarizing information about performance collections that have been created for the selected array • Sample—A table listing information about a snapshot sample of performance information for the selected array.
Obtaining and viewing a sample of configuration settings and performance statistics A sample is a snapshot of configuration and performance statistics for a selected array. After a sample has been obtained, information is presented in pop up windows. The following actions can be performed using the Sample table: • To obtain a sample of current configuration and performance data for the selected array, click Get Sample.
5. In the Create Performance Graph pop-up window, enter the following metrics: NOTE: Available metrics vary, depending on the Statistics Group chosen. For a complete listing of the options, see “Graphing metrics” (page 28). a. b. c. d. e. Select Statistics Group (controllers, host ports, vdisks, volumes, or disks) Select Objects (specific controllers, host-ports, vdisks, volumes, or disks) Select Metrics (group or individual) Customize the graph (name and description) Click Submit.
Table 3 Graphing metrics for controllers Controller group metrics Controller individual metrics Available with P2000 G3 MSA firmware version CPU Load (%)—Percentage of time the CPU is busy, from 0–100. Write Cache Used (%)—Percentage of write cache in use, from 0–100. Read IOPs—Read operations per second, calculated over the interval since this statistic was last requested. Write IOPs—Write operations per second, calculated over the interval since this statistic was last requested.
Table 4 Graphing metrics for host-ports Host-port group metrics Host-port individual metrics Available with P2000 G3 MSA firmware version Read IOPs—Read operations per second, calculated over the interval since this statistic was last requested. Write IOPs—Write operations per second, calculated over the interval since this statistic was last requested. Total IOPs—Read+Write operations per second, calculated over the interval since this statistic was last requested.
Table 5 Graphing metrics for vdisks vdisk group metrics vdisk individual metrics Available with P2000 G3 MSA firmware version Read IOPs—Read operations per second, calculated over the interval since this statistic was last requested. Write IOPs—Write operations per second, calculated over the interval since this statistic was last requested. Total IOPs—Read+Write operations per second, calculated over the interval since this statistic was last requested. IOPs (Read,Write,Total) .
Table 6 Graphing metrics for volumes Volume group metrics Volume individual metrics Available with P2000 G3 MSA firmware version Read IOPs—Read operations per second, calculated over the interval since this statistic was last requested. Write IOPs—Write operations per second, calculated over the interval since this statistic was last requested. Total IOPs—Read+Write operations per second, calculated over the interval since this statistic was last requested.
Table 7 Graphing metrics for drives Drive group metrics Drive individual metrics Available with P2000 G3 MSA firmware version Read IOPs—Read operations per second, calculated over the interval since this statistic was last requested. Write IOPs—Write operations per second, calculated over the interval since this statistic was last requested. Total IOPs—Read+Write operations per second, calculated over the interval since this statistic was last requested.
Table 7 Graphing metrics for drives (continued) Drive group metrics Drive individual metrics Available with P2000 G3 MSA firmware version not respond. Spinup Retry Count Port 2—Number of attempts by the storage system to spin up the disk. Number of Media Errors Port 2—Number of media errors generated by the disk, as specified by its manufacturer. Number of Non-media Errors Port 2—Number of other errors generated by the storage system or generated by the disk and not categorized as media errors.
Table 10 Performance Collection status icons Icon Name Description Unknown Performance collection is in an unknown state. Initializing Performance collection is being initialized. Performance graphs cannot be created until the status is Complete. (To close out a collection, go to the Schedule tab and click Stop.) Pending Performance collection is scheduled and waiting to start. Performance graphs cannot be created until the status is Complete.
5 HP P2000 Software Plug-in for VMware VAAI vSphere The vStorage API for Array Integration (VAAI) is included in VMware vSphere solutions. VAAI can be used to offload certain functions from the target VMware host to the storage array. With the tasks being performed more efficiently by the array instead of the target VMware host, performance can be greatly enhanced.
Enabling vStorage API for Array Integration (VAAI) By default, the three VAAI primitives are not enabled. To enable the VAAI primitives, do the following: 1. Install HP P2000 G3 MSA System Controller Firmware TS230 or later. For information about updating P2000 G3 MSA System firmware, see the HP P2000 G3 iSCSI MSA System User Guide, available on the HP Manuals website: http://www.hp.com/ support/manuals. 2. Enable the primitives from the ESX server.
Installing the VAAI Plug-in Depending on user preference and environment, choose one of the following three methods to install the HP P2000 VAAI Plug-in: • “Installing the HP MSA VAAI Plug-in using ESX host console utilities” (page 39) • “Installing the HP VAAI Plug-in using vCLI/vMA” (page 40) • “Installing the VAAI Plug-in using VUM” (page 41) The following table compares the three VAAI Plug-in installation methods: Table 11 Comparison of installation methods Installation method Required deployment
Installing the HP MSA VAAI Plug-in using ESX host console utilities NOTE: This installation method is supported for use only with VAAI Plug-in version 1.00, in ESX/ESXi 4.1 environments. 1. Obtain the VAAI Plug-in software package and save to a local folder on the target VMware host: a. Go to the HP Support “Downloads” website at http://www.hp.com/support/downloads. b. Navigate through the display to locate and then download the HP P2000 Software Plug-in for VMware VAAI to a temporary folder on the server.
Table 12 Possible VAAI device status values Value Description Unknown The array volume is hosted by a non-supported VAAI Array (such as the MSA2000 G1 or MSA2000 G2) Supported The array volume is hosted by a supported VAAI array (such as the HP P2000 G3) and all three VAAI commands completed successfully. Not supported The array volume is hosted by a supported VAAI array (such as the HP P2000 G3), but all three VAAI commands did not complete successfully.
6. Verify the claimed VAAI device. a. Check for new HP P2000 claim rules. Enter a command using the following syntax: esxcli --server Host_IP_Address --username User_Name --password Account_Password corestorage claimrule list –c VAAI The return display will be similar to the following: Rule Class VAAI VAAI b. Rule 5001 5001 Class runtime file Type vendor vendor Plugin hp_vaaip_p2000 hp_vaaip_p2000 Matches vendor=HP model=P2000 vendor=HP model=P2000 Check for claimed storage devices.
Importing the VAAI Plug-in to the vCenter Server 1. Obtain the VAAI Plug-in software package and save it on the system that has VMware vSphere client installed: a. Go to the HP Support Downloads website at http://www.hp.com/support/downloads. b. Locate the HP P2000 Software Plug-in for VMware VAAI and then download it to a temporary folder on the server. c. Expand the contents of the downloaded .zip file into the temporary folder and locate the HP P2000 VAAI offline bundle file.
4. Create a new Baseline set for this offline plug-in: a. Select the Baselines and Groups tab. b. c. d. Above the left pane, click Create. In the New Baseline window: • Enter a name and a description. (Example: HP P2000 Baseline and VAAI Plug-in for HP P2000 G3) • Select Host Extension. • Click Next to proceed to the Extensions window. In the Extensions window: • Select HP P2000 VAAI Plug-in for VMware vSphere x.x, where x.x represents the Plug-in version.
5. Above the right pane, click Attach to open the Attach Baseline or Group dialog window. Select the HP P2000 Baseline entry, and then click Attach. 6. 7. To ensure that the patch and extensions compliance content is synchronized, again click the DataCenter that has the ESX/ESXi hosts that you want to stage. Then, in the left panel, right-click the DataCenter icon and select Scan for Updates. When prompted, ensure that Patches and Extensions is selected, and then click Scan. Stage the installation: a.
NOTE: • In the Tasks & Events section, the following tasks should have a Completed status: Remediate entry, Install, and Check. • If any of the above tasks has an error, click the task to view the detail events information. Verifying VAAI status 1. 2. 3. From the vCenter Server, click the Home Navigation bar and then click Hosts and Clusters. Select the target VMware host from the list and then click the Configuration tab. Click the Storage Link under Hardware.
Uninstalling the VAAI Plug-in Procedures vary, depending on user preference and environment: • “Uninstalling VAAI Plug-in using the automated script (hpmsa.pl)” (page 46) • “Uninstalling VAAI Plug-in using vCLI/vMA (vihostupdate)” (page 46) • “Uninstalling VAAI Plug-in using VMware native tools (esxupdate)” (page 46) Uninstalling VAAI Plug-in using the automated script (hpmsa.pl) 1. 2. Enter maintenance mode. Query the installed VAAI Plug-in to determine the name of the bulletin to uninstall. 3.
Generating logs Messages generated by the VAAI Plug-in are placed in the VMware kernel log. • ESX : /var/log/vmkernel • ESXi: /var/log/messages If a run time warning condition occurs, the VAAI plug-in includes an IMPACT and/or ACTION statement to clarify the severity of the event. Available command line switches The VAAI plug-in accommodates a number of logging use cases via command line switches.
Table 16 Possible log messages Log Log impact statement Log action statement level ID Category Log message 0 INFO VAAI capable: YN, Claimed: YN Device: naa.xxaxx 0 1 INFO VAAI unclaiming device naa.xxaxx 0 2 INFO Unregistering logging. 0 3 INFO VAAI commands supported: , , on device: naa.xxaxx 1 4 INFO pp-VAAI-SENSE-MODE vmkCmd.status (H-D-P): XX-XX-XX 2 Sense(key-asc-ascq) XX-XX-XX pp-VAAI-BLOCK COPY vmkCmd.
Table 16 Possible log messages (continued) Log Log impact statement Log action statement level ID Category Log message 16 DEBUG LBC too large: nn. VAAI COPY command will not work. 0 17 FAILURE pp-VAAI-SENSE-MODE CDB06: XX XX XX XX XX XX Used for SCSI command debugging.
Table 16 Possible log messages (continued) 50 Log Log impact statement Log action statement level ID Category Log message 24 SYSTEM ERROR Out of memory claiming device: naa.xxaxx. No VAAI support for this device. 0 25 SYSTEM ERROR Out of memory allocating SCSI command. No VAAI support for this device. 0 26 I/O ERROR Inquiry to device naa.xxaxx failed. No VAAI support for this device. 0 27 SYSTEM ERROR Failed to register module: 0xXX. VAAI will not use Hardware Acceleration.
Token Meaning for actual content ccc A sequence of characters VV The device vendor string PPP The device product string FFF The device firmware string xx A hexadecimal general value XX A hexadecimal VMware DDK return code b A Boolean return code (0 = success, 1 = error ) Generating a test log The VAAI plug-in contains a test mode for generating an example log.
Example log entries when a VAAI ATS supported P2000 volume is found vmkernel: 7:02:44:23.909 cpu2:4118)HP_VAAIP_P2000: MsgID-17: 4118-VAAI-ATS CDB10: c2 00 00 00 00 00 00 00 bc a6 00 00 00 01 00 00 vmkernel: 7:02:44:23.910 cpu4:4100)HP_VAAIP_P2000: MsgID-4: 4118-VAAI-ATS vmkCmd.status (H-D-P): 00-00-00 Sense(key-asc-ascq) 00-00-00 vmkernel: 7:02:44:23.910 cpu4:4100)HP_VAAIP_P2000: MsgID-4: 4118-VAAI-ATS vmkCmd.
Other Names: vml.020066000060a98000486e5467535a5361486f74394c554e202020 VAAI Status: unknown <----- VAAI Support status Viewing filter rules When using the automated script (hpmsa.pl): c:\>hpmsa.
Viewing all storage devices When using the automated script (hpmsa.pl): c:\>hpmsa.pl --server Host_IP_Address --username User_Name --password Account_Password --liststorage When using vCLI/vMA (esxcli): c:\>esxcli --server Host_IP_Address --username User_Name --password Account_Password corestorage device list When using OS Native Tools (esxcli): $host# esxcli corestorage device list naa.600c0ff000da02c90000000000000000 Display Name: HP Fibre Channel Enclosure Svc Dev (naa.
MASK_PATH NMP MP MP Viewing all VAAI supported devices When using the automated script (hpmsa.pl): c:\>hpmsa.pl --server Host_IP_Address --username User_Name --password Account_Password --listdevice When using vCLI/vMA (esxcli): c:\>esxcli --server Host_IP_Address --username User_Name --password Account_Password vaai device list When using OS Native Tools (esxcli): $host# esxcli vaai device list naa.600c0ff00010e1cbc7523f4d01000000 Device Display Name: HP iSCSI Disk (naa.
6 Support and other resources Contacting HP For worldwide technical support information, see the HP support website at http://www.hp.com/ support.
A Installation instructions for Smart Components The following MSA software tools are delivered as Smart Components and use these common installation procedures: • HP MSA Device Discovery Tool • HP P2000 MSA Firmware Update Tool • HP P2000 MSA Performance Tool Installing a Smart Component from the HP MSA Software Support/Documentation DVD 1. 2. Insert the HP MSA Software Support/Documentation DVD in the DVD-ROM drive of the server. Read and agree to the HP End User License Agreement.
3. In Linux environments, install the software by doing the following: a. Navigate to the directory containing the downloaded package. b. Untar the software package using tar or an equivalent tool. c. Determine if the software tool is already installed and note its version. Enter a command using the following syntax: rpm -qa | grep [Tool_Name] whereTool_Name is one of the following values: • d. MSADDTool—Device Discovery Tool Install the software.