Important Safety Information A power cord is included with your monitor. If another cord is used, use only a power source and connection appropriate for this monitor. For information on the correct power cord set to use with your monitor, refer to the Power Cord Set Requirements section in Appendix C. warning: To reduce the risk of electric shock or damage to your equipment: • Do not disable the power cord grounding feature. The grounding plug is an important safety feature.
Install your monitor near an outlet that you can easily reach. Disconnect the monitor by grasping the plug firmly and pulling it from the outlet. Never disconnect the monitor by pulling the cord. Turn your monitor off when not in use. You can substantially increase the life expectancy of your monitor by using a screen saver program and turning off the monitor when not in use. Slots and openings in the cabinet are provided for ventilation. These openings must not be blocked or covered.
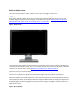
Black or blank screen The screen remains black or blank, and there are no error messages on the screen. note: If the screen is black or blank, but an error message such as No Signal displays on the screen, the problem might be related to the video signal. To troubleshoot, use the Flat Panel Monitor Displays Message About No Signal, Signal out of Range, Sleep, or Power Save.
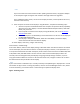
Figure : Correct display Figure : Resolution too low - stretched image
Figure : Correct resolution note: If blurriness occurs only when using a software program such as a game, make sure that the resolution set in the game matches the display resolution.
To fix resolution problems, complete the following steps: 1. Restart the computer. If this does not resolve the issue, continue to the next step. 2. Press the Auto button on the front of the display to run Auto Adjustment. 3. Use the buttons on the front of the display to open the on-screen menu, and select Factory Reset or Default. If the display is still incorrect, continue to the next step. 4. Find the native resolution of the display.
note: If you cannot select the native resolution after updating the video drivers, the graphics adapter in the computer might not support that resolution and might need to be upgraded. If you updated the video drivers, set the correct display resolution, and the problem still occurs, continue to the next step. 9. If the computer connected to the display is using Windows 7, complete the following steps: 1. Start the computer in Safe Mode.
1. To change the screen resolution and refresh rate settings in Windows, do the following: o In Windows 10 1. Right-click the desktop and click Display settings. 2. Under Customize your display, at the bottom, click Advanced display settings. 3. Under Related settings, click Display adapter properties. 4. Select the Monitor tab. 5. Under Screen refresh rate, select another refresh rate if available. 6. Click OK to save the changes. o In Windows 8 o 1.
2. If you have an HP computer, update your video drivers from the HP website. Otherwise, you can get the latest updated video drivers from the video hardware manufacturer's website. The following list shows some of the video hardware websites: o o o Check for NVIDIA video driver updates at NVIDIA (in English). Check for ATI video driver updates at AMD (in English). Check for Intel video support and downloads, Intel Downloads (in English). 3.
1. Use the buttons on the front of the display to open the on-screen menu, and select Factory Reset or Default. If you need help using the on-screen menu, see the manual for your display. 2. Unplug the video cable between the computer and the display and check the ends for bent or broken pins. If any pins are damaged, replace the cable. Otherwise, securely connect the cable between the computer and the display. 3.
6. If updating the drivers does not correct the problem, the graphics adapter might be damaged. Typically, video cards are damaged by too much heat caused by an accumulation of dust around fan areas. Cleaning the components inside the computer, especially the graphic card, might correct this problem. Screen is discolored The entire screen is discolored.
To fix incorrect colors, complete the following steps: 1. Check the video cable connections and make sure the connection is not loose. Tighten the connection screws if the connector is loose. 2. Press the Auto or Autoselect button on the display. 3. Press Menu, and select Factory Reset. If the screen is still discolored, continue to the next step. 4. If the display has more than one type of connection available such as VGA, DVI, or HDMI, try a different type of connection. 5.
To waken the computer, move the mouse or press the Spacebar. If the computer does not wake, press the Suspend button on the keyboard. You might need to press the Suspend button on the keyboard two times. If the computer still does not wake, press the Power button on the computer case for one second and release. For more information about these messages, see HP support document Flat Panel Monitor Displays Message About No Signal, Signal out of Range, Sleep, or Power Save.
o o o Check for AMD video driver updates at AMD (in English). Check for S3 video driver updates at S3 Graphics (in English). Check for Intel video support and downloads, Intel Downloads (in English). 6. Fine tune brightness, colors, image position, and contrast using the on-screen buttons on the display. You can find image adjustment information in the display User Guide or in the online support document "Using and Adjusting your Monitor." 7.
The latest computers and TVs offer a wide variety of video connection options. The video connection on your computer must match an available video connection on your TV or monitor. Select a connection type from the table below that works best for your environment. note: You can use adapters or special converter cables to make a connection between HDMI and DVI digital ports.
Configure the display settings The following are instructions to set up the two most common multiple display configurations: Presentation or Clone: This displays the same (Clone) image on both displays. This configuration is most commonly used for presentations; that is, the presenter works from a smaller monitor while the audience views the presenter’s work from a larger TV, monitor, or projector. Extending the desktop: The Windows desktop or work area extends across both displays.
The Screen Resolution window opens Figure : Screen Resolution window note: If Windows shows only one monitor connected, click Detect. If Windows does not recognize both monitors, click Identify. The numbers 1 or 2 are shown on the monitor icons to help you identify them. 3. Use the Multiple displays drop-down list to select one of the following options: o Duplicate these displays: Show the entire desktop on both displays. o Extend these displays: Stretch the desktop across the two displays.
4. (Optional) To adjust the resolution, select a monitor and choose a resolution from the dropdown list. 5. (Optional) To change the direction of the desktop extension (usually left or right to match how the displays are physically positioned), select a monitor and drag it to the desired position. 6. When done, click Apply, and then click OK.
Supported operating systems The same .inf file for a specific monitor can be used with all operating systems. note: No monitor drivers are available for the Windows NT systems because non-plug and play operating systems do not manage the monitor directly. Instead, it is done through the installed video card.
If a monitor driver is not available, download and install HP My Display or HP Display Assistant. You are done. If a driver, HP My Display software, or HP Display Assistant software is not available, continue to the next step. 3. Open Device Manager: o In Windows 7 and Vista, click Start , type Device Manager in the search box, and select Device Manager from the menu. If prompted with a User Account Control message, click Continue.
If you have a driver disc, select Browse my computer for driver software. note: If you are using a non-HP monitor and it came with software, install the driver that came with your monitor. A window with a Browse button opens. 0. Click Let me pick from a list of device drivers on my computer. An Install From Disk window opens. 1. Insert the disc into the removable media drive. 2. Type the drive letter in the Copy manufacturer's files from field. 3. Click the Browse button. 4.
2. Click Run. The Security Warning window displays. Figure : Security Warning window 3. Click Run. The monitor INF file window displays.
4. Click Setup. 5. Click OK. The window automatically closes when the installation is complete. Use the next section "Manually selecting a monitor driver in Windows 98, Me, and X," to complete monitor setup. Manually selecting an older CRT monitor in Windows 98, Me, and XP Complete the following steps to add an older HP monitor to Windows 98, Me or XP: 1. Open Device Manager: 1. In Windows XP, Right-click the My Computer icon from the Start menu in Windows XP.
Figure : Hardware Update Wizard 11. Click Finish after Windows installs the necessary files. HP Flat Panel LCD Monitors - Monitor is Blank Before you begin Do the following items to prepare for troubleshooting: Turn off the computer. Disconnect all connected devices from the computer except the mouse, and keyboard. This includes removing thumb drives and camera-type memory cards. If the monitor has a detachable cable, obtain a second monitor cable for testing purposes.
If power light remains off when you press the power button, either the monitor is not receiving power or the monitor is defective. Check all of the following items before attempting to service or replace the monitor: o Make sure the power outlet has power and the power outlet matches the power rating for the monitor. o Connect the a different power outlet. o Try a different power cord. If the light comes on, the monitor has power. Continue to the next Step.
3. Connect another video cable to the computer and monitor. If possible use a different cable. For example, if your monitor has an HDMI connector and a DVI connector, use the other cable type if possible. If not, use a new cable of the same type. Continue to the next step. Step 4: Testing the video connection Turn on the computer. What happens? If the monitor works, one of the previous steps corrected the issue. You are done.
3. After Windows opens, right-click on an open area of the desktop and select Properties (Windows XP, 98/Me) or Personalize (Windows Vista). 4. In Windows Vista, Scroll down and click Display Properties. In Windows XP, 98, or Me, click the Settings tab. 5. In Windows Vista, select the native display resolution size using the Resolution slider. Set Colors to Highest (32 bit). In Windows XP, select the native display resolution size using the Screen resolution slider. Set Color Quality to Highest (32 bit).
Low volume from monitor speakers If the built-in speakers on the monitor do not have adequate volume, perform each step that follows, testing for sound after each step, until you can hear sound and the proper volume: 1. Close the software program you are using that is experiencing the sound problems. Test for audio using another software program. If the volume is adequate using another software program, the issue is with the computer, not the monitor.
Panel). For more information on this subject, please read Using HDMI Audio with a Desktop Computer. Figure : Example of selecting HDMI as the default audio output device (Windows Vista). 7. If the previous steps did not resolve the issue, troubleshoot the audio coming from the computer. For more information, please read No Sound from Speakers in Windows 7, No Sound from Speakers in Windows Vista, or No Sound in Windows 98, ME, and XP.
Going to Sleep No input signal No signal detected Signal Out of Range Sync Out of Range Cable disconnected Check cable connection Warning-PC entering power save mode ... or similar. These messages are normal when the computer truly goes into sleep mode or loses the video signal (such as when the computer is turned off). However, if the monitor displays any of these messages when the computer should be displaying video, something is wrong.
1. Wait until the hard drive activity light on the computer is not lit and then press and hold the Power button on the computer case until the computer turns off. 2. Wait 5 seconds and then turn on the computer by pressing the power button again. 3. Click Start , Control Panel, System and Security, and then click Power Options. 4. Click Change plan settings for the currently selected plan. 5. Change the settings to Never. 6. Click Save changes to accept the changes, and then restart the computer.
If the message still opens, the problem is related to software. Things to look for: o o If the message opens after a software program is opened, such as when starting a game, the software is forcibly changing the display resolution to a mode that is not supported by the computer and monitor. Do not use the software or change its video settings. If the message opens after certain period of time when the computer is not in use, the problem is most likely being caused by a screen saver.
note: The best possible resolution quality for your monitor is the native resolution. The native resolution setting for your model of monitor can be found in the Monitor User Guide, the monitor's product packaging, and product specifications. 1. Restart the computer and press F8 repeatedly after the first logo screen. 2. Select Enable Low Resolution Video (640 x 480) from the Advanced Options Menu. 3. Windows should open showing a Windows desktop in a resolution of 640 x 480.
Check for NVIDIA video driver updates at the NVIDIA Web site (in English). Check for ATI video driver updates at the ATI Web site (in English). Check for S3 video driver updates at the S3 Graphics Web site (in English). Check for Intel video support and downloads at the Intel Downloads Web site (in English).
note: If you cannot wake the monitor, you may need to connect the computer to a different monitor to perform these steps. After performing these steps, reconnect the computer to the original monitor. 1. Move the mouse or press the Spacebar. 2. If the computer does not wake, press the keyboard Suspend button. You may need to press the Suspend button on the keyboard twice (the suspend button has an icon that looks like a quarter moon). 3.
o o o o o o Wait until the hard drive activity light on the computer is not lit and then press and hold the Power button on the computer case until the computer turns off. Wait 5 seconds and then turn on the computer by pressing the Power button again. Click Start, then click Control Panel. Double-click Power Options. Select the Always on power scheme and set it to Never. Click the Hibernate tab and remove the checkmark from Enable hibernate support.
3. Select the operating system, Windows Vista or Vista 64-bit, if an operating system selection page opens. 4. Select HP My Display and follow the instructions to download and install the software (sp38944.exe or later). If the errors continue after installing HP My Display software or the HP My Display update is unavailable, disable Auto Pivot when viewing movies as follows: 1. Open HP My Display software. 2.
system. To determine if your computer has an NVIDIA or ATI graphics card, right-click an empty area of the desktop and look for NVIDIA Control Panel or Catalyst(TM) Control Center. Figure : Open NVIDIA Control Panel Figure : Open Catalyst(TM) Control Center Disabling under-scan with NVIDIA Control Panel 1. Right-click an empty area of the desktop, and then click NVIDIA Control Panel.
2. In the View Selection window that opens, select Advanced Settings, and then click OK. The NVIDIA Control Panel opens. 3. In Selecting a Task on the left, under Video & Television, click Resize HDTV desktop. A window opens.
4. Ensure that Do not resize my desktop is selected. If necessary, click this option to select it. 5. Click Apply, and then click Yes to keep the change. This completes the steps to disable under-scan. Changing scaling options with ATI Catalyst Control Center Follow these steps to change the scaling options with ATI Catalyst Control Center. 1. Right-click an empty area of the desktop, and then click Catalyst(TM) Control Center.
2. In the View Selection window that opens, select Advanced, and then click Next. 3. Click Yes to open the ATI Catalyst Control Center. 4. At the top of the window, click Graphics to open the drop-down list, then select Desktops & Displays. 5. Click the arrow in the corner of the display graphic, and then click Configure.
6. Under Scaling Options, make sure that Full Screen is selected. Then click OK. 7. Click Apply, and then click OK to keep the change. This completes the steps to disable under-scan.