
User Guide
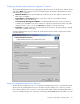

Table Of Contents
- HP Remote Insight Lights-Out Edition II User Guide
- Notice
- Contents
- Operational overview
- Installing the RILOE II
- Configuring the RILOE II
- Using the RILOE II
- Accessing RILOE II for the first time
- Features of the RILOE II
- Managing the user and configuration settings of the RILOE II
- Using the Remote Console
- Terminal Services pass-through option
- Using virtual devices
- Resetting the RILOE II to the factory default settings
- Getting help
- Pocket PC access with RILOE II
- RILOE II security
- Systems Insight Manager integration
- Directory services
- Overview of directory integration
- Benefits of directory integration
- How directory integration works
- Advantages and disadvantages of schema-free and HP Extended
- Setup for Schema-free directory integration
- Setting up HP schema directory integration
- Features supported by HP schema directory integration
- Setting up directory services
- Directory services support
- Schema required software
- Schema installer
- Management snap-in installer
- Directory services for Active Directory
- Active Directory Lights-Out management
- Directory services for eDirectory
- User login using directory services
- Directory settings
- Directory-enabled remote management
- Scripting, command line, and utility options
- Overview of the Lights-Out DOS utility
- Lights-Out directories migration utilities
- Compatibility
- Pre-migration checklist
- HP Lights-Out directory package
- HPQLOMIG operation
- Finding management processors
- Upgrading firmware on management processors
- Selecting a directory access method
- Naming management processors
- Configuring directories when HP Extended schema is selected
- Configuring directories when schema-free integration is sele
- Setting up management processors for directories
- HPQLOMGC operation
- Lights-Out Configuration Utility
- Using Perl with the XML scripting interface
- HPONCFG
- Remote Insight command language
- RIBCL sample scripts
- RIBCL general guidelines
- XML header
- Data types
- Response definitions
- RIBCL
- LOGIN
- USER_INFO
- ADD_USER
- DELETE_USER
- GET_USER
- MOD_USER
- GET_ALL_USERS
- GET_ALL_USER_INFO
- RIB_INFO
- RESET_RIB
- GET_NETWORK_SETTINGS
- MOD_NETWORK_SETTINGS
- GET_GLOBAL_SETTINGS
- MOD_GLOBAL_SETTINGS
- CLEAR_EVENTLOG
- UPDATE_RIB_FIRMWARE
- GET_FW_VERSION
- HOTKEY_CONFIG
- DIR_INFO
- GET_DIR_CONFIG
- MOD_DIR_CONFIG
- SERVER_INFO
- RESET_SERVER
- INSERT_VIRTUAL_FLOPPY
- EJECT_VIRTUAL_FLOPPY
- COPY_VIRTUAL_FLOPPY
- GET_VF_STATUS
- SET_VF_STATUS
- GET_HOST_POWER_STATUS
- SET_HOST_POWER
- GET_VPB_CABLE_STATUS
- GET_ALL_CABLES_STATUS
- GET_TWOFACTOR_SETTINGS
- MOD_TWOFACTOR_SETTINGS
- Troubleshooting the RILOE II
- Supported client operating systems and browsers
- Supported hardware and software
- Server PCI Slot and Cable Matrix
- Network connection problems
- Alert and trap problems
- NetWare initialization errors
- Miscellaneous problems
- Accessing System Partition Utilities
- Inability to reboot the server
- Inability to upgrade the RILOE II firmware
- Incorrect time or date of entries in the event log
- Interpreting LED indicators
- Invalid Source IP address
- Login name and password problems
- Remote Console mouse control issue
- Resetting the RILOE II to Factory Default Settings
- Virtual Floppy media applet is unresponsive
- Video Problems
- Troubleshooting the host server
- Directory Services errors
- Directory Services schema
- Technical support
- Regulatory compliance notices
- Acronyms and abbreviations
- Index

Scripting, command line, and utility options 128
NOTE: The -L parameter cannot designate an output log file. A default log file named with the DNS name
or the IP address is created in the same directory where CPQLOCFG is launched.
6. Click Next. A screen displays the options for naming the task, defining the query association, and
setting a schedule for the task.
7. Enter a task name in the Enter a name for this task field.
8. Select the query that had been created earlier, for example "Mgmt Processors."
9. Click Schedule to define when the Application Launch task will run. A schedule configuration
window appears.
10. Click OK to set the schedule.
NOTE: The default schedule for a control task is Now.
11. Click Finish to save the Application Launch task.
12. Click the Execute a Task icon (the green triangle) to execute the Group Administration.
Batch processing using the Lights-Out Configuration Utility
Group Administration can also be delivered to RILOE II through batch processing. The components used
by batch processing are the Lights-Out Configuration Utility, an RIBCL file, and a batch file.
The following example shows a sample batch file that can be used to perform the Group Administration
for RILOE II:
REM Updating the Remote Insight Lights-Out Edition II board
REM Repeat line for each board to be updated
REM
CPQLOCFG -S RIB1 -F C:\...SCRIPT.XML -L RIB1LOG.TXT -V
CPQLOCFG -S RIB2 -F C:\...SCRIPT.XML -L RIB2LOG.TXT -V
CPQLOCFG -S RIB3 -F C:\...SCRIPT.XML -L RIB3LOG.TXT -V
.
.
.
RIBNLOG -S RIBN -F C:\...SCRIPT.XML -L LOGFILE.TXT -V
The Lights-Out Configuration Utility overwrites any existing log files.
Lights-Out Configuration Utility parameters
• -S is the switch that determines the RILOE II that is to be updated. This switch is either the DNS name
or IP address of the target server.
Do not use this switch if you are launching from Systems Insight Manager. Systems Insight Manager
will provide the address of the RILOE II when CPQLOCFG.EXE is launched.
• -F is the switch that gives the full path location and name of the RIBCL file that contains the actions to
be performed on the board.
• -U and -P specify the user login name and password. These options allow the login information
within the script file to be overridden and allows the login information to be left out of the script.
Be sure that the Lights-Out Configuration Utility is in a directory referenced by the PATH environment
variable. Any log files generated are placed in the same directory as the Lights-Out Configuration Utility
executable
The switches -L and -V might or might not be set depending on the IT administrator's preferences.
• -L is the switch that defines where the log file will be generated and what the file name will be. If this
switch is omitted, a default log file with the DNS name or the IP address is created in the same
directory used to launch CPQLOCFG.