
Secure Boot Customization Guide - Technical whitepaper

Technical whitepaper
© Copyright 2017 HP Development Company, L.P.
2 Setting up a customized Secure Boot environment 13
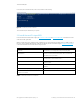
2.4.2 Generate a new KEK
To generate a new self-signed KEK, follow the steps in the immediately preceding section, but replace all filename
references to PK with filename references to KEK. You now have two sets of self-signed keys and certificates which can be
used for Secure Boot customization. We reproduce the commands here but not the command output:
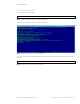
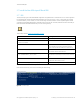
Figure 11 Sample command lines to generate KEK
2.5 Install the new PK
IMPORTANT!: It is critical that all time values in the following steps be identical and that they fall within the valid date/time
ranges of your custom certificates. If this is not the case, the process will fail.
Again, launch PowerShell as administrator. This time, you will use Format-SecureBootUEFI and Set-SecureBootUEFI to
install the new PK and the new PK-signed KEK.
NOTE: Secure Boot is not enabled on your system by default. It is important that Secure Boot is not enabled until a
Signature Database is installed on the system. If you plan to use the default Windows signatures with Secure Boot, you may
wish to sign the default Secure Boot Signature Database that was previously backed up. More on this later.
Once you have launched PowerShell as administrator, you are ready to import your new PK into the Secure Boot database.
In the case of the current example, my signing procedure produces signed packages with a P7 extension. Thus, the PK-
signed KEK file is KEK.CER.P7; and the signed DB and DBX files (described later) will also have a P7 extension. Depending on
your process and HSM provider, your signed files might have a different extension from this, or they might have the same
extension as the unsigned file. The PK is the root of trust and is not signed because nothing more trusted exists with which
to sign it. After importing the PK into the platform, all other artifacts must be signed by the appropriate private key using
your HSM solution.
For step 1, you must obtain your PK public key certificate in DER format. In this example, we use our own PK.CER as the
public key certificate. You should obtain this certificate from your HSM provider. First, the PK key must be formatted using
the Format-SecureBootUEFI
command inside Windows PowerShell.
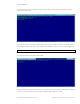
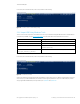
Create certificate:
openssl req -x509 -sha256 -nodes -days 365 -newkey rsa:2048 -keyout KEK.KEY -out
KEK.CRT
Export private key into PFX file:
openssl pkcs12 -export -out KEK.PFX -inkey KEK.KEY -in KEK.CRT
Save certificate in DER format:
openssl x509 -outform der -in KEK.CRT -out KEK.CER