
Secure Boot Customization Guide - Technical whitepaper


Technical whitepaper
© Copyright 2017 HP Development Company, L.P.
2 Setting up a customized Secure Boot environment 24
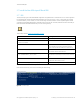
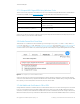
2.7.2.2 Import KEK-Signed DBX Using Windows Tools
There is one more step required to use the Windows tools to import the KEK: writing the KEK itself to Non-volatile Random
Access Memory (NVRAM). Use the Set-SecureBootUEFI command inside Windows PowerShell for this purpose
Set-SecureBootUEFI Command Line Parameter
Meaning
-Name DBX Indicates that you are working with the Secure Boot DBX.
-Time 2016-02-01T13:30:00Z Specifies the current date and time, which must be specified.
-ContentFilePath .\HpDbx_SigList.bin Specifies the name of the file which contains the unsigned, unformatted DBX,
created in a previous step.
-SignedFilePath .\
HpDbx_SigList_Serialization_for_DBX.bin.p7
Specifies the name of the file which contains the signed, formatted DBX.
Signed in the previous step.
Table 12 Command line switches to import the KEK-signed DBX
At this point, you have a Secure Boot configuration whose functionality matched the default functionality shipped from HP’s
factories. However, you are the owner of PK and KEK.
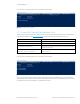
2.8 Enable Secure Boot Once More
The final step is to re-enable Secure Boot. At the HP logo screen during boot-up, press F10 to enter F10 setup. At the F10
Main screen, select the Advanced tab. Then select Secure Boot Configuration. Ensure that the Configure Legacy Support and
Secure Boot option is set to Legacy Support Disable and Secure Boot Enable. Then press F10 again to Save and Exit. The
unit will now boot in Secure Boot mode, and the newly signed Secure Boot keys will verify the existing Windows boot loader.
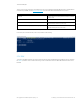
Figure 27 From support.hp.com: How to enable Secure Boot
At this point, the unit works in the same functional fashion as when it shipped from the factory. However, the PK and KEK
owners are not the default factory-shipped PK and KEK but rather the PK and KEK certificates that you have generated. With
this complete, you are now the platform owner for the purposes of Secure Boot.
2.9 Add Additional Certificates to DB or DBX
Adding additional certificates is a standard Secure Boot administration task, but it is worth documenting here in some detail.
First, you must obtain the public key certificate in DER format that you wish to import into the DB or DBX. In the example
shown here, we will import this certificate into the DB, but the procedure is identical (except for the storage location) for the
DBX. In the example, the public key certificate was obtained and saved to a file named NewDbCert.CER, which is a public key