
Secure Boot Customization Guide - Technical whitepaper


Technical whitepaper
© Copyright 2017 HP Development Company, L.P.
2 Setting up a customized Secure Boot environment 8
2 Setting up a customized Secure Boot
environment
2.1 Backup existing Secure Boot configuration
The first step is to back up the default PK, KEK, DB, and DBX. Partly, this is intended as a failsafe because the ultimate
protection against loss of access to a Secure Boot environment is to have a backup copy of the default configuration
1
.
Mostly, however, this is required so that the default DB and DBX can be re-signed and reimported after the PK and KEK are
updated if this is the desire of the system administrator.
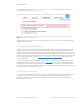
It is necessary to run PowerShell as Administrator to back up the existing Secure Boot configuration. From the Windows 8.1
or Windows 10 Start screen, press the Windows key. Then start typing PowerShell. Choose Windows PowerShell ISE from
the list, right-click on it, and choose Run as administrator.
Figure 1 Run PowerShell as Administrator
Now, from the PowerShell command line, back up the PK, KEK, DB, and DBX, each, in turn, using the Get-SecureBootUEFI
command. In these examples, each Secure Boot configuration setting is backed up to an individual file in the Secure Boot
directory of an attached USB Key, configured here as drive F:
1
This is not strictly necessary on HP platforms, because HP platforms can recover the default Secure Boot configuration and re-apply by
accessing the proper configuration settings via F10 setup. The procedure for restoring the default Secure Boot configuration on an HP
platform is provided as an appendix to this guide.