
Secure Boot Customization Guide - Technical whitepaper


Technical whitepaper
© Copyright 2017 HP Development Company, L.P.
2 Setting up a customized Secure Boot environment 9
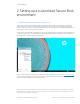
Figure 2 Sample Get-SecureBootUEFI Commands to backup default Secure Boot configuration
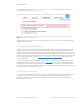
Your output should look something like the following:
Figure 3 Sample backup of default Secure Boot configuration
Once this is complete, you have a back-up of the four Secure Boot configuration settings. This document will assume that
these backup files are the following, but you may, of course, use any file names you like:
• PK backup: HpPk.BAK
• KEK backup: HpKek.BAK
• DB backup: HpDb.BAK
• DBX backup: HpDbx.BAK
2.2 Place your HP PC in Secure Boot setup mode
Next, it is necessary to place your HP PC into Secure Boot Setup Mode. To accomplish this, reboot your machine. At the HP
logo screen during boot-up, press F10 to enter F10 setup. At the F10 Main screen, select the Advanced tab. Then select
Secure Boot Configuration. Ensure that the Configure Legacy Support and Secure Boot option is set to Legacy Support
Disable and Secure Boot Disable. If needed, set the configuration accordingly and choose F10 to Save and Exit. Then enter
Get-SecureBootUEFI -Name PK -OutputFilePath F:\SecureBoot\HpPk.BAK
Get-SecureBootUEFI -Name KEK -OutputFilePath F:\SecureBoot\HpKek.BAK
Get-SecureBootUEFI -Name DB -OutputFilePath F:\SecureBoot\HpDb.BAK
Get-SecureBootUEFI -Name DBX -OutputFilePath F:\SecureBoot\HpDbx.BAK